 by
by The SocketCAN functionality, combined with the can-utils programs, enable you to view, interact and analyze the CAN bus traffic on Linux. However, these tools are no match for high-end tools such as Vector CANalyzer and CANoe under Windows. I especially miss CAPL scripts on Linux. For this reason I developed the CAPLin framework. With CAPLin you can quickly build a SocketCAN node application in the C programming language.
Background
Over the past decades I worked almost daily with Controller Area Network (CAN). When working in Windows, I was fortunate to have access to powerful tools such as Vector CANalyzer and CANoe. These Vector tools offer features to quickly build a CAN node application using so called CAPL scripts. CAPL is an event-driven and C-like programming language for building CAN applications.
When working with SocketCAN under Linux, the one thing I miss the most is something similar to these CAPL scripts. So an event-driven framework that enables you to quickly build applications, for communicating with other nodes on the CAN bus. As a solution, I decided on developing such a framework myself and share it with others. I called it CAPLin: A framework for CAN Application Programming in Linux. With the CAPLin framework you can quickly build an application in C, which uses a SocketCAN interface for accessing the CAN bus. It mimics the event-driven approach from CAPL scripts.
The goal of this article is to help you get started with the CAPLin framework. I’ll explain how you get the CAPLin framework up-and-running on your Linux system. I’ll also present a few code examples that illustrate how to actually use CAPLin to create your own SocketCAN node application in C.
As an introduction, here is what a simple CAPLin application looks like:
#include "caplin.h"

void OnStart(void)
{
  printf("CAPLin application started.\n");
}

void OnStop(void)
{
  printf("CAPLin application stopped.\n");
}

void OnMessage(tCanMsg const * msg)
{
  printf("Received message with ID: %x\n", msg->id);
}

void OnKey(char key)
{
  tCanMsg txMsg =
  {
    .id = 0x201, .ext = false, .len = 2, .data = { 1, 2 }
  };

  if (key == 't')
  {
    printf("Sending message with ID: %x\n", txMsg.id);
    CanTransmit(&txMsg);
  }
}
What do you need
For this article you need to at least the following on your Linux system:
- A configured SocketCAN network interface.
- C development related packages installed.
When it comes to the SocketCAN network interface, a virtual one suffices for testing purposes. Refer to the following article to get one up-and-running:
To obtain and build CAPLin applications, install C development related packages like this:
- Debian/Ubuntu:
sudo apt install gcc g++ gdb make cmake - Fedora:
sudo dnf installgcc g++ gdb make cmake - openSUSE:
sudo zypper install gcc gcc-c++ gdb make cmake
Although not absolutely necessary, I also highly recommend installing Visual Studio Code and configuring it for building CMake projects. I’ll be using the same solution on my openSUSE Tumbleweed system in this article.
CAPLin compared to CAPL
The CAPLin framework resembles the functionality of CAPL scripts, offered by the Vector CAN tools. However, CAPLin and CAPL definitely differ. In my personal (and biased) opinion, CAPLin is more powerful. Mostly because the CAPLin framework directly uses the C programming language. This leads to several advantages:
- Develop with your own preferred IDE such as Eclipse CDT, Visual Studio Code, CLion, KDevelop, etc.
- Full debugging capabilities.
- Integrate whatever third party C libraries you want.
- Easily reuse developed CAN application code on a microcontroller based system.
The one item that CAPL does better is the fact that through CAPL you can access message and signal objects from a CANdb DBC file. This is a database file for CAN networks. However, you can somewhat remedy this with the help of the Python cantools. These cantools include the generate_c_source subcommand, making it possible to convert a CANdb DBC file to a C source and header file. You can add these two files to your CAPLin node application to conveniently work with message and signals objects from the CANdb DBC file.
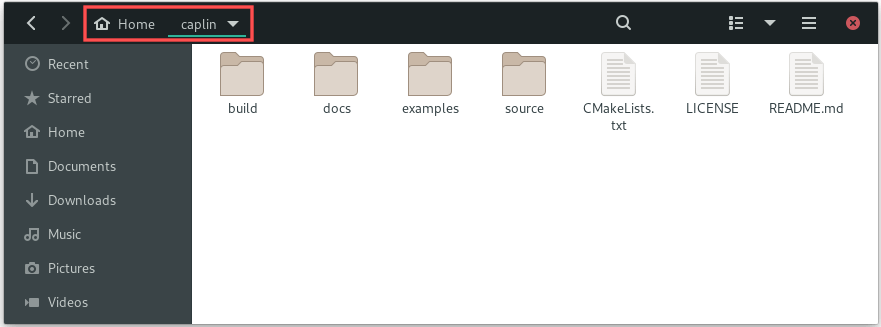
Download the CAPLin framework from GitHub
Time to roll up our sleeves and get started with the hands-on part of this tutorial. As a first step download the CAPLin framework from PragmaticLinux’ GitHub repository. The following terminal commands download the CAPLin framework and extract it to the caplin directory inside your user’s home directory:
mkdir ~/caplinwget https://github.com/pragmaticlinuxblog/caplin/archive/refs/tags/1.0.0.tar.gz -O ~/caplin/caplin.tar.gztar -xzf ~/caplin/caplin.tar.gz -C ~/caplin/ --strip-components=1rm ~/caplin/caplin.tar.gz
You can of course also manually download it from the CAPLin repository on PragmaticLinux’ GitHub account and then extract the archive using your file manager. The choice is yours.
Build a CAPLin SocketCAN C node application
As my weapon of choice, I selected Visual Studio Code as the development environment, combined with the C/C++ and CMake Tools extensions. Refer to this tutorial for setting up the same development environment on your Linux system.
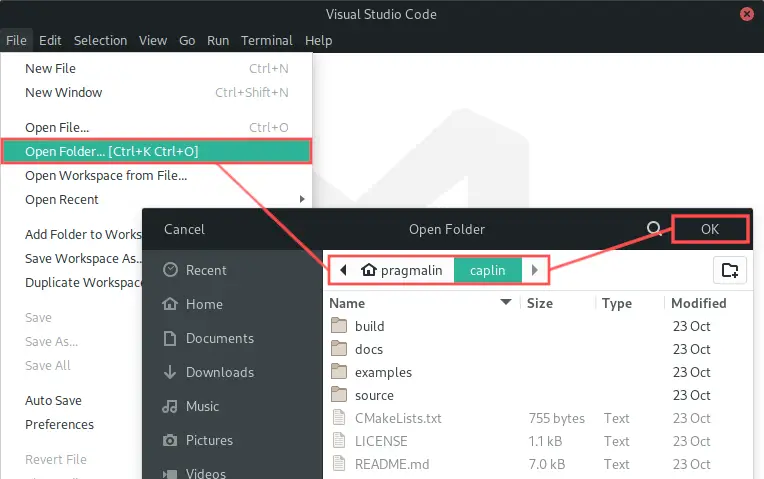
With Visual Studio Code opened, we can import the CAPLin framework application by selecting File → Open Folder… from the program menu. Then browse to the caplin directory inside your home directory:
You might see a dialog where Visual Studio Code asks you if you trust the author of the files in the folder. You can click the Yes, I trust the authors button on the dialog to get rid of it.
The CMake extension automatically detects that we opened a CMake project. It just needs to know which C/C++ development tools it should use. Therefore, a selection box pops up at the top to select the kit. We installed GCC earlier on, so select that option:

With the CAPLin framework imported, open the C source file of the SocketCAN node application. You can find it at source/canapp.c. Add some printf statements to the OnStart() and OnStop() event functions for testing purposes:
void OnStart(void)
{
  printf("CAPLin application started.\n");
}

void OnStop(void)
{
  printf("CAPLin application stopped.\n");
}
To build this CAPLin application, click the Build text in the status bar. Alternatively, you can press F7. You can follow the build progress in the Output window:
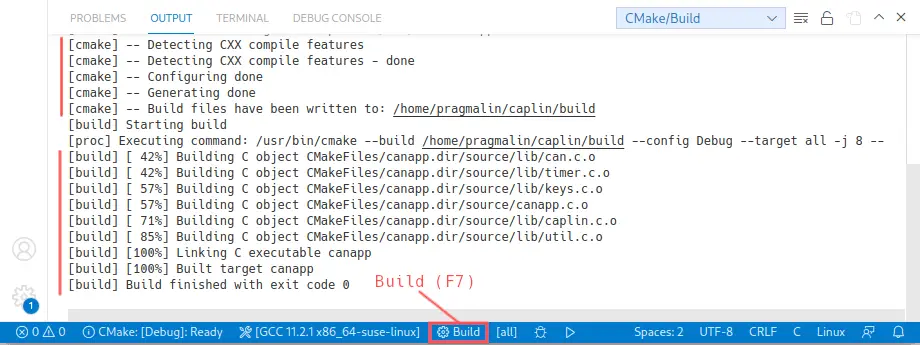
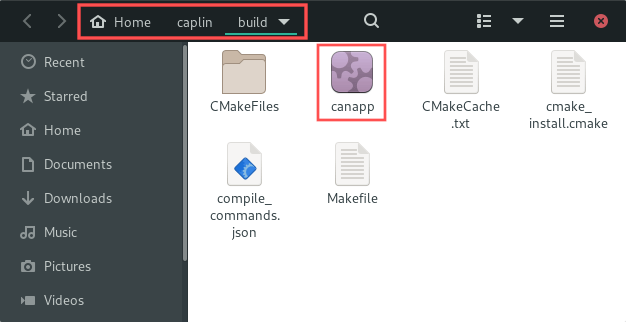
If you look closely, you see that the build procedure automatically invoked CMake to set up the build environment. Once completed, you can find the resulting canapp executable in the build subdirectory:
Run a CAPLin SocketCAN C node application
After building the executable of our CAPLin based SocketCAN C node application, we can run it directly in the terminal. Open up the terminal in the ~/caplin/build directory and start the executable by running command ./canapp:
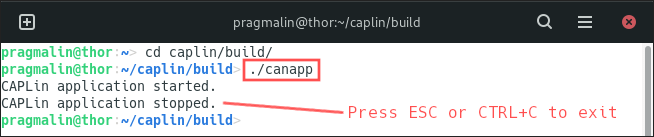
Once started, you can see that it outputs CAPLin application started from our OnStart() function. To exit the CAPLin node application, press either ESC or CTRL+c. The output of text CAPLin application stopped indicates that the OnStop() function was called, right before the application closed.
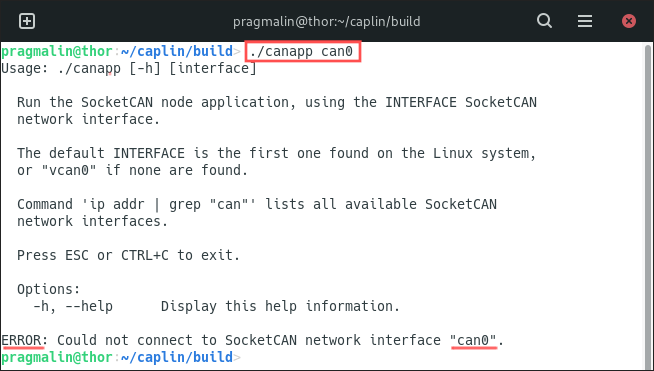
Note that the CAPLin node application contains build-in smartness to automatically detect and connect to the first SocketCAN network interface it finds on your Linux system. If none is found, it attempts to connect to the SocketCAN interface with name vcan0. You can override the name of the SocketCAN network interface, by specifying it as a command line parameter, for example:
./canapp can0
If it cannot connect to the SocketCAN network interface, the CAPLin node application outputs an error for this, including the full help information of the application:
Refer to this previously published tutorial for help with setting up a SocketCAN network interface:
For testing purposes, you can also just use a virtual SocketCAN network interface. This one always works:
Debug a CAPLin SocketCAN C node application
One strong feature of developing a SocketCAN C node application with CAPLin, is that you get full debugging capabilities. So setting breakpoints, stepping through the code line-by-line and inspecting variable values. To start a debug session in Visual Studio Code, click the little bug icon in the status bar or press CTRL+F5 on the keyboard:
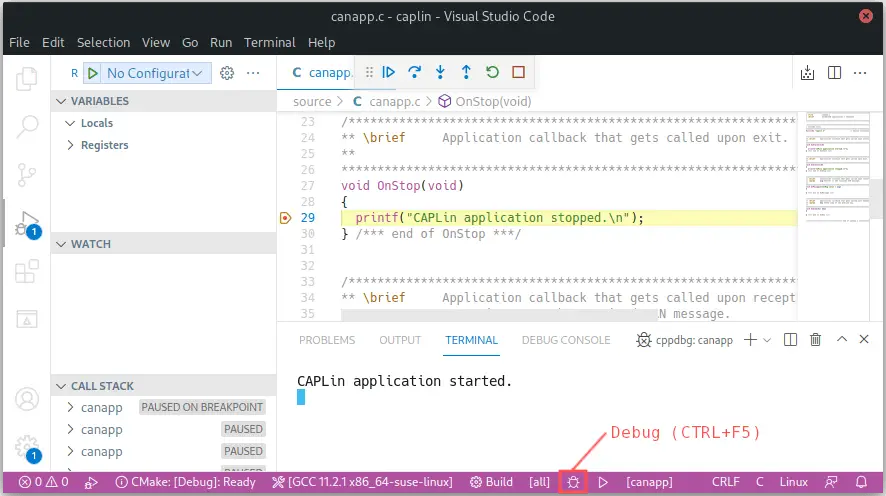
While debugging, you can still use the keyboard to interact with the program, though the Terminal window inside Visual Studio Code.
Transmitting CAN messages with CAPLin
The CAPLin framework includes a CAN driver for accessing the CAN bus through a SocketCAN network interface. Feel free to inspect this CAN driver. You can find it in the can.h and can.c files, located in directory .\source\lib\. To transmit a CAN message, you first declare and initialize a variable of type tCanMsg. Afterwards you can call function CanTransmit() of the CAN driver to handle the actual transmission of the CAN message.
Let’s test this out. Update function OnKey() inside our CAPLin node application (canapp.c) like this:
void OnKey(char key)
{
  tCanMsg txMsg =
  {
    .id = 0x201, .ext = false, .len = 2, .data = { 1, 2 }
  };

  if (key == 't')
  {
    printf("Sending message with ID: %x\n", txMsg.id);
    CanTransmit(&txMsg);
  }
}
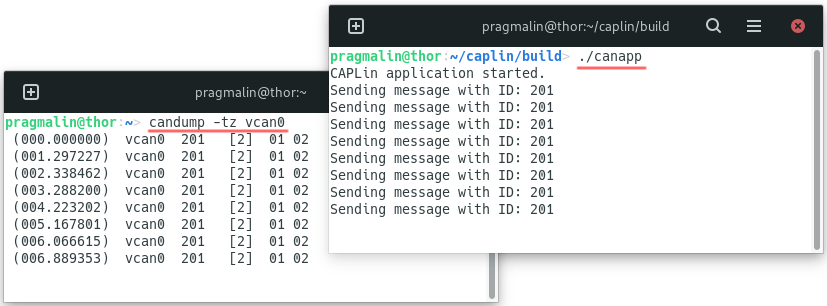
This creates a CAN message variable and initializes the CAN message to have an 11-bit identifier value of 201h. The payload of the message contains 2 bytes, with values 1 and 2, respectively. Since we added this code inside the OnKey() event handler, we can respond to key-pressed events. In this case we transmit the CAN message each time we press the t key on the keyboard.
To test the CAN message transmission, build the modified CAPLin node application and run it. The view the actual CAN message on the CAN network, you can use a the candump program, which is a part of the can-utils package. Refer to the tutorial about how to create a virtual CAN interface on Linux for details on how to install the can-utils package. This screenshot shows that the CAN message transmission works each time you press the t key:
Receiving CAN messages with CAPLin
Now that we know how to transmit CAN messages from our CAPLin based SocketCAN C application, we continue with the reception of CAN messages. Our CAPLin node application already implements the event function for this: OnMessage(). The CAPLin framework is pre-configured such that the CAN driver automatically calls this OnMessage() event function for us, each time a new CAN message was received by the SocketCAN network interface. The msg parameter passed to this function, points to the actual CAN message. It is of type tCanMsg, so the exact same variable type we used for transmitting CAN messages.
To give this a try, update the OnMessage() function to look like the following code snippet:
void OnMessage(tCanMsg const * msg)
{
  printf("%x", msg->id);
  printf(" [%d]", msg->len);
  for (uint8_t idx = 0; idx < msg->len; idx++)
  {
    printf(" %02x", msg->data[idx]);
  }
  printf("\n");
}
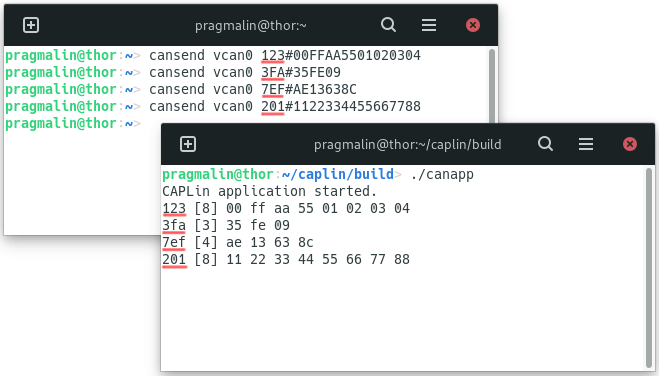
This code essentially turns your CAPLin node application into a CAN logger. To test the CAN message reception, build the modified CAPLin node application and run it. I’ll use the cansend program of the can-utils package to transmit a few different CAN message to verify that our CAPLin node application properly receives CAN messages and logs them to the display:
Using timers in CAPLin
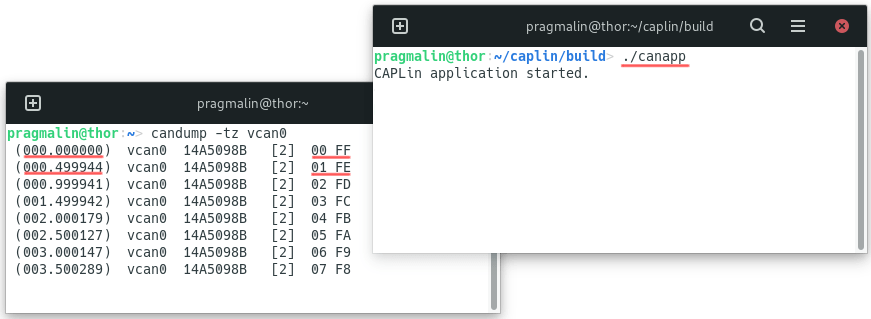
Besides a CAN driver, the CAPLin framework also includes a timer manager. With the timer manager you can create one or multiple millisecond timers for performing time based tasks and periodic CAN message transmission. You can find it in the timer.h and timer.c files, located in directory .\source\lib\. To demonstrate its use, we’ll create a timer for sending a CAN message every 500 milliseconds. We’ll give it a 29-bit CAN identifier of 14A5098Bh and add an up- and a down-counter to its payload.
Timer variable declaration
We’ll start with declaring a variable of type tTimer. This will be the handle to our timer, once created. You can decide on the variable name for the timer yourself, for example timer500ms. Add the following global variable declaration at the start of the canapp.c source file. For example right below the line with #include "caplin.h":
tTimer timer500ms;
Timer callback function
With the timer variable declared. we continue with implementing the timer’s callback function. We can decide on its name ourselves, for example OnTimer500ms(). Inside this function we’ll implement the functionality for transmitting the CAN message, each time it gets called. In the canapp.c source file, add the following function above function OnStart():
void OnTimer500ms(void)
{
  /* Note the static keyword to 'remember' the state of local
   * variable between function calls.
   */
  static tCanMsg txMsg =
  {
    .id = 0x14A5098B,        /* CAN identifier. */
    .ext = true,             /* 29-bit identifier. */
    .len = 2,                /* 2 data bytes. */
    .data = { 0x00, 0xFF }   /* Data byte values. */
  };

  /* Transmit the CAN message. */
  CanTransmit(&txMsg);
  /* Increment the value of the first data byte. */
  txMsg.data[0]++;
  /* Decrement the value of the second data byte. */
  txMsg.data[1]--;
  /* Restart the timer. */
  TimerRestart(timer500ms);
}
Timer creation
As a final step, we just need to create and start the timer. Update function OnStart() such that it looks like this:
void OnStart(void)
{
  printf("CAPLin application started.\n");
  timer500ms = TimerCreate(OnTimer500ms);
  TimerStart(timer500ms, 500);
}
Note that we passed the callback function OnTimer500ms as a parameter, when creating the timer. That way the timer knows which function to call, when the timer event happens. When starting the timer, we passed the timer’s variable to identify it, followed by the 500 millisecond period that we want for the timer,
To test the updated CAPLin node application, go ahead and build it. Then run the CAPLin application in a terminal window and the candump program in another one:
Wrap up
This article introduced you to the CAPLin framework, which allows you to quickly and easily build your own SocketCAN node application in the C programming language. Essentially, CAPLin offers a powerful and flexible alternative to Vector CAPL scripts for Linux. We covered how to:
- Download the CAPLin framework from its repository on PragmaticLinux’ GitHub account.
- Import the CAPLin framework into Visual Studio Code.
- Build, run and debug a CAPLin node application.
With these steps completed, we dove a bit deeper into how to use the CAPLin framework to build our own example SocketCAN node application in C. We learned how to:
- Transmit CAN messages.
- Receive CAN messages.
- Create timer objects.
You now know everything you need to continue and build your own SocketCAN node applications. For additional inspiration, you could look at the included example CAPLin node applications. You can find these in the examples subdirectory.
CAPLin is great for all sorts of CAN related purposes. To name just a few:
- Quickly coding a CAN based application for interacting with the traffic on the CAN bus.
- Developing CAN nodes for prototyping, simulation and even production purposes.
- Creating a CAN tester node to run an automated test suite on a CAN node.
Enjoy working with CAPLin. I hope it proves useful to you!
For more SocketCAN related tutorials, visit the following link. It even includes a low-cost solution for bringing CAN functionality to a Raspberry PI: