 by
by Interested in developing software for your Arduino board in Linux? The Arduino IDE is the recommended tool for developing software and uploading the resulting firmware to your Arduino board. Luckily, the Arduino IDE is developed as a cross-platform solution, meaning that you can also install it on your Linux system. This article explains in detail how you install the Arduino IDE on your Linux PC.
Background
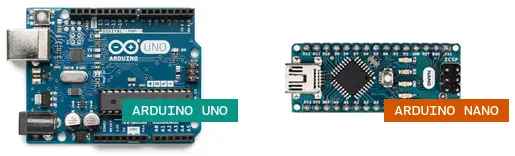
The Arduino company designs, manufactures and sells a variety of microcontroller based boards. Most notably the popular Arduino Uno and Nano boards. Arduino boards offer the perfect entry, for both children and adults, into the world of electronics and microcontroller based embedded systems. There’s a reason why Arduino boards are at the heart of the maker movement.
These Arduino boards feature a standardized pin assignment and connector layout. Thanks to this, an ever expanding Eco-system exists, offering plug-and-play add-on boards. These are called Arduino shields. With the help of Arduino shields you can easily extend the base functionality to fit your specific project needs. Often enabling you to build your prototype, without even needing a soldering iron.
Besides the hardware, the Arduino company also offers an open-source software library and free-to-use development environment, called the Arduino IDE. IDE stands for Integrated Development Environment. With the help of the Arduino IDE, you can conveniently develop the software, to run on your Arduino, and upload it to your Arduino board. Software development for the Arduino takes place in the C / C++ programming language.
Luckily the Arduino IDE is cross-platform, enabling you to install it on Windows, macOS and Linux. This article covers how to install the Arduino IDE on Linux. This includes getting all the permissions straightened out, such that the Arduino IDE can access your PC’s serial port, for uploading software to your Arduino board.
What do you need
For this article you need three things:
- A Linux based PC with desktop environment, for installing the Arduino IDE on.
- One of the Arduino boards. For example an Arduino Uno or Nano.
- For powering and connecting your Arduino board, a USB cable.
I decided on using my Arduino Uno (rev 3) board in combination with Fedora 35 workstation. Simply because Fedora 35 was released about a week ago and I wanted to take it for a spin. However, the procedure outlined in this article works for any type of Linux distribution, because we’ll be using the Flatpak version of the Arduino IDE.
If you don’t yet have Linux installed, consider setting up Ubuntu as a virtual machine:
- How to install Ubuntu Desktop 20.04 LTS in VirtualBox
- Install VirtualBox guest additions in Ubuntu 20.04
Select a source to install the Arduino IDE on your Linux system
When it comes to installing software on a Linux system, I prefer to install from the following sources, in this particular order:
- The Linux distribution’s online package repository.
- Flatpaks hosted on Flathub.
- Build and install directly from sources.
I stay away from Snaps, because these are mostly an Ubuntu only thing. openSUSE recommends against Snaps, for example. I also do not like the auto-update feature of Snaps. Sure, a workaround exists for bypassing the Snap auto-update feature, but I’d rather not use them at all. Then AppImages are another option. Unfortunately, AppImages do not offer functionality to update the installed AppImages all in one go.
On the Arduino website, you’ll find a link for downloading a Linux version of the Arduino IDE. If contains pre-built binaries and a Bash installer script. So option [3] basically. Personally, I am not a big fan of this solution. It works okay for an initial installation, but what if you want to update to a newer version later on?
You could use your Linux distribution’s online package repository, if it offers the Arduino IDE. This is definitely an option, so [1]. However, the Arduino IDE is not yet packaged by all Linux distributions. And if it is, you’ll most likely end up with an older version of the Arduino IDE on your system. At the time of this writing, the latest version available Arduino IDE is 1.8.16. The version packaged for Ubuntu’s 20.04 LTS is 1.0.5.
For these reasons, I decided on using the Flatpak version [2] to install the Arduino IDE on Linux in this tutorial.
Prepare your Linux system for Flatpaks
You can think of a Flatpak as a modern packaging and deployment method for Linux desktop applications. An application installed as a Flatpak runs in a sandbox environment, isolated from the rest of the Linux system. Flathub is an online repository that hosts Flatpak applications. For a more in-depth explanation of managing Flatpaks on your Linux system, refer to the article about how to install Flatpak applications from Flathub.
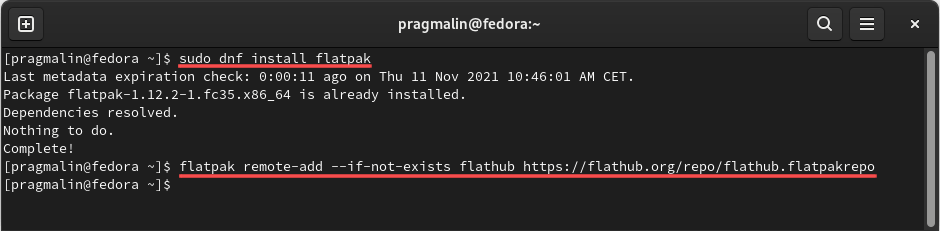
Before we can do anything with Flatpaks on our Linux system, we first need to install the flatpak utility itself. Think of it as the Flatpak equivalent of apt, dnf and zypper. Go ahead and open your terminal program and install the flatpak utility from the command-line:
- Ubuntu/Debian:
sudo apt install flatpak - openSUSE:
sudo zypper install flatpak - Fedora:
sudo dnf install flatpak(already installed by default!)
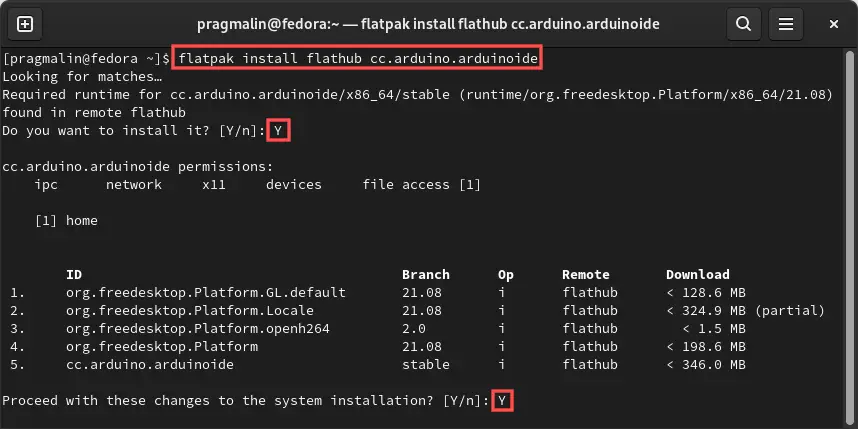
With the flatpak utility installed on our Linux system, we continue by registering the Flathub remote repository as a known installation source. Run the following command from the terminal to achieve this:
flatpak remote-add --if-not-exists flathub https://flathub.org/repo/flathub.flatpakrepo
Note that the command might output a message about the XDG_DATA_DIRS environment variable. It basically means that you should restart your Linux system. Otherwise application launchers won’t appear in our desktop environment’s application menu, for installed Flatpak desktop applications.
Install the Flatpak version of the Arduino IDE on your Linux system
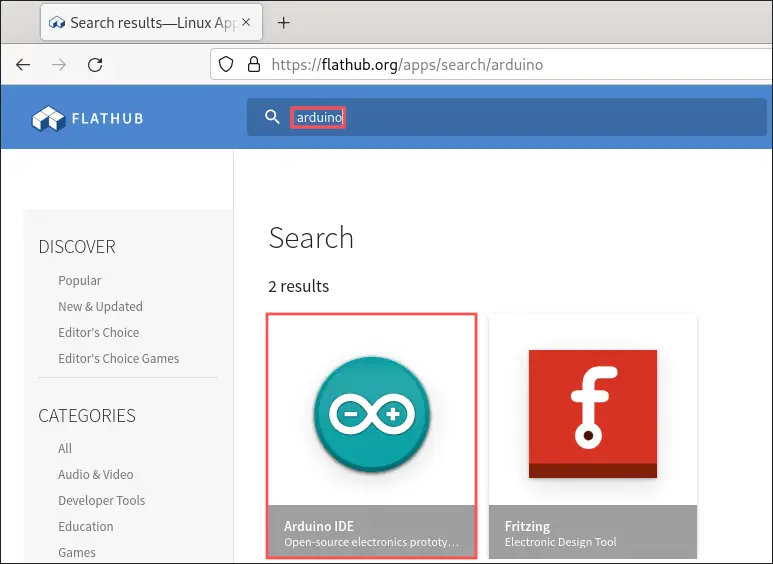
With our Linux system prepared for Flatpaks, let’s continue with the installation of the Arduino IDE. Point your web browser to the Flathub website and enter arduino in the search box. The Flatpak for the Arduino IDE shows up. Click on it to continue:
On the Flathub page for the Arduino IDE, scroll all the way down to the bottom of the page. Here you’ll find the installation instructions:
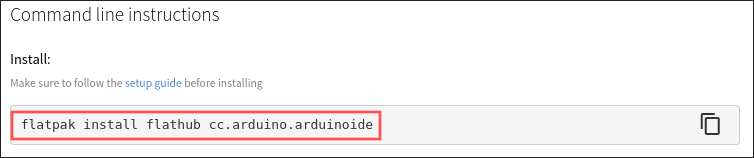
To install the Arduino IDE as a Flatpak from the Flathub online repository, run this command from your Linux terminal:
flatpak install flathub cc.arduino.arduinoide
Set up permissions to access the serial port on Linux
Your Arduino’s USB cable has a double function. It powers your Arduino and also creates a serial communication link between your Arduino and PC. The Arduino IDE relies on this serial communication link for uploading new software programs to your Arduino. Before we start coding in Arduino IDE, we need to take care of one more thing. Namely, making sure your user has the permissions needed for accessing the serial port. Otherwise you won’t be able to upload new firmware to your Arduino.
Let’s first determine the serial port device that your Linux system assigned to your Arduino. Assuming that you connected your Arduino to your PC, with a USB cable, it shows up as either:
/dev/ttyUSBx/dev/ttyACMx
Where the x stand for a number depending on the amount of serial devices currently connected. Run the following command to list all of these serial devices:
ls -l /dev/ttyUSB* /dev/ttyACM*

As you can see in the above screenshot, the Arduino Uno shows up as device /dev/ttyACM0 on my system. That’s the device name to specify, when attempting to connect to it later on. More importantly, the permissions show you that only the root user and members of group dialout have permission to access it. This means that you need to add your user to group dialout in order to communicate with your Arduino. To add your user to group dialout, open the terminal and run command:
sudo usermod -a -G dialout $USER
Afterwards it’s best to reboot your system, to make sure the group change activates.

For more information about using the serial port under Linux, refer to this article:
Test the Arduino IDE with an example program
If you made it all the way to here, then you are all set. The Arduino IDE is installed on your Linux system and ready for action. In this section we’ll build a basic blinking LED program for testing purposes and to help you get started.
Write, compile and link the example program
Start the Arduino IDE. You’ll find a launcher for this in your desktop environment’s application menu. The Arduino IDE presents you with the code of an empty software program, also called a sketch:
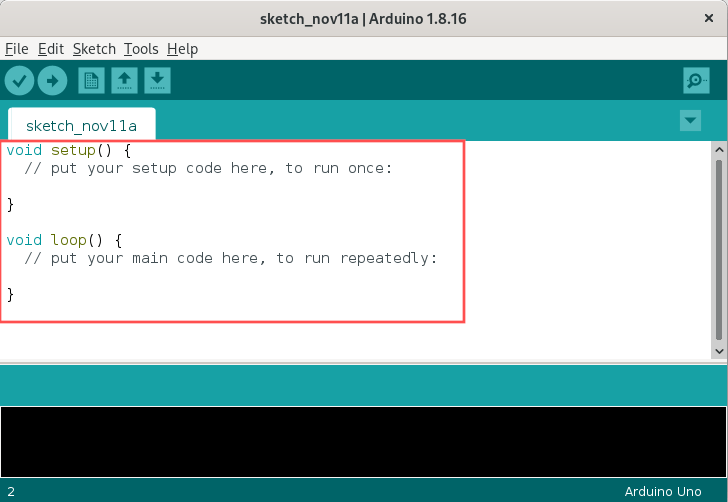
Update the code inside the setup and loop functions to implement the blinking LED functionality:
void setup() {
  /* Initialize digital pin LED_BUILTIN as an output. */
  pinMode(LED_BUILTIN, OUTPUT);
}

void loop() {
  /* Toggle the LED every 500 milliseconds. */
  digitalWrite(LED_BUILTIN, HIGH);
  delay(500);
  digitalWrite(LED_BUILTIN, LOW);
  delay(500);
}
To convert this source code to a binary program, select Sketch → Verify/Compile from the program menu. Alternatively, you can use the CTRL+r keyboard combination. The Arduino IDE will ask you to first save the file. The default proposed location and name are fine. You can follow the progress in the output window at the bottom:

Upload the example program
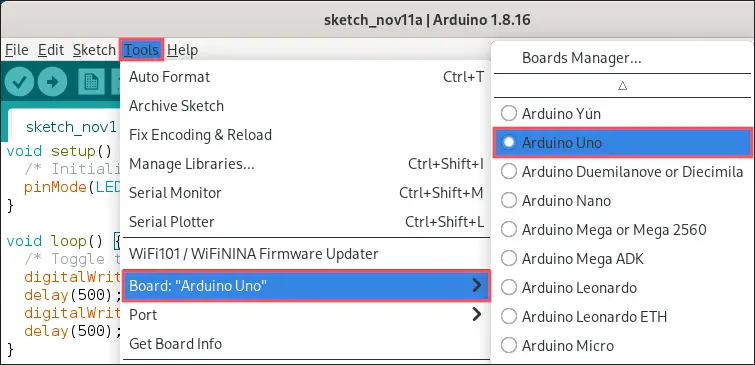
Now that the example program’s binary is ready, it’s time to upload it and run it on the Arduino. We just need to configure the Arduino IDE such that it can communicate with your Arduino. Select Tools → Board from the program menu and select the Arduino board type. In my case the Arduino Uno:
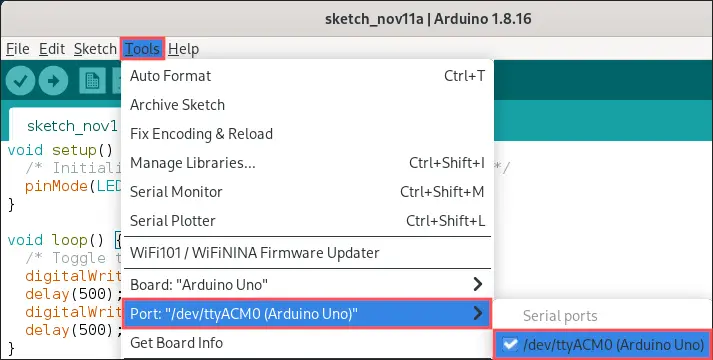
Next, we select the serial port device to use from program menu Tools → Port. In my case /dev/ttyACM0 as we saw in a previous section:
You only have to make this configuration once. Afterwards you can upload the binary of the example program to your Arduino, by selecting Sketch → Upload from the program menu. Or using the keyboard shortcut CTRL+u. The program starts running automatically, as you can tell by the LED blinking.
Wrap up
This tutorial explained in detail how to install the Arduino IDE on your Linux system. We opted for installing the Flatpak version of the Arduino IDE from Flathub. That way the installation instructions are Linux distribution agnostic, because Flatpaks work on all Linux distributions. Furthermore, you get the latest version of the Arduino IDE.
After installing the Arduino IDE on your Linux system, we also made sure your user belongs to group dialout. Otherwise you (and the Arduino IDE) cannot access the serial port, for communicating with the Arduino board. You need this to upload programs to your Arduino board.
To test that everything works as expected, the last section presented the source code of a blinking LED example program. After building it, we uploaded the binary of the example program to the Arduino board. A visual check that the LED actually blinks verified the successful completion of all steps in this tutorial.
For more Arduino related tutorial, follow this link: