 by
by The hostname of your Raspberry PI allows you to address it by its name, as opposed to its IP address. The hostname is how your Raspberry PI identifies itself to other systems on your local network. By default, the hostname is set to raspberrypi. Feel free to change the hostname of your Raspberry PI though. Especially if you plan on running more than one Raspberry PI on your local network. This tutorial presents several ways of how you can change the hostname of your Raspberry PI.
What is a hostname?
The hostname of your Raspberry PI, or any Linux system for that matter, is pretty much just a name. The hostname:
- Helps you recognize the system you are currently working on.
- Enables you to address the system by name on your local network, instead of the IP address.
- Is the first part of the fully qualified domain name (FQDN), needed for publicly accessing your system on the Internet.
Have a look at the following image for an explanation of how the terms hostname, domainname and FQDN relate:

Think of the hostname as your system’s first name and the domainname as its last name. Friends, such other systems on your local network, can address the system by its first name. Unknown systems, such as those on the public Internet, need to use a more formal approach. They need to use both its first and last name, so the fully qualified domain name.
After installing the Raspberry PI operating system, its default hostname is set to raspberrypi and no domainname is configured. When remotely connecting to your Raspberry PI via SSH, from another system on your local network, you can therefore conveniently run command:
ssh pi@raspberrypi
Instead of having the figure out and specifying its IP address:
ssh pi@[IP ADDRESS]
Why and when should you change the hostname?
Why would you want to change the hostname? If it’s the only Raspberry PI on your local network, then the default raspberrypi hostname works fine. You would only need to change it out of personal preference.
The moment you have more than one Raspberry PI attached to your local network, it’s a different story. Each system on your local network should have a unique hostname. Therefore, you should really change the hostname of your Raspberry PIs in this scenario.
The goal of this article is to show you how you can change the hostname of your Raspberry PI. We’ll cover a few different approaches. For example purposes, we’ll change the Raspberry PI hostname from the default raspberrypi to mypi. You can of course change this to whatever you want. Just keep in mind that the hostname can only have valid characters from a to z and digits from 0 to 9. A hyphen - is allowed, as long as the hostname doesn’t start with a hyphen.
What do you need?
To complete the steps in this article, you need a Raspberry PI. Ideally, one where you already installed the Raspberry PI operating system on. Which type of Raspberry PI doesn’t matter. You can have a keyboard, mouse and display attached to it, or remotely log in to it via SSH. That’s up to you.
For this article I decided on using my Raspberry PI Zero W. I installed the Lite edition of the Raspberry PI operating system, as explained in the tutorial about how to perform a minimal install on your Raspberry PI. I’ll use SSH to remotely connect to it.
Change the hostname with the Raspberry PI Imager
Assuming that you still need to install the Raspberry PI operating system on its SD card, you could use the Raspberry PI Imager software. In previous Raspberry PI tutorials, I used either Balena Etcher or the dd command directly, for writing the Raspberry PI operating system to the SD card. You can do the same with the relatively new Raspberry PI Imager software, also called rpi-imager.
Starting with version 1.6 of the Raspberry PI Imager software, you can access an advanced options screen. It’s a bit hidden. To access it, press the CTRL+SHIFT+x combination on your keyboard. On the dialog that appears, you can configure the hostname for your Raspberry PI:

After making this change, you continue as usual by clicking the Write button on the user interface. This writes the Raspberry PI operating system to the SD card. Upon first booting your Raspberry PI from your SD card, a shell script gets automatically executed to configure the settings you made on the advanced options screen. This include the hostname change for your Raspberry PI.
Change the Raspberry PI hostname with raspi-config
The Raspberry PI operating system includes a configuration tool for your Raspberry PI. It is called raspi-config and you can run it directory in the terminal. Two methods exist for changing the hostname of your Raspberry PI with raspi-config: interactive mode and non-interactive mode. We’ll cover both methods in this section.
Interactive mode
Open up the terminal on your Raspberry PI. Either directly or by remotely connecting to it via SSH. Next, start raspi-config by running this command:
sudo raspi-config
From the menu, select: System Options and then Hostname. On the next dialog, you can enter a new hostname. I entered mypi:
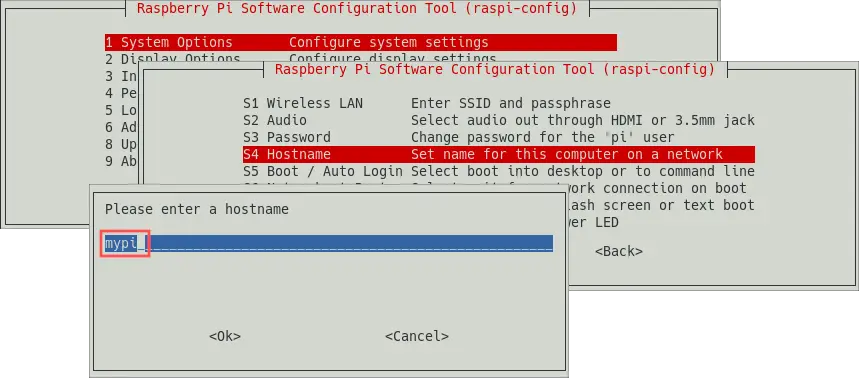
Once you changed the hostname, close the raspi-config program, by selecting the Finish option on the main screen. The program asks you, if you want to reboot. Go ahead an select Yes, because the hostname change will not activate until your reboot your Raspberry PI.
Non-interactive mode
Using the raspi-config program in non-interactive mode, offers an alternative and quicker method. Simply open up the terminal and run the following command:
sudo raspi-config nonint do_hostname "mypi"
Just don’t forget to manually initiate a reboot, for the hostname change to take effect:
sudo reboot

Change the Raspberry PI hostname manually
The previously described methods for changing your Raspberry PI’s hostname, essentially do the exact same thing under the hood. They change the hostname in the following two files:
/etc/hostnameand/etc/hosts
Therefore you can also simply edit these files manually to change the hostname. I personally prefer this method, because it also works on other Linux distributions such as Debian and Ubuntu.
With the Nano text editor
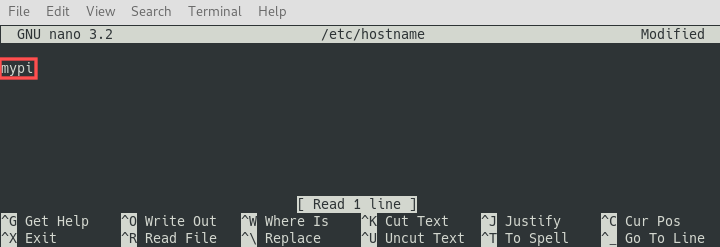
Let’s get started with the first file. We’ll use the Nano text editor for this, directly in the terminal. Refer to this tutorial on how to use the Nano text editor. Open up the /etc/hostname file with Nano:
sudo nano /etc/hostname
This file only contains the hostname itself, so simply change it right there. Once done, close the file and save the changes (CTRL+x):
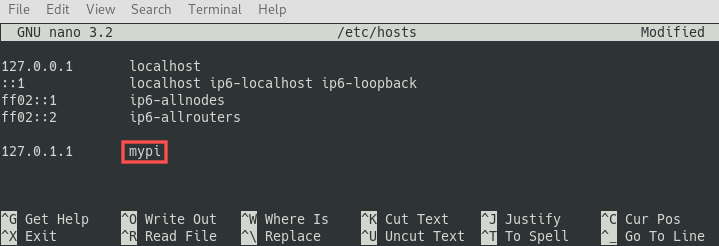
One down, one to go. Continue by opening up the /etc/hosts file with Nano:
sudo nano /etc/hosts
Replace all occurrences of the old hostname with the new hostname. Afterwards, close the file and save the changes:
That’s all. Just don’t forget to reboot your Raspberry PI, for the hostname change to take effect:
sudo reboot
With terminal commands
Instead of editing the /etc/hostname and /etc/hosts file with Nano, you can also change the hostname directly with terminal commands. It’s quicker and you could even turn it into a shell script for automation purposes.
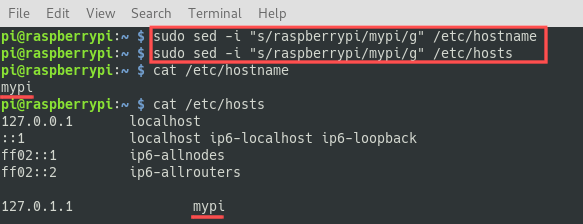
We need to perform the same edit operation on both files: Search for the old hostname raspberrypi and replace it with the new hostname mypi. The sed program is perfect for this. Run the following two commands:
sudo sed -i "s/raspberrypi/mypi/g" /etc/hostnamesudo sed -i "s/raspberrypi/mypi/g" /etc/hosts
Don’t forget to reboot your Raspberry PI, for the hostname change to take effect:
sudo reboot
Verify the hostname change on your Raspberry PI
How do you check that the hostname change was successful? Well, if you are working directly on the Raspberry PI, just open up the terminal. Its command prompt should now read pi@mypi instead of pi@raspberrypi.
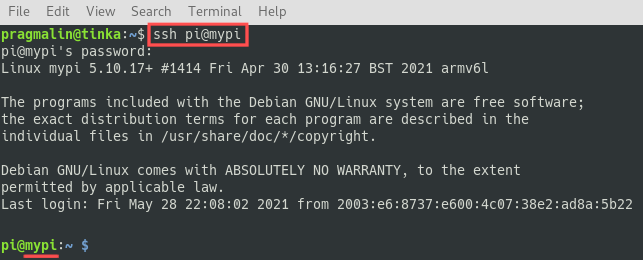
Similar in case you connect to your Raspberry PI remotely, with the help of SSH. Just make sure you specify the new hostname in the ssh command:
ssh pi@mypi
Wrap up
This article presented a few different solutions for changing the hostname of your Raspberry PI:
- With the help of the Raspberry PI Imager software, in case you haven’t yet installed the Raspberry PI operating system on the SD card.
- Using the Raspberry PI specific
raspi-configtool, both in interactive and non-interactive mode. - By manually editing the
/etc/hostnameand/etc/hostsfiles. Either with the Nano editor or directly on the command line withsed.
Use whichever solution you prefer. They all yield the same results. My personal preference goes out to manually editing the /etc/hostname and /etc/hosts files. Simply because this is how you would achieve this task on other Linux distributions as well.