 by
by A virtual CAN interface is the perfect solution when developing CAN nodes, without needing an actual physical CAN bus. Think of a virtual CAN interface as a software CAN adapter, through which you can access an emulated CAN bus. The SocketCAN subsystem of the Linux kernel comes with build-in support for virtual CAN interfaces. This tutorial explains in detail how to create and use a virtual CAN interface on your Linux system.
Background
Whenever you want to develop, prototype, simulate or test a Controller Area Network (CAN) node, without an actual physical CAN bus, virtual CAN interfaces offer a solution. Think of a virtual CAN interface as an software CAN adapter that can access an emulated CAN bus inside your computer. There is no need for a CAN hardware adapter to access the CAN bus. It’s all right there inside your PC.
On Linux, the kernel directly offers CAN functionality. It’s called SocketCAN. SocketCAN not only contains hardware drivers and a network protocol stack for Controller Area Network. It also brings support for virtual CAN devices. This tutorial explain in detail how to create and work with virtual CAN interfaces on Linux. We’ll cover both the manual creation of a virtual CAN interface and also an automated approach, such that the virtual CAN interface persists after a reboot.
The only limitation of a virtual CAN interface is that you cannot directly access a hardware CAN node. However, you could use the CAN gateway kernel module can-gw and route messages between a physical and virtual CAN bus, to bypass this limitation. That’s outside the scope of this article, but let me know if you are interested in this. I could then cover it in a future article.
What do you need
The entire idea behind a virtual CAN interface on Linux, is that you don’t need actual CAN hardware. As such, you just need a Linux system to complete the steps outlined in this tutorial. A Raspberry PI or a virtual machine suffices. Ideally with a desktop environment installed for convenience. However, even that is optional.
For this tutorial, I decided on using an Ubuntu virtual machine in VirtualBox. If you don’t yet have Linux installed, consider setting up Ubuntu as a virtual machine as well:
- How to install Ubuntu Desktop 20.04 LTS in VirtualBox
- Install VirtualBox guest additions in Ubuntu 20.04
Manually create a virtual CAN interface on Linux
Before you can use a virtual CAN interface on Linux, you need to perform these three steps in the terminal:
- Load the
vcankernel module:sudo modprobe vcan - Create the virtual CAN interface:
sudo ip link add dev vcan0 type vcan - Bring the virtual CAN interface online:
sudo ip link set up vcan0
Afterwards, you can run the ip addr | grep "can" command to verify that the virtual CAN interface is available and online on your Linux system:
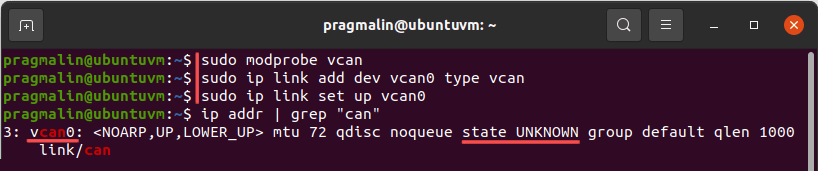
If you worked with real CAN hardware under Linux before, you’ll notice one difference: The output of the ip addr command shows the state as UNKNOWN, instead of UP. That’s normal for a virtual CAN interface on Linux.
Note that you do not have to configure the CAN bitrate for a virtual CAN interface on Linux. The SocketCAN subsystem emulates the CAN bus and it does not need to do any communication synchronization.
You could automate these steps with a basic bash script:
#!/bin/bash
# Make sure the script runs with super user privileges.
[ "$UID" -eq 0 ] || exec sudo bash "$0" "$@"
# Load the kernel module.
modprobe vcan
# Create the virtual CAN interface.
ip link add dev vcan0 type vcan
# Bring the virtual CAN interface online.
ip link set up vcan0
Save these contents to a file in your home directory. For example: ~/vcan.sh. Then flag it as an executable: chmod +x ~/vcan.sh. From now on you just need to run this script to get the vcan0 virtual CAN interface on your Linux system:
cd ~./vcan.sh
Note that the script automatically prompts you for the sudo password.
Automatically create a virtual CAN interface on Linux
The method explained in the previous section works fine. The only downside is that the virtual CAN interface does not persist after a reboot of your Linux system. With other words, if you work with virtual CAN interfaces often, you need to manually create the virtual CAN interface on Linux, every time you start your Linux system. To automate this procedure, I can think of two options:
- Create a systemd service that runs the
vcan.shscript, when you boot your system. - Leverage the systemd-networkd subsystem to create and bring the virtual CAN interface online.
In a previous article I already covered option one, about how to run script during system startup with systemd. For this reason, I decided on covering option two in this article: Automatically creating and bringing a virtual CAN interface online, using Linux’ systemd-networkd subsystem.
Load the virtual CAN kernel module on boot
As a first step we configure the vcan kernel module to load automatically, each time we boot our Linux system. Open the terminal, create and open the following file for text editing with Nano:
sudo nano /etc/modules-load.d/can.conf
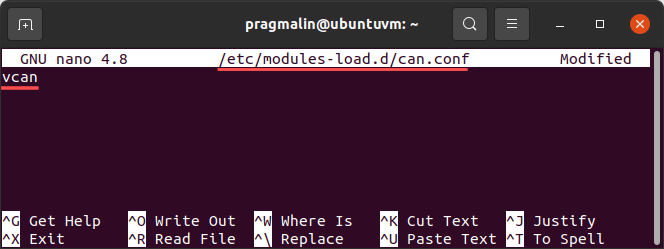
Next, enter the vcan kernel module on the first line. Afterwards, save the changes and exit Nano. The next time you boot your Linux system, the kernel loads the vcan module automatically.
Start and enable the systemd-networkd subsystem
Most Linux desktop distributions manage the network interfaces with NetworkManager. NetworkManager works great for your Internet and VPN connections. Unfortunately, it currently does not support managing SocketCAN network interfaces. Systemd-networkd is an alternative network interface manager, which includes support for SocketCAN network interfaces.
Luckily you can run both network managers at the same time. This means that we can simply use systemd-networkd to handle our virtual SocketCAN network interface on our Linux system.
Debian, Ubuntu and Fedora install systemd-networkd by default. The installer just leaves it inactive. openSUSE does not install systemd-networkd by default, but you can easily remedy that by running command sudo zypper install systemd-network.
Before we move on with the configuration of our SocketCAN network interface, we need to first activate the systemd-networkd service. Run the following two commands from the terminal:
sudo systemctl start systemd-networkdsudo systemctl enable systemd-networkd
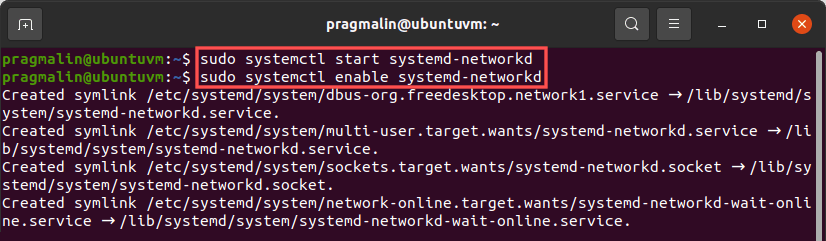
This starts the systemd-networkd service and makes sure it also starts the next time your boot your Linux system. In case you receive an error after enabling it, it’s probably because it was already enabled on your system, so not much to worry about.
Create the virtual CAN network interface
With systemd-networkd enabled, we continue with instructing it to create a virtual CAN network interface for us, each time we boot our Linux system. Open the terminal, create and open the following file for text editing with Nano:
sudo nano /etc/systemd/network/vcan0.netdev
Enter the following text. Then save the changes and exit the Nano editor:
[NetDev]
Name=vcan0
Kind=vcan
MTUBytes=16
Description=Virtual CAN0 network interface
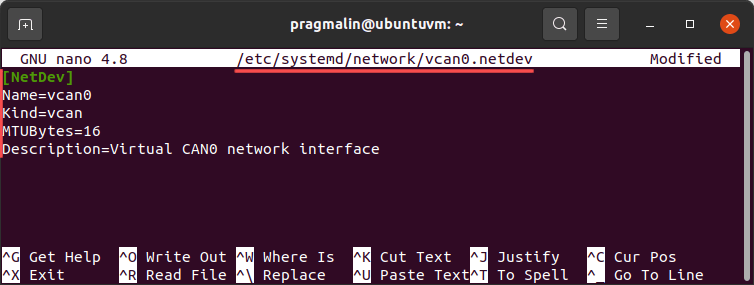
This creates the virtual CAN interface with name vcan0 for us, each time Linux boots.
Configure the virtual CAN network interface
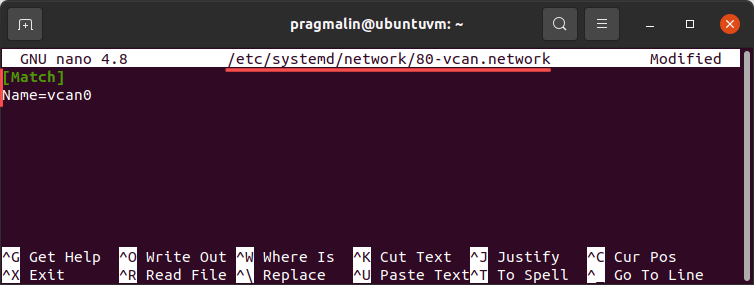
With the virtual CAN interface vcan0 created, we now just need to configure it. Otherwise systemd-networkd won’t bring it online. Open the terminal, create and open the following file for text editing with Nano:
sudo nano /etc/systemd/network/80-vcan.network
Enter the following text. Then save the changes and exit the Nano editor:
[Match]
Name=vcan0
Note that a similar approach works, when using a real physical CAN interface. However, you would then also specify CAN properties such as the bitrate. This is not necessary in the case of a virtual CAN interface. Refer to this article for more information on using a physical CAN interface:
Alright, at this point go ahead and reboot your system to see if it works. Similar to before, you can verify if systemd-networkd created and brought the vcan0 virtual CAN interface online with:
ip addr | grep "can"

Testing CAN communication with can-utils
With our newly created virtual SocketCAN interface brought online on our Linux system, we can test the communication on our virtual CAN bus. The package can-utils contains a few command-line programs perfect for this purpose. We just need install the can-utils package on our Linux system:
- Ubuntu/Debian:
sudo apt install can-utils - Fedora:
sudo dnf install can-utils - openSUSE:
sudo zypper install canutils
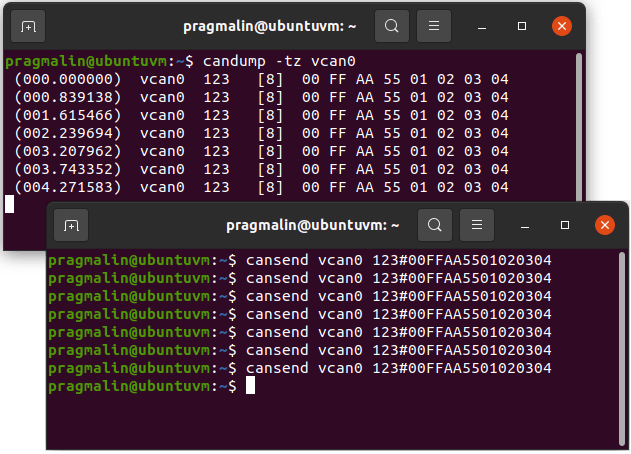
Next, we open up two terminal windows. One for viewing all CAN messages on the virtual CAN bus and one for transmitting a CAN message for testing purposes. In the first terminal window, run the command:
candump -tz vcan0
Moving over to the next window, transmit a CAN message using command:
cansend vcan0 123#00FFAA5501020304
Wrap up
In this tutorial you learned how to create a virtual CAN interface on your Linux system, by leveraging the SocketCAN kernel functionality. In a nutshell, three steps are needed:
- Load the
vcankernel module:sudo modprobe vcan - Create the virtual CAN interface:
sudo ip link add dev vcan0 type vcan - Bring the virtual CAN interface online:
sudo ip link set up vcan0
The article presented two approaches for creating and bringing the virtual CAN interface online:
- Manually create a virtual CAN interface on Linux.
- Automatically create a virtual CAN interface on Linux.
The first approach included a bash script that you can run to do it all with a one-liner in the terminal. The perfect solution for when you only work with a virtual CAN network sporadically.
The second approach built upon the SocketCAN support present in systemd-networkd. Overall a bit more work to set this up. However, it results in a solution that guarantees the vcan0 virtual CAN interface’s availability with each system boot.
Where to go from here after configuring a SocketCAN network interface on your Linux system? If you feel like coding, try building your own SocketCAN node application in the C or C++ programming language with the CAPLin framework:
For more SocketCAN related tutorials, visit the following link. It even includes a low-cost solution for bringing CAN functionality to a Raspberry PI: