
 by
by Is your VirtualBox virtual machine starting to run out of disk space? No worries, because VirtualBox allows you to easily increase the disk size of your virtual machine. Just keep in mind that afterwards you still need to increase the size of your partitions accordingly. This article will help you along the way. It provides you with step-by-step instructions on how to increase the disk size of your VirtualBox virtual machine.
Background
Virtual machines provide a great playground for learning about and testing out all sorts of Linux related things. Both for desktop and server purposes. But what do you do when your virtual machine runs out of disk space? On real hardware you would swap the hard disk for a larger version. But how do you achieve this task for your VirtualBox virtual machine?
Luckily, VirtualBox allows you to easily increase the size of your virtual disk. However, that’s not the end of the story. Your disk partitions still have the same size as before. So to complete the disk size increase of your VirtualBox virtual machine, you still need to change the size of the disk partition(s). This latter step is a bit trickier. Fear not, because this article provides you with step-by-step instructions on how to increase the disk size of your VirtualBox virtual machine.
If you don’t yet have a virtual machine, you can follow this tutorial to create a minimal Debian server virtual machine in VirtualBox. This article takes the same Debian server virtual machine as a starting point.
Virtual machine backup
Increasing the disk size of your VirtualBox virtual machine, including the partition resizing, is an invasive operation. For this reason we’d better make a backup copy of the virtual machine. A virtual machine consists of plain files on you PC. Therefore simply copying these files already creates a backup of the entire virtual machine.
My Debian server virtual machine resides at this location in my user’s home directory:
/home/pragmalin/VirtualBox VMs/Debian Server/
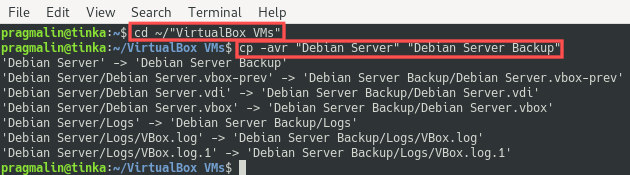
The following two commands backup this virtual machine to a directory called Debian Server Backup:
cd ~/"VirtualBox VMs"
cp -avr "Debian Server" "Debian Server Backup"
These directory names contains spaces and therefore I surrounded them with double quotes.
If something goes wrong while performing the steps outlined in this article, you can simply delete the Debian Server directory and restore the backup. For restoring the backup, you can use a similar cp command as above. You just have to swap the Debian Server and Debian Server Backup command parameters around.
Increase the size of your VDI virtual disk in VirtualBox
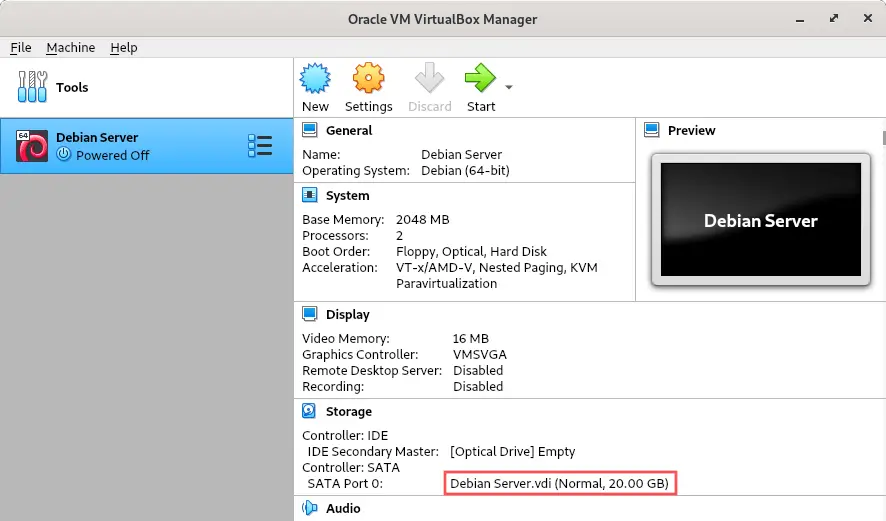
Upon creation of a virtual machine, VirtualBox creates a VDI file. VDI stand for virtual disk image. Think of this VDI file as the hard disk of your virtual machine. To locate the name of your virtual machine’s VDI file, select your virtual machine on VirtualBox’s main screen. You can then see the name of the VDI file in the “Storage” section. In my case it is Debian Server.vdi and its current size equals 20 GB:
For increasing the size of your VDI disk, go to the VirtualBox main screen. Next, click on the icon located at the right side of the Tools entry. Select Media from the pop-up menu to open the media view. The media view lists all the hard disks attached to your virtual machines.
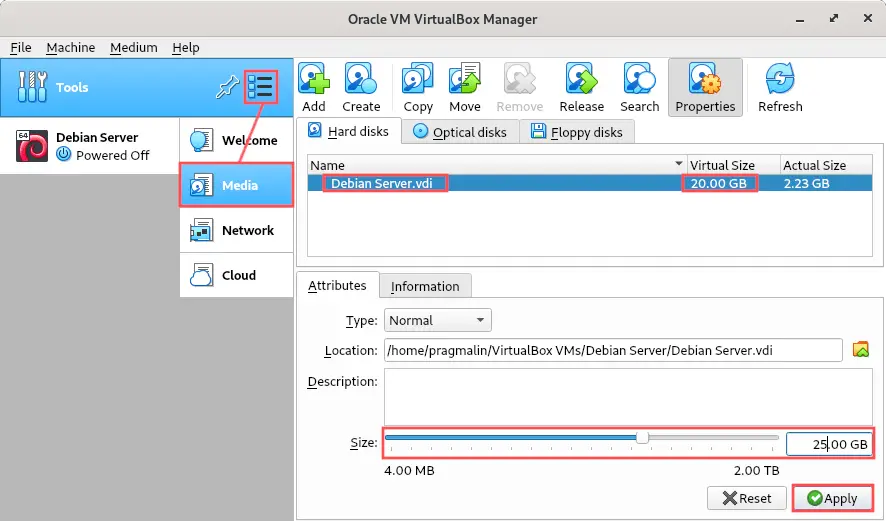
On the VirtualBox media view, select the VDI disk that you want to increase in size. In my case it is Debian Server.vdi which currently has a size of 20 GB. Once selected, you simply move the slider at the bottom of the screen to increase the disk size. In this example, I want to increase the disk size from 20 GB to 25 GB. Once you selected the new disk size, confirm it by clicking the Apply button. Keep in mind though that you can only increase the disk size and not decrease it.
Let’s verify that the disk size of your VirtualBox virtual machine actually got increased. Go ahead and start your virtual machine. Once ready, open the terminal if it has a desktop environment or log in via SSH if it is a server. List the information about the attached disks with command:
lsblk -p | grep "disk"

As expected, the command output reports 25 GB for the disk size. This proves that we successfully increased the disk size of our VirtualBox virtual machine. All done, right? I’m afraid not. Run the following command to list the partitions:
lsblk -p | grep "part"
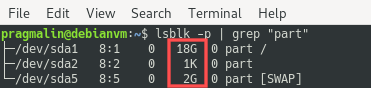
After adding up the size of the individual partitions, we get to about 20 GB and not the desired 25 GB. So the virtual hard disk of our virtual machine was increased, but we still need to increase the partitions. The next section describes how to achieve this.
Increase the size of your root file system partition
The previous terminal screenshot tells us that the virtual machine has a primary partition sda1 that holds the root file system. Furthermore, the virtual machine has an extended partition sda2 that holds the swap partition sda5. For our virtual machine to reap the benefits of the larger disk size, we want to increase the partition with the root file system (sda1) from 18 GB to 23 GB. Unfortunately, you cannot change the partitions while the system is live. To solve this conundrum, we will boot our virtual machine from a GParted Live ISO.
Download the GParted Live ISO
The GParted Live ISO contains a CD image with a live Linux system, which includes the GParted program. With the GParted program you can change your disk partitioning and format disks. Note that making a mistake in GParted tends to be permanent. To the point where you might loose data on your virtual machine. That’s the reason why I recommended making a backup copy of the virtual machine first earlier in this article. If you decided to skip the step where you back up your virtual machine, now would be a good time to reconsider this decision.
Before we can boot our virtual machine from the GParted Live ISO, we should first download it. Visit the download section of the GParted website. Once there, download the latest 64-bit stable release. At the time of this writing the latest stable release is 1.1.0-5:

After the download the file resides at the following location on my PC:
/home/pragmalin/Downloads/gparted-live-1.1.0-5-amd64.iso
Attach the GParted Live ISO to the virtual machine
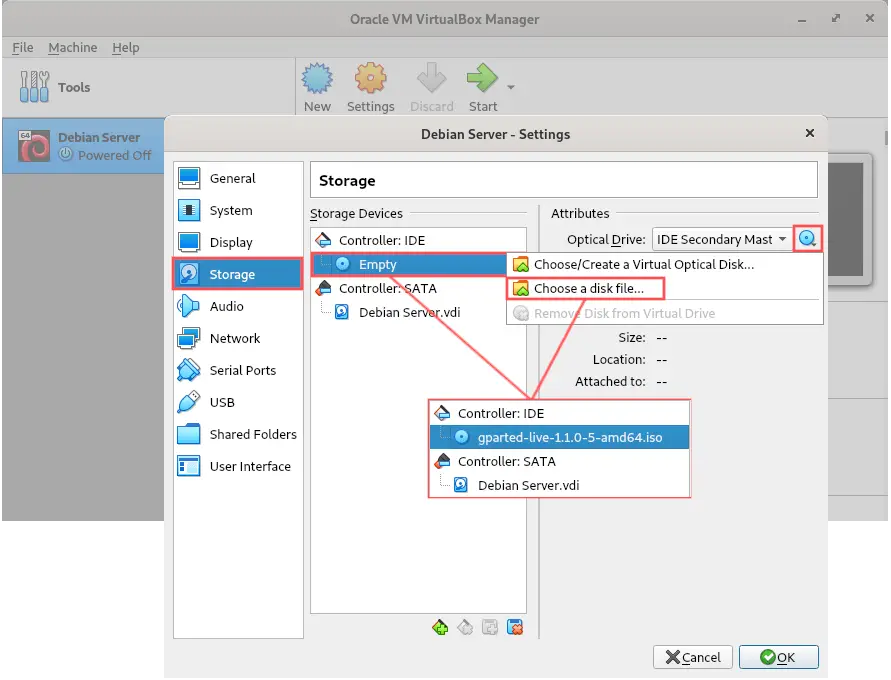
With the GParted Live ISO downloaded, we connect it to the CD-ROM drive of our virtual machine. Make sure your virtual machine is powered off at this point. On the VirtualBox main screen, select your virtual machine and click the Settings button on the toolbar. When the Settings dialog appeared, go to the Storage section and select the Empty IDE controller. Once selected, click the blue disk icon button on the right side of the dialog. From the menu that dropped down, select the Choose a disk file… option. Now select the GParted Live ISO file you downloaded in the previous step. Complete the configuration by clicking the OK button on the Settings dialog. The Empty IDE controller should now have changed to the name of the GParted Live ISO file:
Boot the virtual machine from the GParted Live ISO
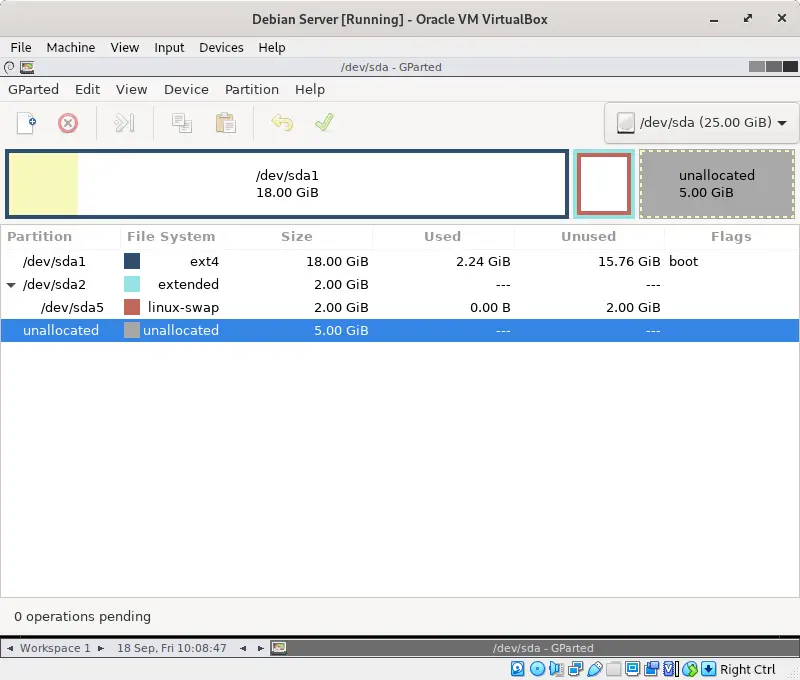
With the GParted Live ISO connected to the virtual machine’s optical drive, the virtual machine will boot from this Live CD image instead of its virtual disk. So go ahead and startup your virtual machine. A few prompts appear during the boot process. Just hit Enter every time to accept the defaults. Eventually, you’ll end with a basic desktop environment with the GParted program running:
Resize the partitions
In GParted you can see a 5 GB chunk that is unallocated. This is expected because it represents the size with which we increased the disk in our VirtualBox virtual machine. The goal is to give this 5 GB unallocated disk chunk to /dev/sda1. So once we are all set and done, /dev/sda1 should have a size of 23 GB instead of 18 GB. It would be nice if we could just drag and drop this unallocated disk space onto /dev/sda1.
Unfortunately, you cannot just move a piece of the disk space like that. What we have to do instead is move the extended partition, including the swap partition, all the way to the right. This opens up 5 GB between /dev/sda1 and /dev/sda2. Once it is directly on the right side of /dev/sda1 we can increase the size of the /dev/sda1 to include this 5 GB. Now that we know the general idea, let’s get work.
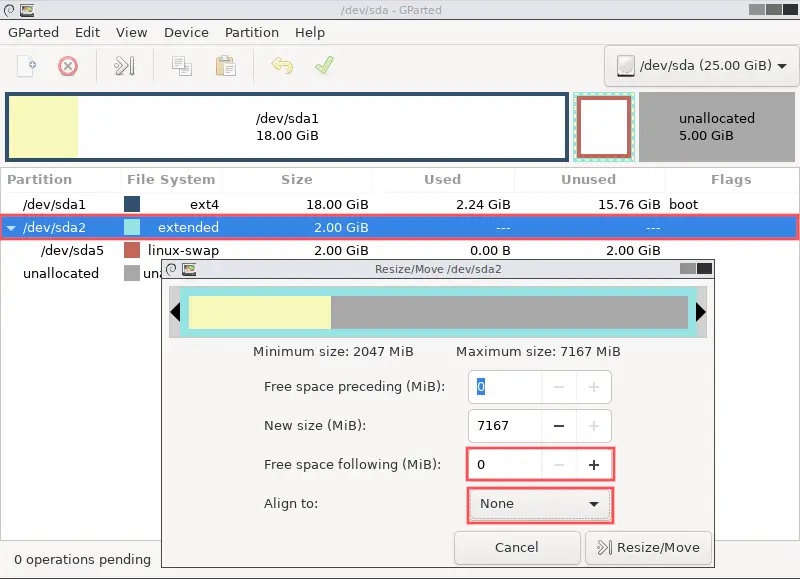
Step 1 – Add the unallocated space to the extended partition
Select the /dev/sda2 extended partition in GParted and select Partition → Resize/Move from the program menu. On the dialog that appeared, select None from the Align to drop down menu. Next, resize the partition by entering a value of 0 in the Free space following edit box. Alternatively, you can drag the right arrow all the way to the right, in the visual representation of the partition size. Click the Resize/Move button to confirm the change.
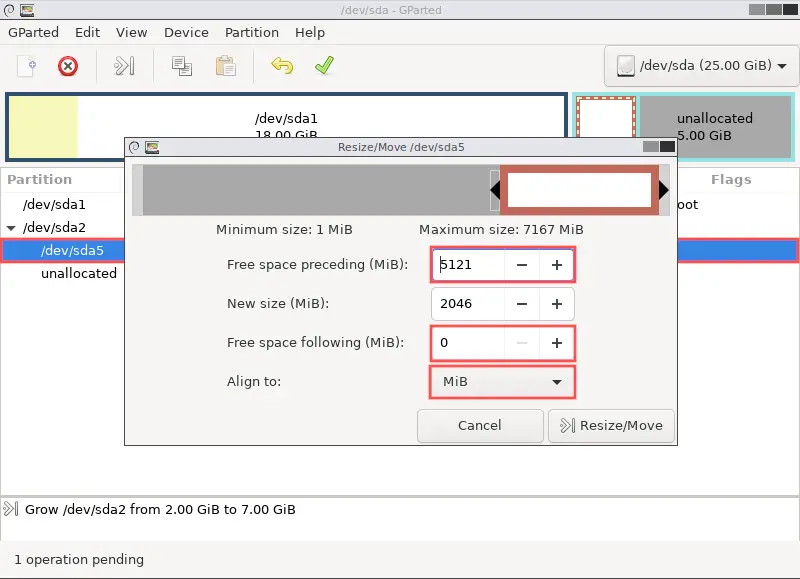
Step 2 – Move the swap partition to the right of the extended partition
The unallocated disk space is now a part of the /dev/sda2 extended partition. As a next step we move the /dev/sda5 swap partition, which is inside the extended partition, all the way to the right. Select the /dev/sda5 swap partition in GParted and select Partition → Resize/Move from the program menu. On the dialog that appeared, select None from the Align to drop down menu. Next, drag the swap partition all the way to the right, in the visual representation of the partition size. Alternatively, you can change the numbers directly in the edit boxes. Basically the values in Free space preceding and Free space following need to be swapped. Click the Resize/Move button to confirm the change. Note that you might get a warning that moving a partition might cause the operating system to fail to boot. You can ignore this warning, so just click OK on the warning dialog.
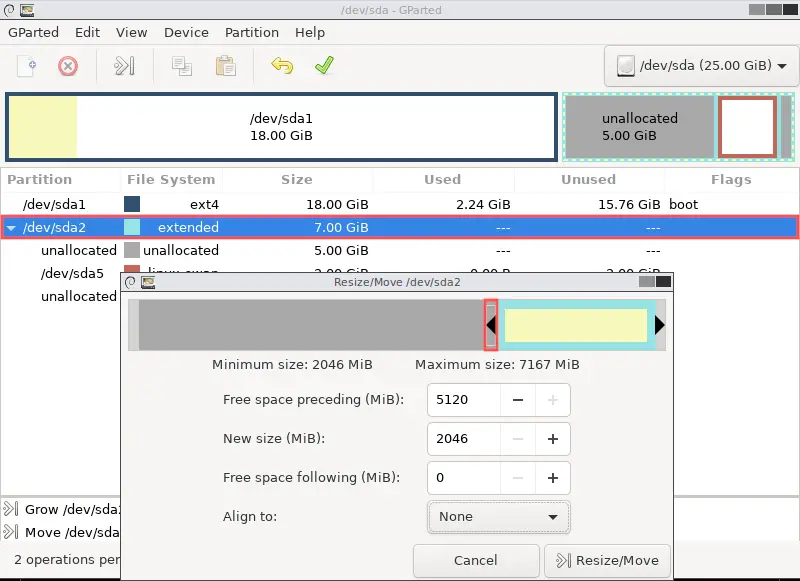
Step 3 – Shrink the extended partition back to its original size
The unallocated space still resides in the /dev/sda2 extended partition. To remove it from the extended partition, we simply shrink the extended partition back to its original size. Select the /dev/sda2 extended partition in GParted and select Partition → Resize/Move from the program menu. On the dialog that appeared, select None from the Align to drop down menu. Next, drag the left arrow as far as you can to the right. So basically to the start of where the swap partition is now located. Click the Resize/Move button to confirm the change.
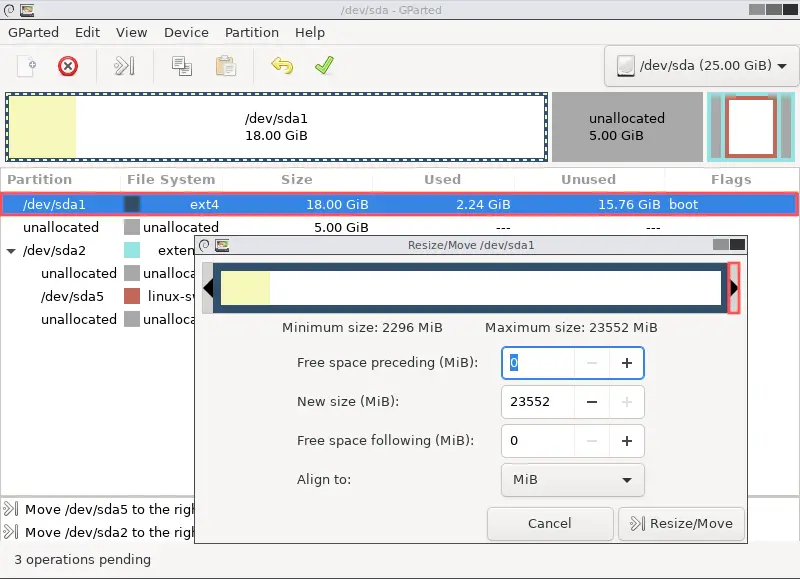
Step 4 – Add the unallocated space to the root file system partition
Almost there. The unallocated space holds the correct position. Right between the /dev/sda1 root file system partition the /dev/sda2 extended partition. Now we just need to increase the size of the /dev/sda1 root file system to include the unallocated space. Select the /dev/sda1 root file system partition in GParted and select Partition → Resize/Move from the program menu. On the dialog that appeared, select None from the Align to drop down menu. Next, resize the partition by dragging the right arrow all the way to the right, in the visual representation of the partition size. Click the Resize/Move button to confirm the change.
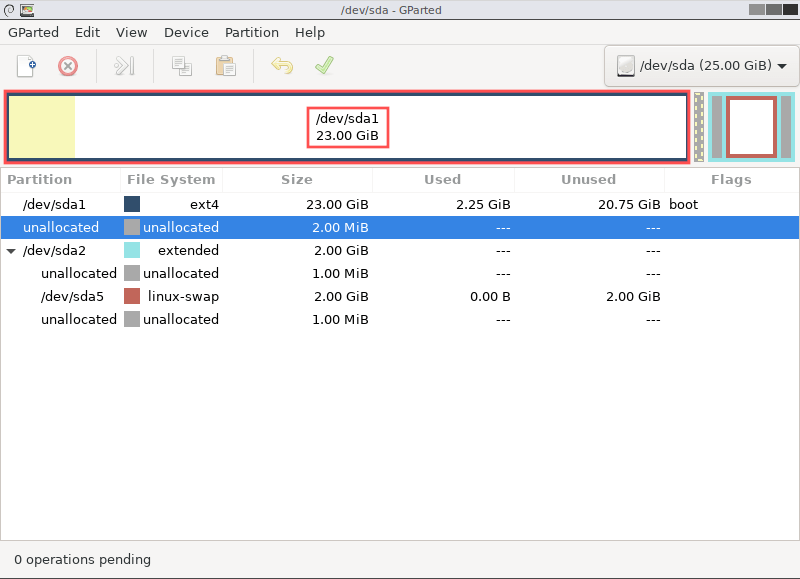
Step 5 – Apply the partition changes
After reorganizing of the partitions, we just need to apply the changes. Note that there are some minor snippets of unallocated space in between the partitions. An unfortunate side effect of the changes, but these are so tiny that we can ignore them. Go ahead and select Edit → Apply All Operations from the program menu. Click Apply on the confirmation dialog for this operation. Afterwards, the status bar should display 0 operations pending. Also note that the size of the /dev/sda1 root file system partition increased from 18 to 23 GB. Exactly what we wanted.
Power down the virtual machine
Since we completed increasing the disk size of the root file system partition in our VirtualBox virtual machine, it is time to power down the GParted live system. Select GParted → Quit from the program menu to close GParted. Back on the desktop you’ll notice a red icon labeled Exit. Double-click this icon and select Shutdown from the dialog the appeared. Click the OK button on the same dialog to confirm. At the end of the power down procedure, it asks you to remove the live-medium and then press Enter. On a virtual machine we do not have to physically remove the live-medium, so simply press Enter to completely shutdown the virtual machine. Note that this automatically detaches the GParted Live ISO from the virtual machine.
Final testing
Alright, so we did quite some work and we should be all set now. Lets power up the virtual machine and verify that our root file system partition increased in size. Once ready, open the terminal if it has a desktop environment or log in via SSH if it is a server. Enter this command to list information about the attached disks and its partitions:
lsblk -p | grep "disk\|part"
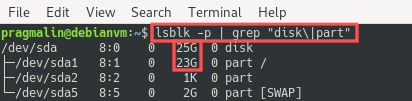
We successfully increased the disk size of our VirtualBox virtual machine from 20 GB to 25 GB. This is old news, since we already verified that in a previous section. The command output does offer new information about the root file system partition (/dev/sda1). This partition grew from 18 GB to 23 GB. This proves that we successfully added to 5 GB to the root file system partition.
Wrap up
After working your way through this tutorial, you learned the technique involved to increase the disk size of your VirtualBox virtual machine. The VirtualBox user interface offers a feature for the actual disk size increase. You also learned that increasing the disk size of the virtual machine in VirtualBox is only half the story. You still need to resize partitions to reap the benefits of the newly created disk space. Resizing partitions cannot be done on a live system, therefore you booted your virtual machine with the GParted Live ISO. With the help of GParted you could increase the size of the root file system partiton. Using GParted involves a learning curve and hopefully this tutorial sufficiently helped you with this part.

One thought on “How to increase the disk size in a VirtualBox virtual machine”
Comments are closed.