
 by
by This article covers step-by-step the PyCharm virtual environment creation. It is written specifically for those Python developers that prefer to have their Python development environment manage the creation and activation of their project specific virtual environment.
Virtual environment purpose
The availability of many third party packages makes Python such a powerful and appealing programming language choice. Moreover, you can select Python for almost any kind of project, ranging from desktop applications, web applications, server scripts and even embedded systems. The recommended approach for installing third party packages is to install them in a project specific virtual environment.
The concept of Python virtual environments is great. You can install whatever package, and even a specific version of a package, just for the project you work on. It won’t affect your main Python installation or your other Python projects.
Unfortunately creating, activating and deactivating virtual environments strikes me as tiresome. You need to leave the comfort of your Python programming environment and fire up a terminal to perform these tasks. Luckily, the PyCharm development environment solves this problem. It enables you to conveniently create a virtual environment for your Python project. Once created, PyCharm automatically activates and deactivates the virtual environment for you, each time you open and close your Python project, respectively.
PyCharm development environment
PyCharm is an integrated development environment (IDE) for Python, developed by JetBrains. It features an uncluttered and intuitive user interface, combined with a pleasant to work with editor. Additionally, the editor features a powerful auto-complete. PyCharm packs all the functionality a Python developer could ever wish for and presents it in a way that makes it a joy to work with.
PyCharm comes in two editions: the professional edition and the community edition. Keep in mind though that the professional edition needs to be bought. In contrast, JetBrains makes the community edition free and open source. With other words, you can download the community edition for free and get started with it right away. The professional edition does offer more functionality, especially for those developing web applications and working with databases.
You can always start with the free community edition first. That way you get to evaluate PyCharm without spending a dime. At a later point, you can upgrade to the reasonably priced professional edition. Either because you need to added functionality or just to support JetBrains and thank them for making the community edition available to everyone. To follow the steps outlined in this article, all you need is the community edition.
PyCharm community edition installation
Several options exists of installing the PyCharm community edition. The route I went for was installing it as a snap. For this to work I had to first install the snap daemon on my Debian 10 system:
sudo apt update sudo apt install snapd
After installing the snap daemon, the installation of the PyCharm community edition commences with the command:
sudo snap install pycharm-community --classic
Once the installation completes, you can start PyCharm by selecting the program from your desktop environment’s program menu. Note that the snap daemon automatically updates PyCharm for you, when snapcraft finished packaging a new release.
Virtual environment creation
When starting a new project in PyCharm, you can instruct PyCharm to create a new virtual environment right away. You just need to specify the directory for the new virtual environment. Since it is recommended to give each project its own virtual environment, I prefer to use the following directory structure:
<home directory>/venv/<project name>
Let’s assume that you want to create a new project called hello-world with its own virtual environment. In the New Project dialog, specify the following:
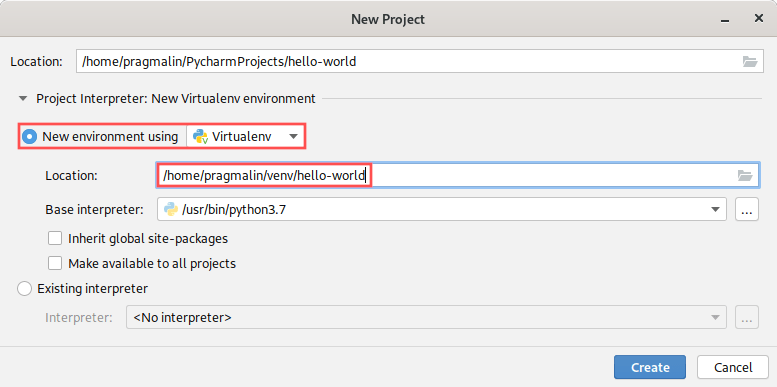
Keep in mind that my home directory is /home/pragmalin. Replace this part with the location of your user’s home directory.
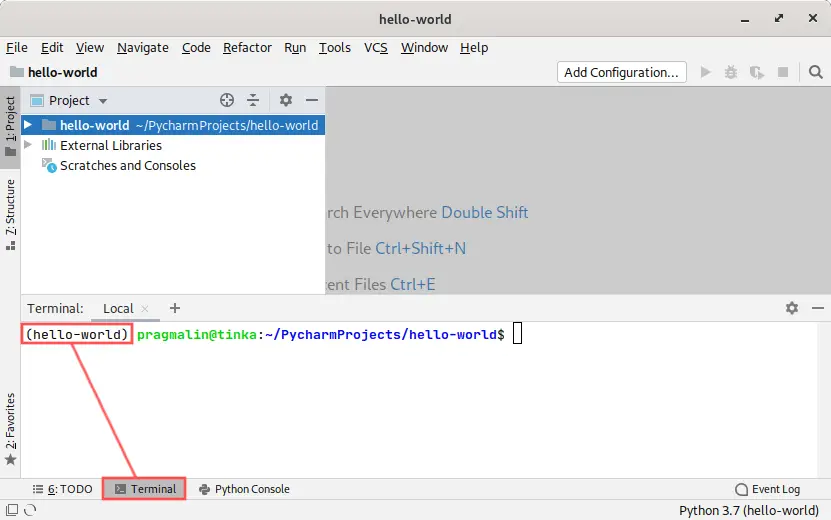
To verify that the virtual environment got created and automatically activated, open up the terminal window in PyCharm. The PyCharm terminal postfixes the name of the virtual environment to the prompt, as illustrated in the following screenshot:
PyPi package installation example
The Python Package Index (PyPi) is an online repository of Python packages, maintained by the Python Software Foundation. For example purposes, let’s install the popular Python imaging library pillow in our newly created virtual environment of the hello-world project.
Open up the PyCharm terminal and type the command:
pip install "pillow"
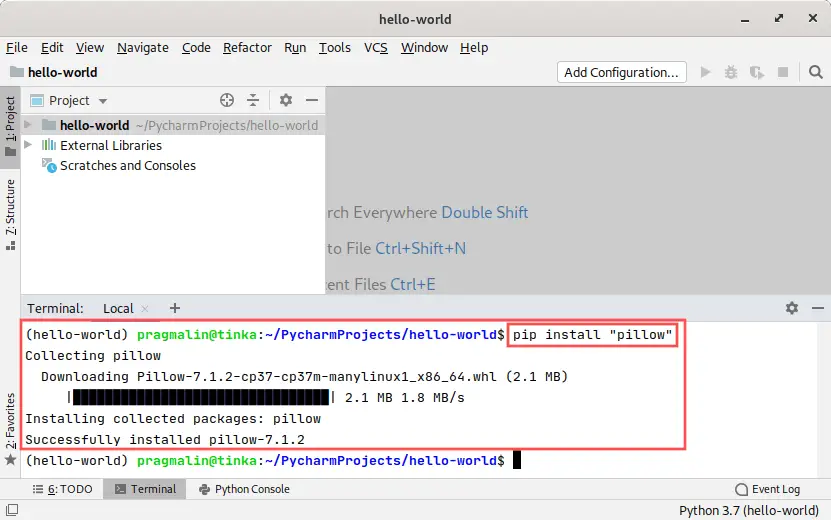
The pillow package is now installed in our project’s virtual environment and ready for usage by whatever Python program we plan on developing. As a next step let’s create a simple Python program to demonstrate that we can use the newly installed pillow package.
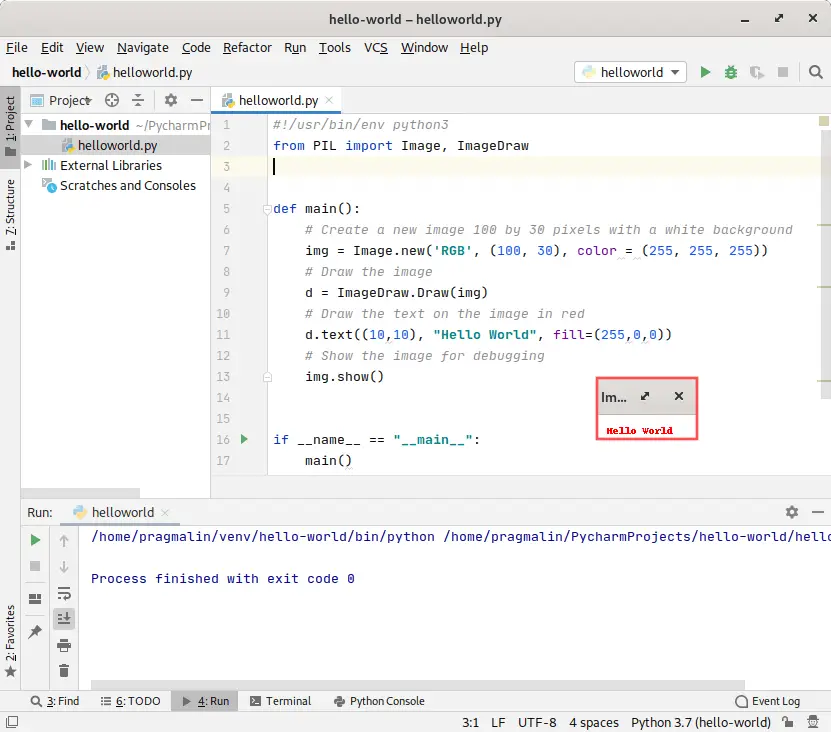
Using the PyCharm IDE, create a new Python file in the project, called helloworld.py, and enter the following contents:
#!/usr/bin/env python3
from PIL import Image, ImageDraw


def main():
    # Create a new image 100 by 30 pixels with a white background
    img = Image.new('RGB', (100, 30), color = (255, 255, 255))
    # Draw the image
    d = ImageDraw.Draw(img)
    # Draw the text on the image in red
    d.text((10,10), "Hello World", fill=(255,0,0))
    # Show the image for debugging
    img.show()


if __name__ == "__main__":
    main()
This program builds upon the pillow package. It creates an image with some text on it and then displays the image to verify that it worked. To run the Python program, select Run → Run… from the PyCharm program menu. The following screenshot shows how the dynamically created image pops up in a little dialog:
Wrap up
This article explained in detail the PyCharm virtual environment creation. It even included an example of how to install and use a Python package from PyPi into this newly created virtual environment. Hopefully it became clear to you how convenient it is to have PyCharm manage the virtual environment for you. Good luck with your Python programming projects! Feel free to contact us if you would like to see more articles about Python programming.
4 thoughts on “PyCharm virtual environment creation”
Comments are closed.