 by
by Working with Controller Area Network (CAN) on your Linux PC? Through the SocketCAN kernel modules, Linux supports CAN quite well. It can be a bit tricky though, to get your USB-to-CAN adapter configured and up-and-running. This tutorial not only explains how to bring up your SocketCAN network interface, it also shows you how to configure your Linux system to automatically bring up your SocketCAN network interface, each time you plug it in or boot up your Linux system.
Background
SocketCAN comprises drivers and a network protocol stack to bring CAN support to the Linux kernel. CAN stands for Controller Area Network and it is a distributed networking technology mostly seen on embedded microcontroller based systems. The CAN protocol, originally developed by Bosch, sees widespread use in the automotive industry. Due to its flexibility and reliability, factory automation and other industrial applications are adopting CAN as well.
While developing microcontroller firmware that needs to support CAN communication, you typically want a means of interacting with the CAN bus that your microcontroller communicates on. For this purpose you can attach a USB-to-CAN adapter between the CAN bus and your PC. For example a Peak PCAN-USB or a Kvaser Leaf Light. After connecting such a USB-to-CAN adapter to your Linux PC, you still need to perform a few steps before you can actually interact with the CAN bus:
- Load the SocketCAN related modules into the Linux kernel.
- Configure the SocketCAN network interface.
- Bring up the SocketCAN network interface.
By default, you need to repeat these steps after each reboot. This gets tedious if you often work with CAN on your Linux PC. The goal of this tutorial is to show you how you can automatically bring up a SocketCAN interface, when you boot your Linux system. We’ll start from scratch, so I’ll also explain how to manually bring up the SocketCAN interface, by performing the steps from the previous bullet list. Afterwards, I’ll show you how to automatically bring up the SocketCAN interface with the help of systemd-networkd.
What do you need
To complete the steps in this article, you need three things:
- A Linux desktop distribution installed on your PC.
- One of the USB-to-CAN adapters that SocketCAN supports.
- A CAN bus with at least one other CAN node connected to it.
I’ll be using Ubuntu 20.04 running as a VirtualBox virtual machine and a Peak PCAN-USB adapter. Additionally, I have a 2-wire CAN bus with 120 Ohm termination resistors on my desk. One end of the CAN bus connects to the Peak PCAN-USB adapter and the other end to an STM32 microcontroller. I programmed firmware on the microcontroller that sends out a periodic message on the CAN bus, for testing purposes.

Manually bring up the SocketCAN network interface
As a first step in manually bringing up your SocketCAN network interface, plug your USB-to-CAN adapter into your PC’s USB port. To verify that the Linux kernel detected your device, open up your terminal and run:
lsusb

Now that we know that the Linux kernel detected your device, we need to figure out the network interface name the Linux kernel assigned. Run the following command for this:
ip addr | grep "can"

In the previous two screenshots, you can see that Ubuntu detected my Peak PCAN-USB device, assigned it the can0 network interface name and that it’s in the DOWN state. So far so good!
Load the SocketCAN kernel modules
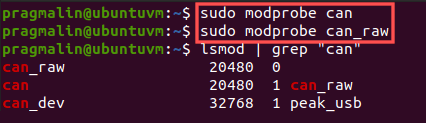
Before we can bring the can0 SocketCAN network interface in the UP state, we need to first load the SocketCAN related kernel modules. Open up the terminal again and run these commands:
sudo modprobe cansudo modprobe can_raw
To verify that the SocketCAN related kernel modules loaded properly, you can run lsmod | grep "can".
If something didn’t work with loading the Socket CAN kernel modules, then CAN support was not enabled when your Linux kernel was compiled. In this case you’ll have to recompile your Linux kernel with CAN support enabled. Luckily, all popular Linux desktop distributions (Debian, Ubuntu, Fedora and openSUSE) build their kernel with CAN support.
Configure and bring up the SocketCAN network interface
With the USB-to-CAN adapter plugged in and the SocketCAN kernel modules loaded, we continue with configuring the can0 SocketCAN network interface. The command for this is:
sudo ip link set can0 type can bitrate 500000 restart-ms 100
This configures the can0 network interface for a CAN communication speed of 500,000 bits/second. Feel free to adjust this to match the CAN communication speed on your CAN bus. Furthermore, it configures can0 to automatically re-initialize the CAN controller in case of a CAN bus off event, after 100 milliseconds. Feel free to adjust this if needed, but 100 milliseconds works fine in most cases.
With the can0 SocketCAN network interface configured, we can continue with the last step, which is bringing it in the UP state:
sudo ip link set up can0
To verify that the can0 SocketCAN network interface is now in the UP state, you can run the ip addr | grep "can" command one more time:

Verify the CAN communication with can-utils
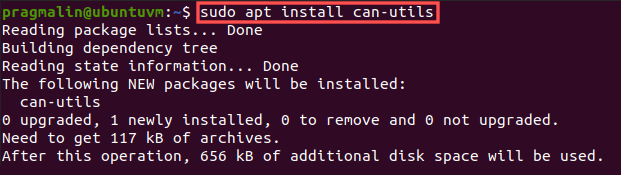
That’s it. Your Linux PC can now communicate with all other CAN nodes on the CAN bus. Hmm…but how do we actually do this on Linux? This is where the can-utils come in. The package can-utils contains a set of command-line programs for viewing and sending CAN messages. Before we can uses these programs, we just need to install the can-utils on our Linux system:
- Ubuntu/Debian:
sudo apt install can-utils - Fedora:
sudo dnf install can-utils - openSUSE:
sudo zypper install canutils
Receive a CAN message
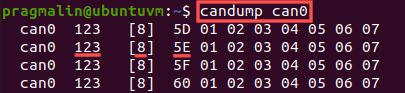
For receiving and displaying CAN messages, we can run the candump program from the terminal:
candump can0
While running, it lists all received CAN messages:
To close the program, press CTRL + c.
In the screenshot you can see that the node on my CAN bus periodically sends a CAN message. One with identifier 123 (HEX), 8 data bytes and an incrementing value in the first data byte.
Send a CAN message
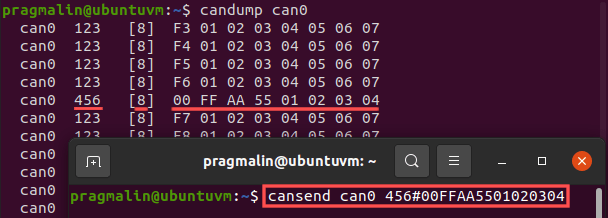
We can send a CAN message with the cansend utility. For example this CAN message:
- CAN identifier: 456h
- CAN data: 00h FFh AAh 55h 01h 02h 03h 04h (8 bytes)
To send this CAN message using our can0 CAN network interface, run this command in the terminal:
cansend can0 456#00FFAA5501020304
Note that you can run candump in another terminal at the same time, to see our transmitted message on the CAN bus:
Automatically bring up the SocketCAN network interface
In the previous sections you learned how to manually configure and bring up a SocketCAN network interface. Although this method works, it doesn’t persist after a reboot or after hot-plugging the USB-to-CAN adapter. Wouldn’t it be nice if your Linux system automatically brings up the can0 SocketCAN network interface? For example after your boot your Linux system or when you plug-in the USB-to-CAN adapter. Luckily this is possible and, as you’ll see, quite easy to setup.
Automatically load the SocketCAN kernel modules on boot
As a first step we configure the can and can_raw SocketCAN kernel modules to load automatically, when we boot our Linux system. To achieve this, we simply add a file to the /etc/modules-load.d/ directory that lists these modules. We can chose the filename ourselves, as long as it ends with the .conf extension.
From the terminal run the following command to create this file and to edit it with the Nano terminal text editor:
sudo nano /etc/modules-load.d/can.conf
Next, enter the can and can_raw kernel modules each on their own line:
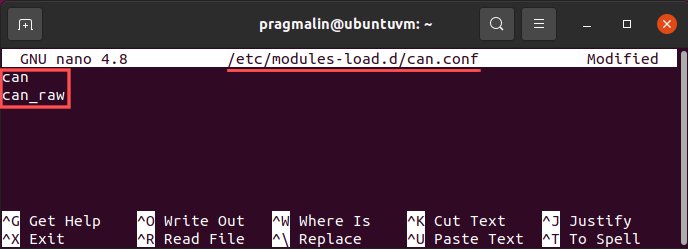
Afterwards, save the changes and exit Nano. The next time you boot your Linux system, these two kernel modules load automatically.
NetworkManager versus systemd-networkd for managing SocketCAN network interfaces
Several tools exist on Linux for managing network interfaces. To list the common ones: NetworkManager, wicked and systemd-networkd. Most Linux desktop distributions default to using NetworkManager. NetworkManager works great for WLAN and Ethernet network interfaces. Not so much for SocketCAN network interfaces, unfortunately. Luckily, systemd-networkd features support for SocketCAN network interfaces.
You can use both NetworkManager and systemd-networkd at the same time, as long as they are not trying to manage the same network interface. With other words, you can keep on using NetworkManager for your regular Internet connection. Then use systemd-networkd just for your SocketCAN network interface.
Debian, Ubuntu and Fedora install systemd-networkd by default. The installer just leaves it inactive. openSUSE does not install systemd-networkd by default, but you can easily remedy that by running command sudo zypper install systemd-network.
Before we move on with the configuration of our SocketCAN network interface, we need to first activate the systemd-networkd service. Run the following two commands from the terminal:
sudo systemctl start systemd-networkdsudo systemctl enable systemd-networkd
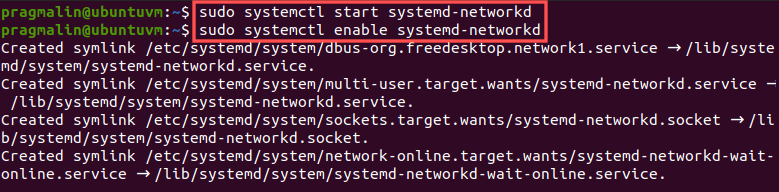
This starts the systemd-networkd service and makes sure it also starts the next time your boot your Linux system.
Configure the SocketCAN network interface with systemd-networkd
In the previous section we made sure systemd-networkd is active on our Linux system. The next step is to configure it, such that it automatically brings up our SocketCAN network interface. From the terminal run the following command to create the configuration for our can0 SocketCAN network interface:
sudo nano /etc/systemd/network/80-can.network
With this file open in the Nano text editor, add the following text to it:
[Match]
Name=can0

[CAN]
BitRate=500K
RestartSec=100ms
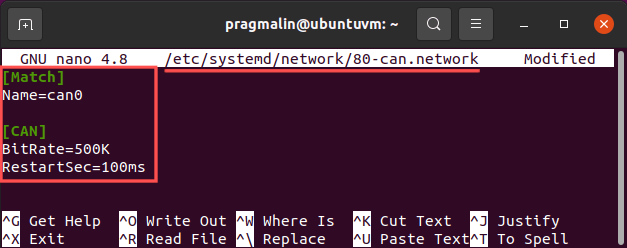
Once done, save the file and exit Nano. This configures our can0 SocketCAN network interface to communicate with a CAN bus as 500,000 bits per second. Upon occurrence of a CAN bus off event, the CAN controller on your network interface automatically restarts after 100 milliseconds. So the same settings as we previously used. Feel free to adjust them for your CAN network.
To enable this configuration file for our can0 SocketCAN network interface, we just need to restart the systemd-networkd service:
sudo systemctl restart systemd-networkd
To verify that bringing up the can0 SocketCAN network interface was successful, you can run the ip addr | grep "can" command again. Alternatively, you can run ip -details link show can0 for a bit more information:

If for some reason systemd-networkd could not bring up your SocketCAN network interface, you can obtain more information by running:
sudo systemctl status systemd-networkd
Refer to this previously published article for more information on using systemd services.
That’s it! Your Linux system now automatically brings up your SocketCAN network interface, when it boots or when you plug it in.
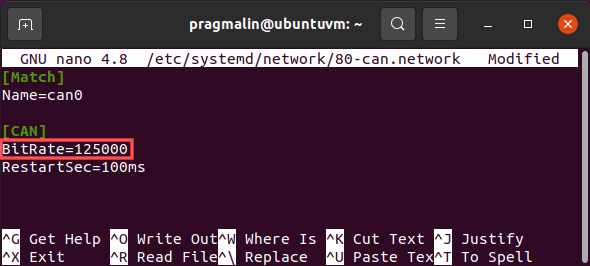
Change the CAN baudrate configuration
In the previous section, you learned how to automatically bring up your SocketCAN with systemd-networkd. The example configuration always configures the CAN communication speed (baudrate) for 500 kbits/second. What if you want or need to use a different CAN communication speed? Well, simply edit the 80-can.network configuration file and change the BitRate setting:
sudo nano /etc/systemd/network/80-can.network
Then restart the systemd-networkd service to activate the change:
sudo systemctl restart systemd-networkd
Wrap up
We covered a lot of ground in this article. Pretty much everything you ever need to know about working with Controller Area Network (CAN) on your Linux PC:
- Manually bring up a SocketCAN network interface.
- Send and receive CAN messages with the help of the can-utils programs.
- Automatically bring up a SocketCAN network interface with systemd-networkd.
Once you worked your way through this tutorial, you configured your Linux system to automatically bring up your SocketCAN network interface. Not only when you boot your system, but also when you plug your USB-to-CAN adapter into your PC.
Where to go from here after configuring a SocketCAN network interface on your Linux system? If you feel like coding, try building your own SocketCAN node application in the C or C++ programming language with the CAPLin framework: