 by
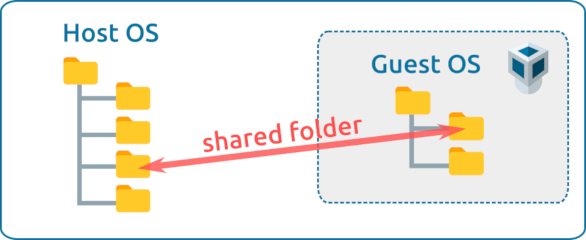
by Ever needed to access a file inside your virtual machine, which resides on your host operating system? With the help of VirtualBox’s shared folders feature, you can select a folder on your host OS to share. Inside your VirtualBox virtual machine you can then mount this shared folder. Once configured, you can easily exchange files between the host and guest OS. In this article you’ll learn how to configure and mount a shared folder on your Linux based VirtualBox virtual machine.
Background
VirtualBox comes with a feature called shared folders. As the name implies, a shared folder enables file sharing between the host and the guest operating systems. With the host operating system I mean the operating system, where you installed the VirtualBox program itself. The guest operating system is the one you run inside a VirtualBox virtual machine.
When you work with virtual machines, sooner or later you run into a situation where a file resides on the host OS and you want to access it on the guest OS, or the other way around. Some example scenarios:
- While trying out a new Linux distribution in a virtual machine, you want to configure the desktop environment the exact same way as on your host OS. This includes the background image. Through the use of a shared folder, you can quickly copy the background image to the guest OS.
- You took a few screenshots inside a guest OS. You want to insert these screenshot images in a document you are writing on your host OS. With the help of the shared folder, you can easily copy the screenshot image files to your host OS.
- You cloned one of your GitHub repositories inside your guest OS. After fixing or improving some code, you want to push the changes back to the remote repository. You need the correct SSH keys on the guest OS, for write access to your GitHub repository. Thanks to the shared folder feature, you can simply copy the SSH keys from your host OS to your guest OS.
This article shows you step-by-step how to configure and mount a shared folder for your Linux based guest OS, running as a VirtualBox virtual machine.
Shared folder alternatives
What if you do not want to use shared folders? In this case you can can use alternative methods for exchanging files:
Exchange files with a USB Stick
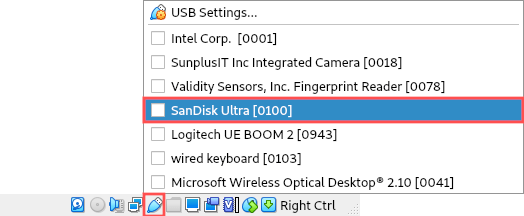
With VirtualBox you can access a USB stick, inserted into the host OS, on the guest OS. This article provides details on how to manually mount a USB stick from the terminal. To virtually insert the USB stick into the guest OS, right-click the little USB icon on your virtual machine’s status bar. A menu pops up where you can select which USB device to connect to the guest OS:
Copy files via SSH
In case you do not have a USB stick lying around, you can exchange files the way you typically do with a Linux server: good old SSH. This does require that you have an SSH server installed and running on your guest OS. For improved convenience and security, you could use SSH keys for accessing the guest OS. Refer to this article for details on how to copy files via SSH.
What do you need
The explanation presented in this article, assumes that you have a Linux based VirtualBox virtual machine. So for starters, you need a VirtualBox virtual machine, where you already installed Linux. The type of Linux distribution and desktop environment doesn’t really matter. Choose whatever you prefer.
In order to mount a shared folder inside your VirtualBox virtual machine, the VirtualBox Guest Additions should already be installed in the guest OS. This article explains how to do this for a Debian or Ubuntu based virtual machine.
Throughout this article I’ll use my Linux laptop, currently running Debian 10, as the host OS. It has VirtualBox installed. I already created a VirtualBox virtual machine based on openSUSE Leap 15.2. This virtual machine serves as the guest OS.
Configuring the shared folder
As a first step, we configure the shared folder. We do this from the VirtualBox user interface. Here’s a screen animation on how to configure the shared folder, followed by a description of each step:
- Select your virtual machine and open its settings dialog.
- Locate the Shared Folders category and click the little folder icon with the green plus-sign on it.
- On the Add Share dialog select the folder on the host OS that you want to share with the guest OS.
- I typically share my user’s Desktop folder, but you can change this to whatever directory you prefer.
- As a final step, check the Auto-mount check box. Click the OK button and start the virtual machine.
Permissions for accessing the shared folder
When the virtual machine of your guest OS finished booting, you can open your file manager. There, you’ll see a new device entry for the shared folder that VirtualBox automatically mounted for you. However, if you try to access the shared folder, you’ll notice that your user misses the necessary permissions to access the shared folder:
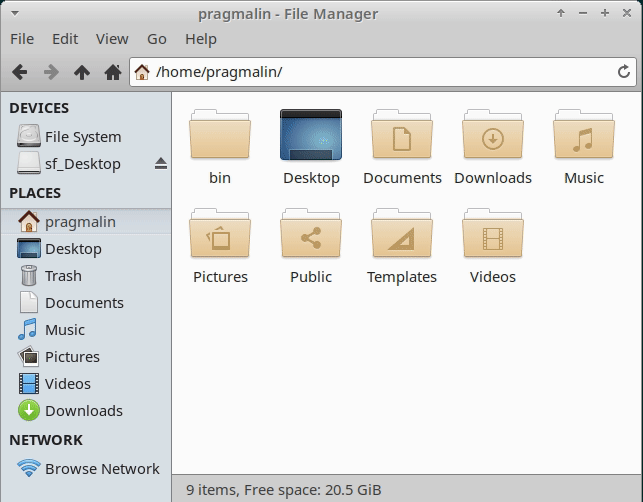
No worries, because we can easily fix this VirtualBox shared folder permission problem. Note though that the error message did tell us, where VirtualBox automatically mounted the shared folder to:
/media/sf_Desktop
Let’s find out which user and group owns the mounted shared folder. Run the following command from the terminal on the guest OS:
sudo ls -l /media/

From the command output we can deduce that:
- The root user owns the folder.
- Everyone in the vboxsf group has read, write and execute permissions.
With other words, we just need to add our own user to the vboxsf group. You can add your user to the vboxsf group by issuing this command from the terminal on the guest OS:
sudo usermod -a -G vboxsf $USER

For group changes to take effect, you should reboot your virtual machine. Afterwards, your user has full access to the shared folder, which VirtualBox automatically mounted to /media/sf_Desktop.
Specifying a specific mount point
As we saw in the previous section, VirtualBox automatically mounted the shared folder to:
/media/sf_<share name>
In our case, the <share name> was set to Desktop, resulting in the /media/sf_Desktop mount point. What if you don’t want to use that particular folder as the mount point? Well, we can easily configure a different folder for the mount point. Only two minor steps are involved:
- Make sure the folder for the new mount point actually exists on the guest OS.
- Change the mount point in the Shared Folder settings.
Let’s assume we want /mnt/shared as the mount point for our shared folder. Open up the terminal in the guest OS and make sure this folder exists:
sudo mkdir -p /mnt/shared

Next, shut down the virtual machine of the guest OS. After that, go to the Shared Folder settings of the virtual machine to specify our preferred mount point of /mnt/shared:
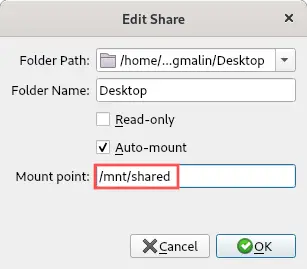
If you now start up the virtual machine of the guest OS, you’ll notice that VirtualBox mounted the shared folder to /mnt/shared, instead of the default /media/sf_Desktop.
Manually mounting the shared folder
In the previous examples, VirtualBox automatically mounted the shared folder for us, during system boot. Convenient, but not always wanted. This section shows you how to manually mount (and unmount) a VirtualBox shared folder.
Why would you not want to automatically mount a shared folder? Let’s say that you use the shared folder for backup purposes. So for backing up data from the guest OS, to your host OS. In this situation you should only mount the shared folder right before you run a backup. Then when the backup operation completed, you should unmount the shared folder. Otherwise the guest OS can always access the shared folder with backup data and potentially corrupt it if something goes wrong.
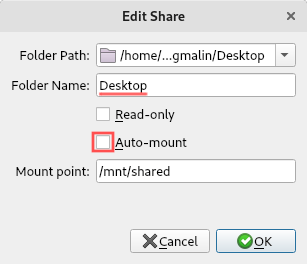
Disable the auto-mount feature
First we need to disable the auto-mount feature. With the virtual machine turned off, access the Edit Share dialog. On this dialog, uncheck the Auto-mount check box. Also make a note of the Folder Name, which is set to Desktop in my case:
Mount a shared folder manually
After disabling the auto-mount feature, start the virtual machine. At any point in time you can manually mount the shared folder with command syntax:
sudo mount -t vboxsf -o uid=$USER,gid=vboxsf [SHARE NAME] [MOUNT POINT]
Note that [SHARE NAME] should be the Folder Name, which you saw on the Edit Share dialog. In my case, I used the following command to manually mount the shared folder:
sudo mount -t vboxsf -o uid=$USER,gid=vboxsf Desktop /mnt/shared

The $USER part gets automatically replaced with your username, which is pragmalin on my guest OS. Your user now has full access to the shared folder.
Unmount a shared folder manually
Once you no longer need access to the shared folder, you can unmount it with this command syntax:
sudo umount [MOUNT POINT]
In the case of the previous example, run this command to unmount the share folder:
sudo umount /mnt/shared

Wrap up
After working your way through this article, you learned how to configure VirtualBox’s shared folder feature. The VirtualBox shared folder feature makes it possible for your guest OS, to mount a directory from the host OS. Once configured, you can easily exchange files between the host OS and the guest OS.
This article demonstrated three different approaches:
- Automatically mount a shared folder to a mount point assigned by VirtualBox. This is typically somewhere inside the
/mediadirectory on your guest OS. - Automatically mount a shared folder to a mount point of your choosing. We used
/mnt/sharedin the examples. - Manually mount (and unmount) a shared folder to a mount point of your choosing.
Just keep in mind that the VirtualBox shared folder feature only works, if you installed the VirtualBox Guest Additions on your guest OS.