by
by Although modern PCs no longer come with a physical serial port, plenty of devices still require RS232 serial communication to interact with them. With the help of an RS232-to-USB adapter you can easily connect them to your PC. Once connected, you might wonder: How do I monitor the serial port in Linux? Luckily several tools exist, both for the terminal and with a GUI. In this article I’ll introduce you to few popular programs to monitor the serial port in Linux.
Background
The mouse of my first PC connected to the serial port. As did my modem for dialing-in to my Internet provider over the phone line. But who actually still needs a serial port in the day and age of USB? Typically those working with microcontroller based systems. Think Arduino, Atmel AVR, Microchip PIC, STM32, etc.
All microcontrollers still feature a UART subsystem. UART stands for Universal Asynchronous Receiver/Transmit. UART enables these embedded devices to communicate serially with each other (RS232 / RS485 / Modbus), but also a PC. To communicate with such a device using your PC, its UART peripheral connects to your PCs serial port, with the help of an RS232 level shifter chip. The RS232 level shifter adjusts the voltage levels of the UART peripheral’s TX and RX lines (TTL) to those specified by the RS232 specification.
Most PCs no longer ship with a serial port, but luckily you can purchase a low-cost RS232-to-USB adapter to connect the standardized RS232 SUB-D9 connector to your PCs USB port. Even better, recent microcontroller designs include all the electronics for this on-board. For example with a FTDI FT232R chip. That way you can directly connect the board to your PC using a standard USB cable.
No matter what method you use for connecting the RS232 device to your PC, it shows up as a serial device. On Windows its a COM port such as COM1. On Linux it shows up as a teletype terminal (TTY) device such as /dev/ttyS0, /dev/ttyUSB0 or /dev/ttyACM0.
This tutorial explains how you can use Linux to monitor the serial port communication data and even interact with it. I typically use this while debugging microcontroller software or to send commands to the firmware running on the microcontroller.
A brief introduction to serial communication
A serial port offers a basic interface for communicating with external devices. It’s named serial because bits move serially through the communication line, meaning one bit after the other. The bits travel at a predetermined speed, also known as the baudrate. Typical baudrate settings: 9600, 19200, 38400, 57600 and 115200 bits per second. Serial communication consists of two wires, one for transmitting (TX) and one for receiving (RX) data. Each wire measures logic high when idle.
To transfer a full byte, the transmitting side first send a logic low bit (start-bit), then the eight data bits and finally another logic low bit (stop-bit). Meaning that a byte transfer actually consists of ten bits. These start- and stop-bits enable the receiving side to synchronize with the data stream. Because of the separate TX and RX wires, data can travel in both directions as the same time, also referred to as full-duplex communication.
What do you need
For this article you need two things:
- A Linux PC, ideally with desktop environment installed.
- A device that communicates via RS232.
The Linux PC can be anything, really. Your daily driver, a Raspberry PI or a virtual machine. For this article I decided on using my main PC, which runs openSUSE Tumbleweed. If you don’t yet have Linux installed, consider setting up Ubuntu as a virtual machine:
- How to install Ubuntu Desktop 20.04 LTS in VirtualBox
- Install VirtualBox guest additions in Ubuntu 20.04
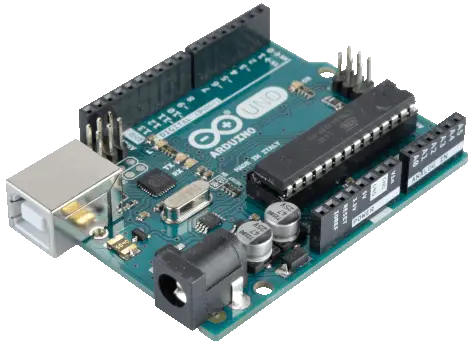
For the device, capable of communicating via RS232, I selected a good old Arduino Uno. As a Linux aficionado, with an interest in monitoring the serial port, you might even have one lying around. If not, consider getting one. Arduinos are a blast to tinker with and offer an educational entry into the field of embedded systems.
Example serial communication program for the Arduino Uno
For this tutorial, I created a small sketch for the Arduino. It does the following:
- It prints out a selection menu on the serial port.
- Then waits for your input, either 1 or 2.
- Blinks the on-board LED at the interval time, based on your menu selection.
The code for the sketch:
void setup() {
  /* Initialize digital pin LED_BUILTIN as an output. */
  pinMode(LED_BUILTIN, OUTPUT);

  /* Configure serial port for 9600 bits/second. */
  Serial.begin(9600);

  /* Output program info and its menu. */
  Serial.println("|**************************************|");
  Serial.println("|**        Serial port demo          **|");
  Serial.println("|**************************************|");
  Serial.println("");
  Serial.println("  Enter LED toggle time:");
  Serial.println("");
  Serial.println("    1: 100 milliseconds");
  Serial.println("    2: 500 milliseconds");
  Serial.println("");
  Serial.print("> ");

  /* Obtain user input. */
  bool entryValid = false;
  while (!entryValid) {
    /* Wait for reception of new data from the serial port. */
    while(!Serial.available()) {
      ;
    }
    /* Read out the received data as an integer value. */
    int option = Serial.parseInt();
    /* Process received menu option. */
    switch(option) {
      case 1:
        Serial.println(option);
        ledToggleTime = 100;
        entryValid = true;
        break;
      case 2:
        Serial.println(option);
        ledToggleTime = 500;
        entryValid = true;
        break;
    }
  }
}

void loop() {
  /* Toggle the LED with the selected time. */
  digitalWrite(LED_BUILTIN, HIGH);
  delay(ledToggleTime);
  digitalWrite(LED_BUILTIN, LOW);
  delay(ledToggleTime);
}
The remainder of this article assumes that you uploaded this sketch to your Arduino Uno. Furthermore, it assumes that you connected the Arduino to a USB port on your Linux PC. Alternatively, you can use any other device. As long as it communicates ASCII back at forth, for testing purposes. Refer to this article for more information on installing the Arduino IDE on Linux and building and uploading sketches to your Arduino board.
Finding the serial port device on Linux
Taking into consideration that you connected your serial communication device to your PC, using a USB cable, it shows up as either:
/dev/ttyUSBx/dev/ttyACMx
Where the x stand for a number depending on the amount of serial devices currently connected.
In order to monitor the serial port, we first need to determine its Linux device name. Run the following command to obtain a list:
ls -l /dev/ttyUSB* /dev/ttyACM*

As you can see in the above screenshot, the Arduino Uno shows up as device /dev/ttyACM0 on my system. That’s the device name to specify, when attempting to monitor the serial port on my Linux PC.
Setting up permissions to access the serial port device
The terminal screenshot from the previous section, listing the serial communication devices, holds more important information. Namely that only the root user or members of group dialout have permission to access it. With other words, you should add your own user to group dialout. Otherwise you cannot access the /dev/ttyACM0 serial device.
To add your user to group dialout, open the terminal and run command:
sudo usermod -a -G dialout $USER

Afterwards, run the groups command to verify that your user now belong to group dialout. You might have to reboot your Linux system first, for the group change to activate.
Monitor the serial port in Linux from the terminal
With the system setup out of the way, we can continue with the actual serial port monitoring part on your Linux system. We’ll start by doing this directly in the terminal. My preferred program to use for this purpose is called screen.
Installing the screen program
On my openSUSE Tumbleweed system, the installer automatically installed screen. I briefly fired up some virtual machines of other Linux distributions. Only to realize that Debian, Ubuntu and Fedora do not install screen by default. No worries, because here follow the installation commands:
- Debian and Ubuntu:
sudo apt install screen - Fedora:
sudo dnf install screen - openSUSE:
sudo zypper install screen
Running the screen program
The syntax for running screen to monitor the serial port on your Linux system:
screen [DEVICE NAME] [BAUDRATE]
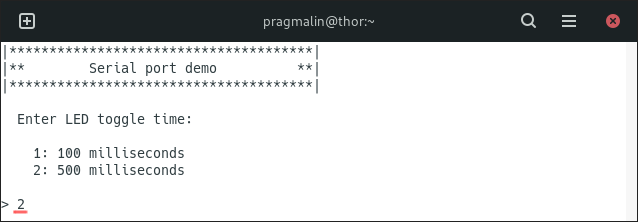
As seen in a previous section, my Linux system knows my Arduino Uno as a serial device with name /dev/ttyACM0. Furthermore, the sketch running on the Arduino Uno initializes the serial interface for a baudrate (communication speed) of 9600 bits per second. Taking these to configuration parameters into consideration, I start screen using this command:
screen /dev/ttyACM0 9600
After pressing the reset button on the Arduino Uno, the menu from the example program appears. This proves that the Linux system properly receives data from the Arduino Uno serial device. To test that we can send data back to the Arduino Uno, we can press either 1 or 2 on the keyboard. The on-board LED should then start blinking every 100 milliseconds or 500 milliseconds, respectively:
Closing the screen program
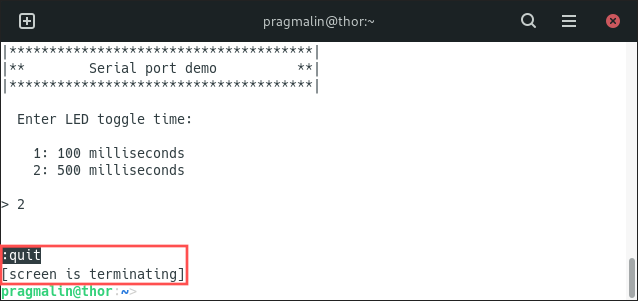
In my opinion, screen works great for monitoring the serial port on Linux. The only tricky and non-intuitive part is closing the screen program. You would expect that CLTR+c would to the trick or perhaps ESC. Unfortunately not. To properly exit screen, perform these two steps:
- Enter command mode by pressing CLTR+a .
- Type
:quitand press ENTER.
Monitor the serial port in Linux using a GUI application
For those that do not enjoy working directly in the Linux terminal, the CuteCom GUI application offers a solid alternative.
Installing the CuteCom program
Your Linux installer did not install CuteCom by default. No big deal, because we can quickly take care of this using the following installation command:
- Debian and Ubuntu:
sudo apt install cutecom - Fedora:
sudo dnf install cutecom - openSUSE:
sudo zypper install cutecom
Running the CuteCom program
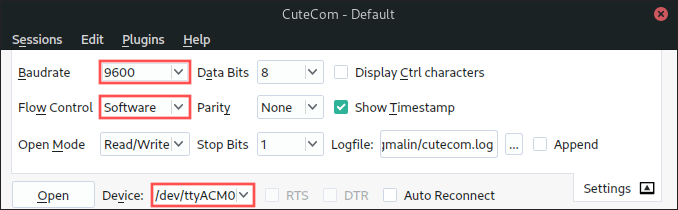
To run CuteCom, locate its launcher in your desktop environment’s application menu. Click the settings button, which you find in the top-right corner. The settings window drops down where you configure these settings:
- Serial device name to connect to. On my system this is
/dev/ttyACM0. - The communication speed (baudrate). The example Arduino sketch uses 9600 bits per second.
- Set the flow control to Software.
Afterwards, you can click the settings button once more, to roll up the settings window. With CuteCom configured to communicating with the Arduino Uno, continue by clicking the Open button on the user interface. Next, press the reset button on the Arduino Uno to verify that the menu from the example program appears:
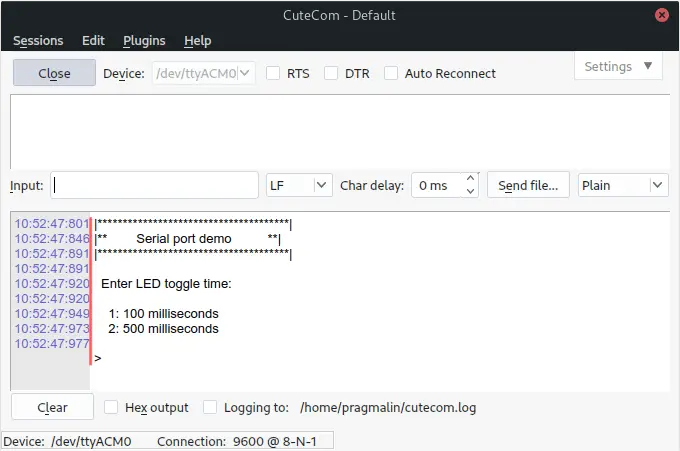
Knowing that data reception works, we continue by testing data transmission. Enter either 1 or 2 in the Input box and press ENTER to actually send it. The on-board LED should then start blinking every 100 milliseconds or 500 milliseconds, respectively. To close the connection with the serial communication device, click the Close button on the user interface.
Wrap up
The main question that the article answered was: How do I monitor the serial port in Linux? Two programs for this purpose were selected. One that works directly in the terminal (screen) and one that comes with a graphical user interface (CuteCom). At the end of the day, it boils down to personal preferences, to decide which on you want to use. Both get the job done.
What I disliked about screen is that it’s a bit tricker to figure out how to exit the program. First entering command mode by pressing CLTR+a . Followed by typing :quit and pressing ENTER.
CuteCom offers a user-friendly interface. My only pet peeve with CuteCom is that you can’t seem to change the font. I would prefer a monospaced font by default.
In case you didn’t like either one of these programs, alternatives exist. Have a look at minicom and putty for example.
Visit the following links for more serial port and Arduino related articles: