
 by
by Do you plan on running your Raspberry PI as a server? Perhaps you prefer to skip the Pixel desktop environment installation and install a different desktop environment instead? In these cases it makes sense to start with a minimal install of the Raspberry PI operating system. This way you start with a clean slate, which you can afterwards custom tailor to your needs. This article shows you step-by-step how to install the Lite edition, so a minimal Raspberry PI operating system.
Background
The first task for getting your Raspberry PI up-and-running is the installation of the Raspberry PI operating system. You can download this Debian based Raspberry PI operating system from the Raspberry PI website for free. Two options exist:
- You can start with a full blown Linux system, including the Pixel desktop environment.
- You can start with a minimal Linux system, without a desktop environment. Also known as the Lite edition.
This article shows you step-by-step how to install the Lite edition, so a minimal Raspberry PI operating system. Why would you want this? I can think of a couple of reasons:
- You plan on running your Raspberry PI as a server. For example a SAMBA server that acts as a network attached storage (NAS) device.
- You plan on installing a desktop environment other than the Pixel desktop environment. For example XFCE, LXQt, Mate, Gnome or KDE.
- You want to learn more about setting up a Linux system by installing everything manually one step at a time.
After you install a minimal version of the Raspberry PI operating system, you start with a clean slate. Afterwards you decide on what you want to install and how you want to configure it. Basically enabling you to setup your own custom tailored Linux system.
What do you need
To install a minimal version of the Raspberry PI operating system, you need the following:
- A Raspberry PI board, for example a Raspberry PI 4 or a Raspberry PI Zero W.
- A power supply for the Raspberry PI board.
- A micro-SD card of 4 GB or more in size.
- A USB keyboard.
- A computer monitor or TV.
- A cable for connecting the HDMI output to your monitor or TV.
Additionally, you need a PC with micro-SD card slot and Internet connection. You need the PC for downloading the Raspberry PI Lite operating system and writing it to the micro-SD card. It doesn’t really matter what operating system you run on your PC. It can be Linux, Windows or macOS. My PC runs Debian Buster with the Gnome desktop environment, which I’ll use throughout the explanations in this article.
Note that if no extra USB keyboard and TV or monitor are available, you can still install a minimal version of the Raspberry PI operating system. Such an installation procedure is called a headless install. You can find the headless installation instructions in a different tutorial.
Download the Raspberry PI Lite operating system
To kick off the hands-on approach in this article, let’s start with downloading the Raspberry PI Lite operating system. Point your browser to the download page on the Raspberry PI website: https://www.raspberrypi.org/downloads/raspberry-pi-os/. Next, click the Download ZIP button for Raspberry Pi OS (32-bit) Lite:

Once downloaded, open up your terminal in the directory that holds the ZIP-file. On my PC the ZIP-file is called 2020-08-20-raspios-buster-armhf-lite.zip and is located in directory /home/pragmalin/Downloads.
Continue with the next section where we’ll store the downloaded Raspberry PI Lite operating system on the micro-SD card.
Store the image file on the micro-SD card
At this point you downloaded the Lite edition of the Raspberry PI operating system. As a next step, we store this image file on the micro-SD card.
During this tutorial, we’ll use the Balena Etcher program for conveniently writing the image file to the micro-SD card. You can run Balena Etcher in Linux, Windows and macOS. Alternatively, you could use the dd program to perform the same task in the terminal. Refer to this tutorial for more info on using the dd program for this purpose.
Install Balena Etcher
Assuming that you didn’t yet install the Balena Etcher program, head over to the developer’s GitHub project for detailed installation instructions. Since my PC runs Debian, I ran the following commands from the terminal to install Balena Etcher:
- Add the Etcher Debian repository:
curl -1sLf 'https://dl.cloudsmith.io/public/balena/etcher/setup.deb.sh' | sudo -E bash
- Update and install:
sudo apt update
sudo apt install balena-etcher-electron
In case Balena Etcher doesn’t start, have a look at this fix.
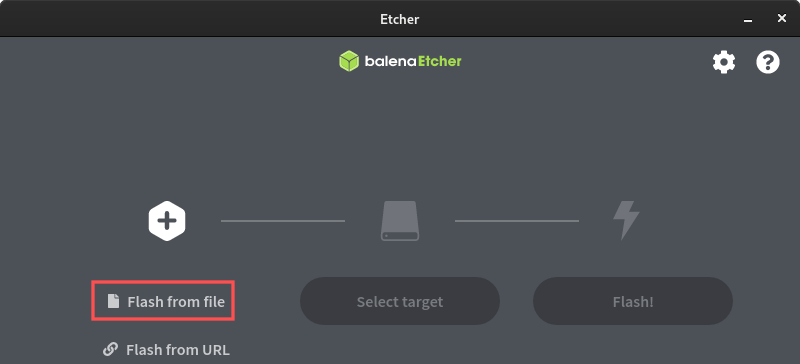
Write the image file to the micro-SD card with Balena Etcher
Insert the micro-SD card into your PC and start the Balena Etcher program. You can find it in your desktop environment’s application menu. Once Balena Etcher opens, select Flash from file on the user interface:
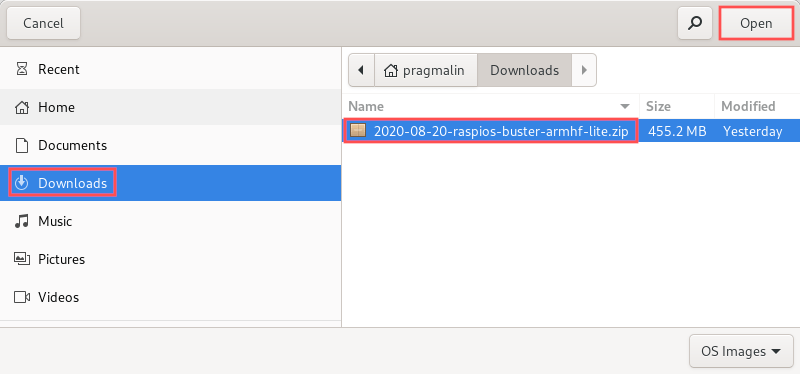
Select the Raspberry PI Lite operating system ZIP-file that we downloaded earlier:
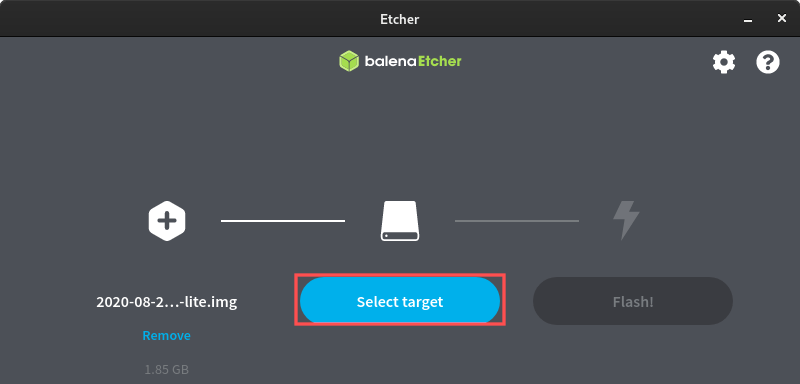
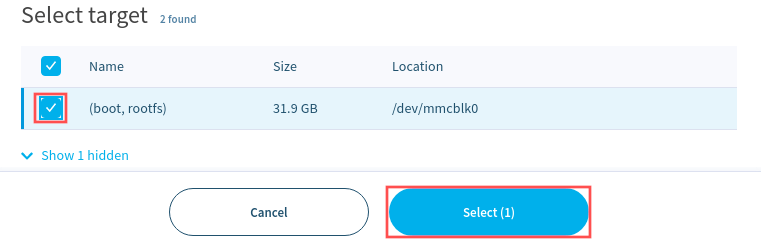
Once back on the main screen of the Balena Etcher user interface, click the Select target button:
On the Select target dialog, locate and select the micro-SD card. In my case it is /dev/mmcblk0:
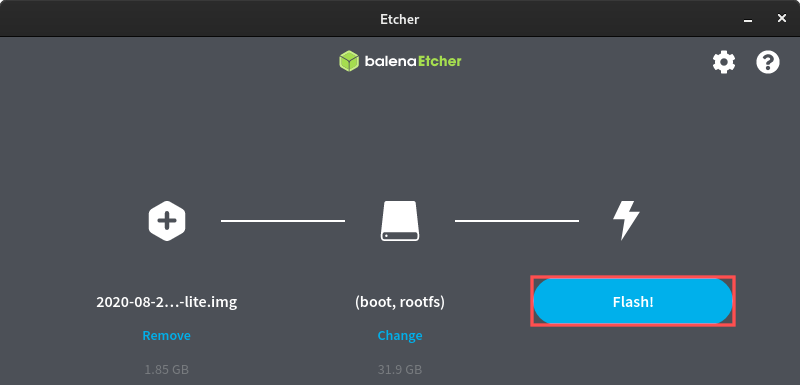
To start writing the Raspberry PI Lite operating system to the micro-SD card, click the Flash! button:
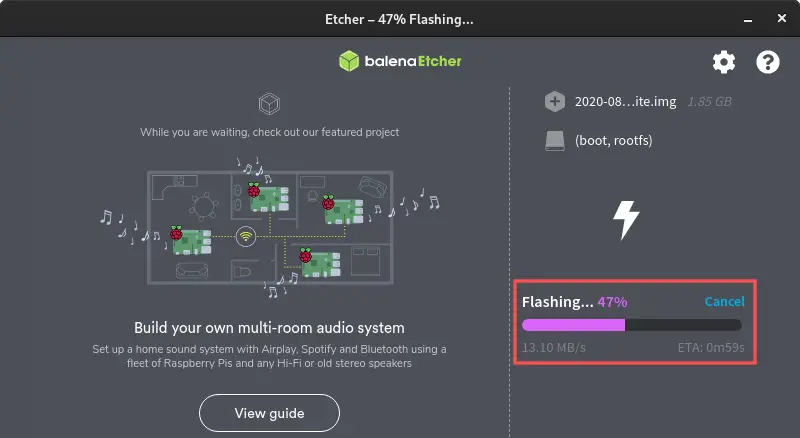
Note that you might be prompted to enter your sudo password, since writing to the micro-SD card requires elevated privileges. The actual write operating could take a couple of minutes. The user interface informs you about its progress:
Once Balena Etcher reports that it is done, you can simple close the program and remove the micro-SD card from your PC.
Boot and configure your Raspberry PI
Believe it or not, we are already half-way done with the install of the minimal Raspberry PI operating system. We just need to boot the Raspberry PI for the first time and complete its initial configuration.
Boot your Raspberry PI for the first time
Continue with these steps to boot your Raspberry PI for the first time:
- Insert the micro-SD card into the card slot on your Raspberry PI.
- Connect the Raspberry PI to your monitor or TV with a HDMI cable.
- Attach a USB keyboard to your Raspberry PI.
- Hook up the power supply to your Raspberry PI.
Once you hooked-up the power supply, your Raspberry PI starts booting the operating system for the first time. If you watch your screen, you’ll see the boot messages scroll by. When the operating system completed booting, it present you with a login prompt. Go ahead and login with these default credentials:
- Username:
pi - Password:
raspberry
Configure the Raspberry PI operating system
After a successful login, we’ll continue with the system configuration. Run the following command to start the Raspberry PI configuration tool:
sudo raspi-config
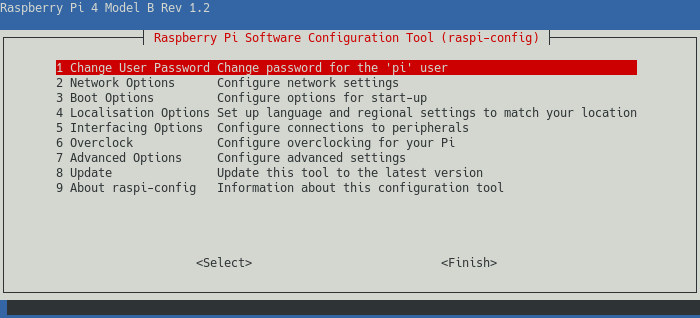
A quick overview for working with the Raspberry PI configuration tool:
- Navigate through the menu items with the ↑ and ↓ keys.
- Hit Enter to activate the highlighted item.
- Press Space to enable/disable an option, such as a check-box item.
- Press the Tab key to highlight a different part of the user interface, for example the Select and Finish buttons at the bottom.
Configure time zone
Let’s start by telling your Raspberry PI the time zone that it resides in:
- Select Localisation Options in the main menu and hit Enter.
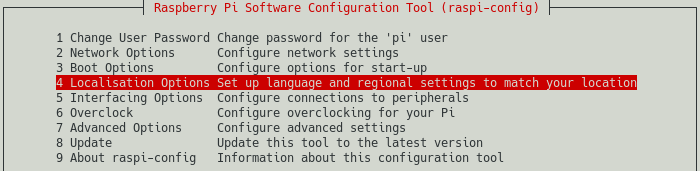
- In the sub-menu, select Change Time Zone from the sub menu and hit Enter.

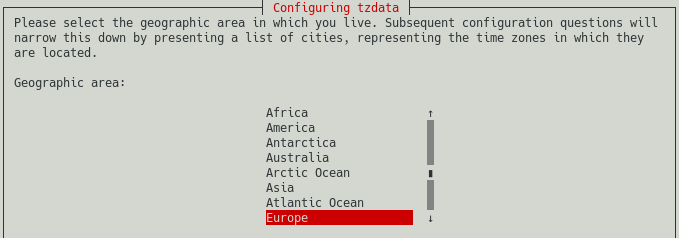
- On the next screen, select your Geographic area from the list and hit Enter.
- I selected Europe here.
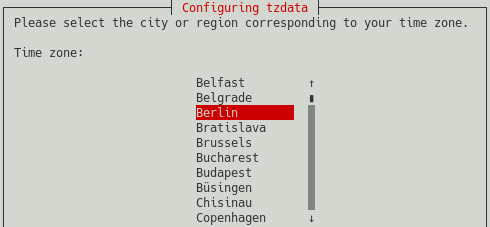
- Select the entry from the list that is closest to you and hit Enter.
- I selected Berlin here.
Once done the Raspberry PI configuration tool automatically returns you to the main menu.
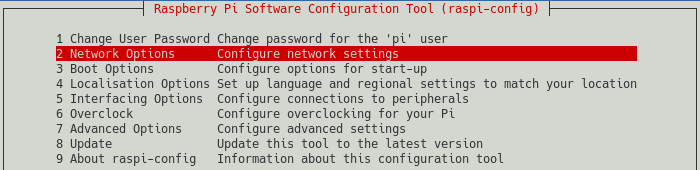
Configure Wi-Fi access
As a next step we can configure Wi-Fi access. This assumes that you want to connect your Raspberry PI to the Internet via the Wi-Fi adapter. If you plan on using an Ethernet cable instead, you can skip this section.
- Select Network Options in the main menu and hit Enter.
- In the sub-menu, select Wireless LAN from the sub menu and hit Enter.

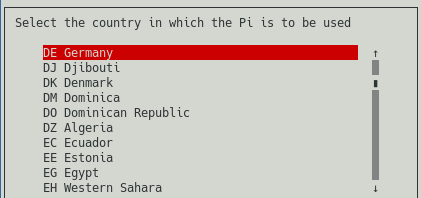
- On the next screen, select the country where your Raspberry PI is located from the list and hit Enter.
- I selected Germany here.
- Enter the name of the wireless network (SSID) to connect to and hit Enter.
- I entered Linksys00042 here.

- Enter the passphrase needed to gain access to the wireless network and hit Enter.

Once done the Raspberry PI configuration tool automatically returns you to the main menu.
Enable SSH access
By default the Raspberry PI operating system disables SSH access. Everyone with a Raspberry PI knows that the default username is pi with raspberry as the password. Therefore having remote SSH access enabled by default, would make it rather easy for an unwanted third party to login to your Raspberry PI.
However, if you plan on running your Raspberry PI as a server, you probably won’t have a keyboard and screen attached at all times. In this case you most likely plan on administrating your Raspberry PI via a remote SSH session. For this to work, SSH access needs to be enabled first. Note that if you do not need remote access via SSH, you can skip this section.
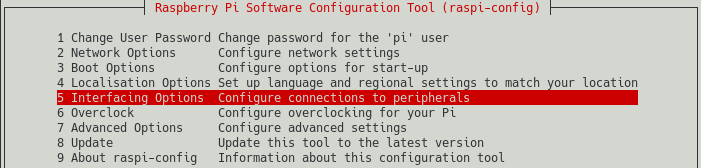
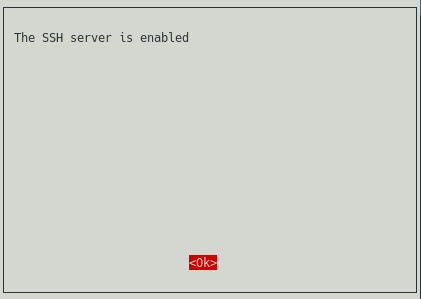
- Select Interfacing Options in the main menu and hit Enter.
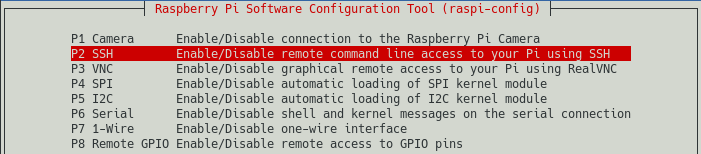
- Select SSH from the sub menu and hit Enter.
- Press Tab so highlight the Yes button and confirm enabling the SSH server by hitting Enter.
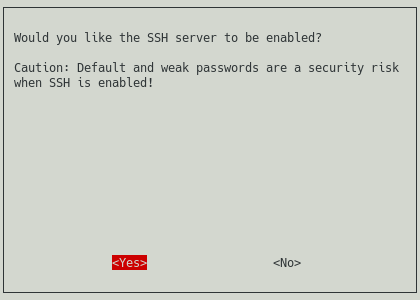
- Hit Enter to close the confirmation dialog about the SSH server being enabled.
Once done the Raspberry PI configuration tool automatically returns you to the main menu. Press the Tab key twice to highlight the Finish button on the user interface. Then hit Enter to close the Raspberry PI configuration tool. Note that you can restart the raspi-config tool at any time to make additional configuration changes in the future.
Reboot and test Internet connectivity
With all the basic configuration steps completed, reboot the Raspberry PI to make the changes active:
sudo reboot
Once the reboot completed, login again with these default credentials:
- Username:
pi - Password:
raspberry
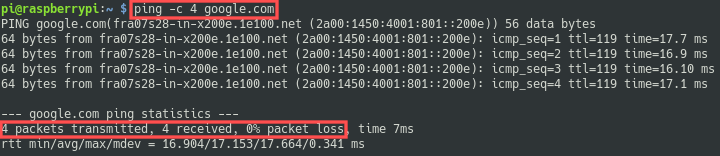
As a final step we can test if the Raspberry PI has Internet access. This verifies that we properly configured the Wi-FI access. Run a ping test and check if a response comes back:
ping -c 4 google.com
Upgrade the system packages
After the minimal install of the Raspberry PI operating system, I recommend that you upgrade the installed system packages. This applies the latest available security patches. Start by running the following command to check the availability of system package upgrades:
sudo apt update
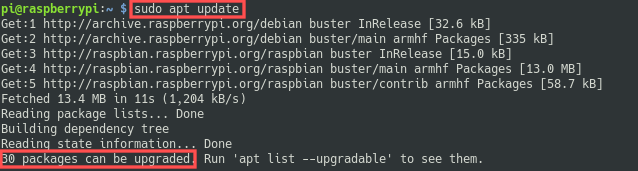
As you can see in the above screenshot, the apt package manager reports that 30 packages can be upgraded. To perform the actual package upgrade, run the command:
sudo apt dist-upgrade
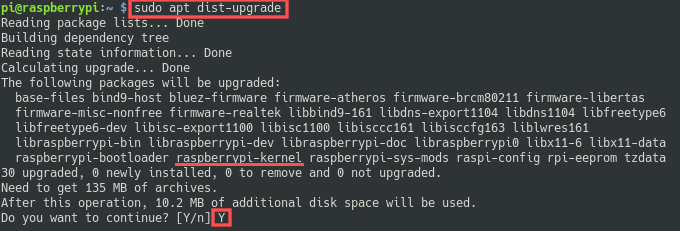
Note that the list of upgradeable packages included the actual Linux kernel. After a kernel upgrade, it is recommended to reboot the Raspberry PI. This makes sure the Raspberry PI runs with a kernel patched with the latest security fixes. Run this command to reboot the Raspberry PI:
sudo reboot
How often should you upgrade the system packages? Personally, I recommend once a week. Especially if others can access your Raspberry PI from the Internet. For example in case it functions as a live web and/or mail server. If access to your Raspberry PI is limited to those on your local home network, you could update a bit less often. For example once a month.
Keep in mind that the minimal Raspberry PI operating system we installed is based on the Debian distribution, similar to Ubuntu. This means that the two commands for upgrading the system packages also works for any other Debian and Ubuntu based system.
Create a new user and delete the pi user
At this point the minimal install of the Raspberry PI operating system is done. However, its security leaves something to be desired. As you noticed in a previous section, the default user is pi with password raspberry. Everyone that ever played with a Raspberry PI knows this. Thus it is highly recommended to change the password for the pi user as soon as possible. My personal recommendation is to take this a step further: create a new user and delete the pi user altogether.
Create a new user
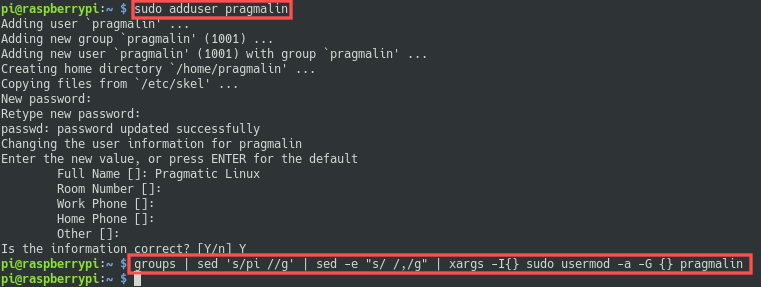
To create a new user, make sure you already logged into your Raspberry PI as the pi user and run the command:
sudo adduser <newusername>
Replace <newusername> with the username of your preference. Just make sure to not pick an obvious one that hackers might guess. Visit an online username generator, if you need inspiration. The command prompts you to enter some basic information about the new user, including the password. The password should be a strong one. You can generate such a password with online tools such as this password generator.
As a next step, add the new user to the same groups as the pi user belongs to (just excluding the pi group itself). By piping together a few commands, this can be achieved with a one-liner:
groups | sed 's/pi //g' | sed -e "s/ /,/g" | xargs -I{} sudo usermod -a -G {} <newusername>
Side note: At this point you might notice that not all keys on your keyboard behave as expected. By default the Raspberry PI operating system assumes a British (GB) QWERTY keyboard layout. You can change this with the Raspberry PI configuration tool (sudo raspi-config). Go to section Localisation Options and then select Keyboard. Next, follow the on-screen instructions for selecting your keyboard layout.
Before actually removing the pi user, we should first verify that the newly created user account actually works. Go ahead and logout the pi user:
exit
Next, login again but this time with the newly created user account. So specify the <newusername> username and password.
Delete the default pi user
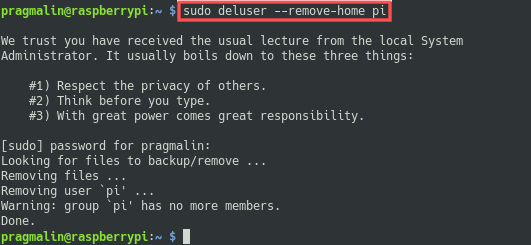
After verifying that you can login as the new user, it is time to remove the pi user, including its home directory:
sudo deluser --remove-home pi
All set! Congratulations on successfully completing your new install of the minimal Raspberry PI operating system.
Wrap up
In this article we performed a minimal install of the Raspberry PI operating system. Although the article seems lengthy, the actual procedure goes fairly quickly. You can have your Raspberry PI operating system up-and-running within about 10 minutes.
In a nutshell we performed the following steps:
- Downloaded the Lite edition of the Raspberry PI operating system.
- Wrote the downloaded ZIP-archive to the micro-SD card with the help of Balena Etcher.
- Booted the Raspberry PI for the first time.
- Configured the Raspberry PI: Time zone, Wi-Fi and SSH access.
- Upgraded the system packages to apply the latest security fixes.
- Created a new user account and removed the default
piuser.
Once you completed the minimal install of the Raspberry PI operating system, you can continue installing and configuring packages to custom tailor your system. You could make it a web, file or game server. Another fun exercise is the installation of the XFCE desktop environment on your Raspberry PI.
Before installing new software on your Raspberry PI, consider making a snapshot of your current Raspberry PI operating system. The snapshot enables you to quickly switch between projects or restore your Raspberry PI operating system, in case something went wrong.

4 thoughts on “Perform a minimal install on your Raspberry PI”
Comments are closed.