
 by
by Developing C or C++ applications with CMake and looking for a fitting development environment? I can highly recommend Visual Studio Code for this purpose. With the right extensions, Visual Studio Code offers excellent support for CMake projects. In this article I’ll show you how to install and configure Visual Studio Code. To the point that you can conveniently import CMake projects into Visual Studio Code and quickly start coding, building and debugging your C/C++ application.
Background
When developing an application in C or C++, I build the code either with the help of a Makefile or generate the build environment automatically using CMake. Over the past years, I noticed that I gravitate more towards CMake than Makefiles. CMake just offers so many benefits. To name just a few:
- Its syntax is easier than that of a Makefile.
- Not as picky when it comes to the use of spaces versus tabs.
- Automatically detects the installed compiler.
Last week I needed to code up a basic command-line program in C and I decided to go for CMake this time. Additionally, I wanted to use a development environment that offers good support for CMake. I wanted it to automatically detect the CMakeLists.txt file and prepare the build environment for me. Usually, Eclipse with the CDT plugin is my weapon of choice. But its support for CMake felt limited, to the point that I started looking for an alternative development environment.
After trying out a few (Geany, Code::Blocks, CodeLite, NetBeans, KDevelop) I eventually settled on Visual Studio Code. After finding and installing the right extensions, I was quite smitten with how well Visual Studio Code supports CMake for C/C++ development. In this article I’ll share my findings with you. I’ll show you how easy it is to import a CMake project into Visual Studio Code. To the point that you can code, build, run and debug your C/C++ application in Visual Studio Code.
What do you need
Since this blog covers Linux topics, I assume that you run a Linux desktop distribution. The choice of which one is up to you. For this article I decided on using Ubuntu Desktop 20.04 running in a VirtualBox virtual machine.
To complete the steps in this tutorial, you also need to install C/C++ development tools on your Linux system. Here are the installation instructions for the C/C++ development tools on popular Linux distributions:
- Debian/Ubuntu:
sudo apt install git gcc g++ gdb make cmake - Fedora:
sudo dnf install git gcc g++ gdb make cmake - openSUSE:
sudo zypper install git gcc gcc-c++ gdb make cmake
We’ll also need Visual Studio Code installed on our Linux system. I’ll cover the installation of Visual Studio Code in the next section.
Install Visual Studio Code on Linux
For installing Visual Studio Code on Linux, several options exist. I’ll list them in order of my personal preference:
- Use your distribution’s package manager to install the DEB (Ubuntu/Debian) or RPM (Fedora/openSUSE) package.
- Locate Visual Studio Code on flathub.org and install it as a Flatpak.
- Find Visual Studio Code on snapcraft.io and install it as a Snap.
In my experience, running desktop applications in a sandbox environment, such as a Flatpak or a Snap, works fine. They just tend to start-up a tad slower, compared to when you install them from a software package natively supported by your Linux distribution (e.g. DEB or RPM). For this reason I always prefer a DEB package for Ubuntu and Debian or an RPM package for Fedora or openSUSE, over a Flatpak or Snap.
As mentioned in the previous section, I selected Ubuntu Desktop 20.04 for this article. Therefore the following installation instructions cover the installation of Visual Studio Code as a DEB package.
As a first step, point your web browser to the download page on the Visual Studio Code website. Next, click on the download link of the 64-bit .deb package:
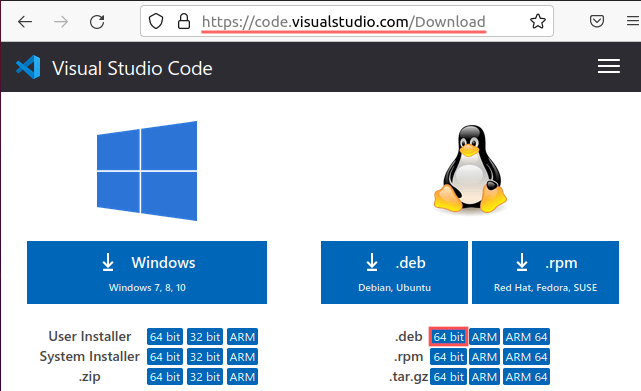
On my PC, the downloaded file shows up in my Download directory as: ~/Downloads/code_1.58.2-1626302803_amd64.deb. The filename can differ for you, in case the publisher released a newer version in the mean-time.
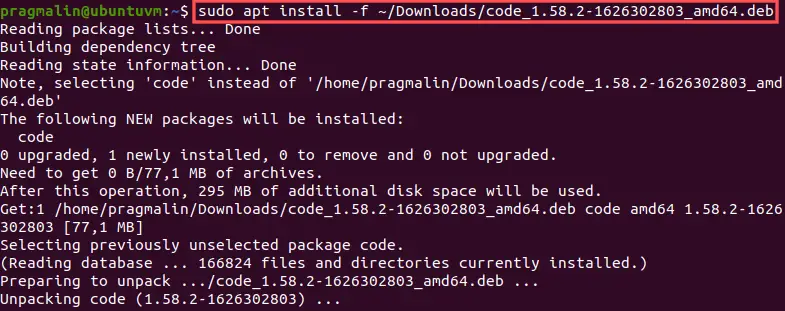
To install the downloaded Visual Studio Code DEB package on Ubuntu (or Debian), open up the terminal and run the following command:
sudo apt install -f ~/Downloads/code_1.58.2-1626302803_amd64.deb
Install C/C++ and CMake extensions in Visual Studio Code
By default, Visual Studio Code does not yet support developing in C/C++ or CMake projects. We can remedy this by installing the following two free extensions:
- C/C++: C/C++ IntelliSense, debugging, and code browsing.
- CMake Tools: Extended CMake support in Visual Studio Code.
To install these extensions, start Visual Studio Code. You can find an application launcher in your desktop environment’s application menu. Next, open the extensions screen by pressing Ctrl+Shift+x. To find the extension, enter its name in the search box and, once located, click the Install button. Repeat these steps for both the C/C++ and the CMake Tools extensions. When successfully installed, it looks like this:
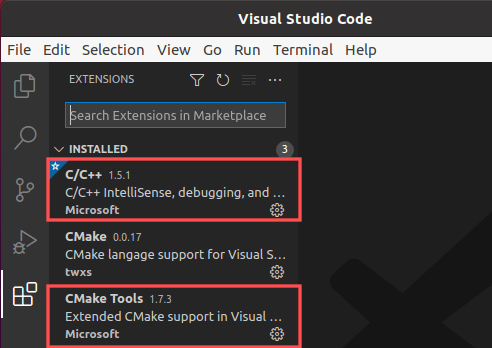
Note that the third extension (CMake by twxs) was automatically installed, when installing the CMake Tools extension.
Download the example CMake project
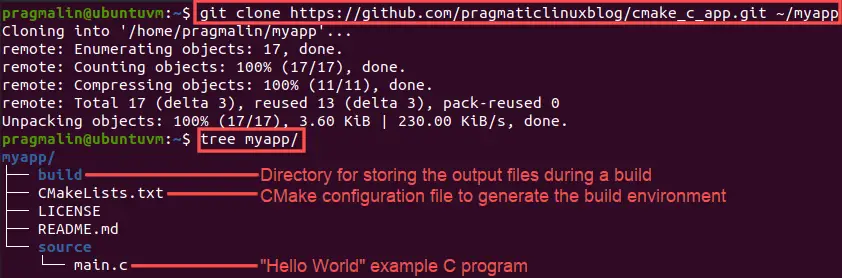
With Visual Studio Code all prepared for C/C++ development with CMake, we should take it for a spin. For this purpose, I prepared a simple Hello World type C application, which you can build with the help of CMake. You can find it at PragmaticLinux’s GitHub account. To clone the example CMake project, open the terminal and run the command:
git clone https://github.com/pragmaticlinuxblog/cmake_c_app.git ~/myapp
You can now find this example CMake project in subdirectory myapp inside your home directory:
Import the CMake example project into Visual Studio Code
After cloning the CMake example project and adding C/C++ and CMake support to Visual Studio Code, let’s see how it works. Open up Visual Studio Code and select File → Open Folder.. from the program menu. Next, browse to where we cloned the CMake example project. Basically, the directory that contains the CMakeLists.txt file, so ~/myapp:
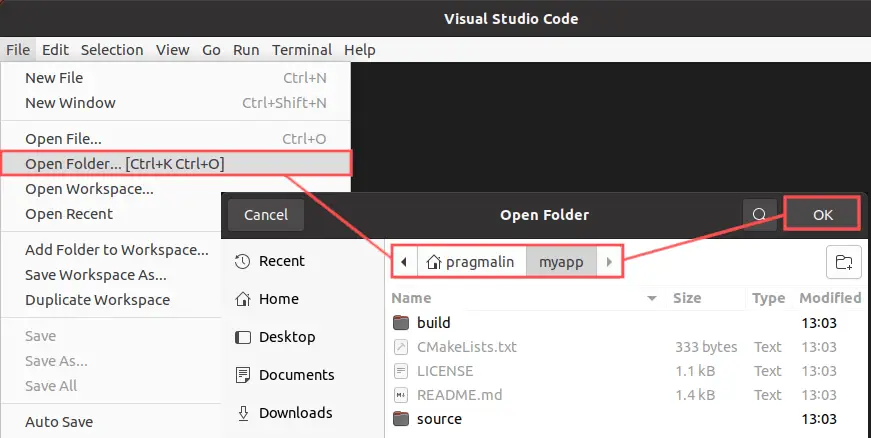
You might see a dialog where Visual Studio Code asks you if you trust the author of the files in the folder. You can click the Yes, I trust the authors button on the dialog to get rid of it.
After importing the CMake project into Visual Studio Code, move your gaze to the status bar at the bottom:

You can see two interesting things here:
CMake:[DEBUG]:Ready. This shows that Visual Studio Code indeed detected that our project is a CMake project. By default it will build a debug version of our application. Which is perfect during development and we can leave it at that. If you ever want to change the build type, you can simply click on this text in the status bar.No Kit Selected. A kit just means the C/C++ development tools we prefer to use. For example GCC or CLANG. You might have multiple development tools installed on your system. Therefore we need to inform Visual Studio Code’s CMake extension, which one to use.
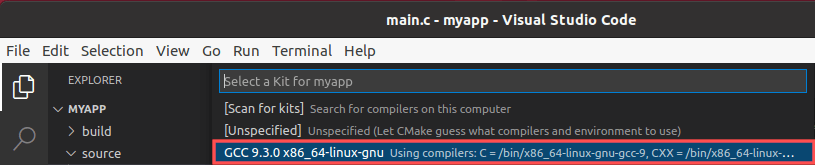
At this point, the only step left for us is to let Visual Studio Code know which kit we prefer to use in combination with CMake. To select the kit, click on the No Kit Selected text in the status bar. A selection box pops up at the top, where you can select C/C++ development tools that Visual Studio Code detected on your system. We installed GCC at an earlier step, so select that option:
Build, run and debug your CMake project in Visual Studio Code
As you saw in the previous section, to import the CMake project, all we had to do was:
- Open the folder that contains the
CMakeLists.txtfile. - Select the CMake kit to use. GCC in our example.
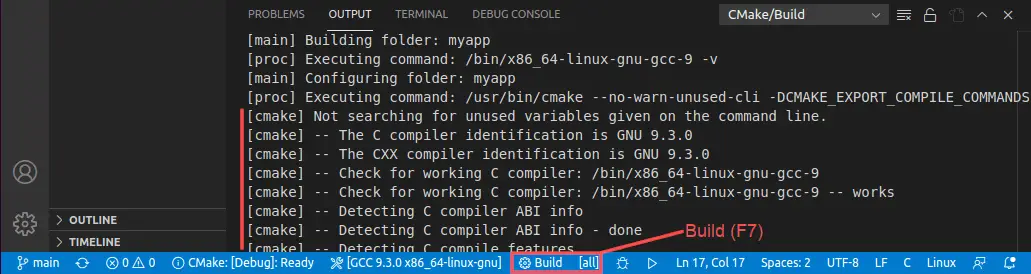
That’s all! We are now all set to do actual development work on our C/C++ application. Let’s start by building the example C program. Click on the Build text in the status bar or press F7. In the Output window you can follow the progress. If you look closely, you see that it first automatically uses CMake to setup the build environment:
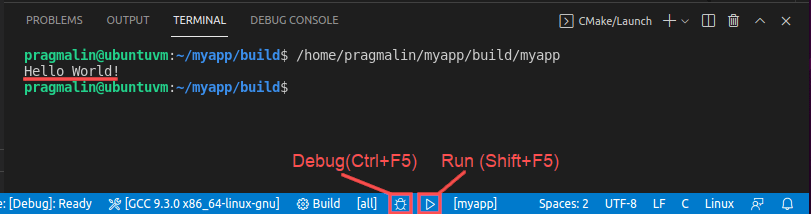
After building the C program, we can run or debug it. To run the program, click the little play icon in the status bar or press Shift+F5. To debug the program, click the little bug icon in the status bar or press Ctrl+F5. The program output appears in the Terminal window:
Wrap up
Visual Studio Code and CMake C/C++ projects go hand-in-hand, thanks to the extensions C/C++ and CMake Tools. Once installed, all you have to do to import a CMake project in Visual Studio Code:
- Open the folder that contains the
CMakeLists.txtfile. - Select the C/C++ development tools you would like to use. This is called the CMake kit.
From there on out you can immediately build (F7), run (Shift+F5) and debug (Ctrl+F5) your C/C++ program. The installed CMake extension automatically detects that you imported a CMake project into Visual Studio Code. The next time you build your C/C++ program, it automatically invokes the cmake program for you, to generate the build environment.
If you plan on developing C or C++ applications with CMake and are looking for a fitting development environment, I can highly recommend Visual Studio Code. If you enjoyed this article and developing with Visual Studio Code, you might also be interested in the article about how to install Visual Studio Code and .NET Core for C# coding on Linux.