
 by
by In this article you’ll learn how to install the XFCE desktop on your Raspberry PI. We’ll take a minimal install of the Raspberry PI operating system as a starting point. The XFCE installation on your Raspberry PI includes setting up all necessary building blocks, such as: display server, display manager, session manager, window manager and desktop environment.
Background
When you install the default Raspberry PI operating system, it presents you with the PIXEL desktop. The Raspberry PI foundation developed and maintains the PIXEL desktop. It offers a user-friendly desktop, with all basic features and applications included. For example: an application menu, a file manager, a text editor, etc. PIXEL is lightweight, meaning that it doesn’t consume a lot of RAM and CPU resources. This makes it run smoothly, even on a Raspberry PI Zero with only 512 MB of RAM.
So why would you want to switch to another desktop, such as XFCE? I can think of a few reasons:
- As a Linux desktop user, you probably did your fair share of desktop environment hopping. You might have settled on the XFCE desktop. Consequently, you prefer to run the XFCE desktop also on your Raspberry PI.
- Your Raspberry PI serves as a Linux learning platform. You would like to find out what it takes to install a desktop environment from scratch.
The new Raspberry PI 400
Over the years the Raspberry PI has gotten ever more powerful. It’s no longer just an embedded Linux board. Especially the Raspberry PI 4 packs enough CPU power and RAM for usage as you daily desktop computer. The Raspberry PI foundation thinks so too. Just look at the Raspberry PI 400 model they recently released. They market it as a “complete personal computer, built into a compact keyboard”:
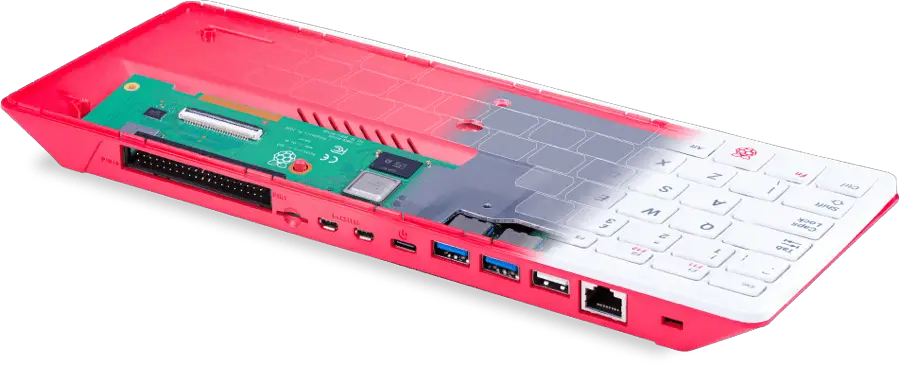
You no longer need to restrict yourself to the PIXEL desktop. The Raspberry PI 4 comes a quad-core 64-bit CPU and 2, 4 or 8 GB RAM. More than sufficient to run a ‘real’ Linux desktop such as XFCE, KDE or Gnome.
Why the XFCE desktop
So why did I select the XFCE desktop for this article? In my opinion the XFCE desktop sits nicely between the PIXEL desktop and the more resource intensive desktops such as Gnome and KDE. It offers a full desktop experience, while still being lightweight and with snappy responsiveness. The XFCE desktop is stable, well maintained and available in all major Linux distributions. It’s the desktop environment I personally select, when installing a Linux desktop on older hardware or in a virtual machine.
What do you need
To complete the steps in this article and install the XFCE desktop on your Raspberry PI, you need the following:
- Any Raspberry PI 4 board, including the new Raspberry PI 400.
- A power supply for the Raspberry PI board.
- A micro-SD card of 8 GB or more in size.
- A USB mouse
- A USB keyboard (not needed for the Raspberry PI 400).
- A computer monitor or TV.
- A cable for connecting the HDMI output to your monitor or TV.
Throughout this article, I assume you already installed the Raspberry PI operating system. I recommend the Lite edition. The Lite edition of the Raspberry PI operating system does not include a graphical desktop environment. That way you start with a clean slate.
I’ll be using my Raspberry PI 4 with 4 GB RAM to install the XFCE desktop. I already installed the Lite edition of the Raspberry PI operating system on it. Furthermore, I added a new user account for user pragmalin and removed the default pi user account, for security purposes. Although not necessary, I recommend that you start with the same foundation. Refer to the previously published tutorial on how to perform a minimal install on your Raspberry PI for step-by-step instructions.
Graphical desktop components
Before diving right into the installation of XFCE on your Raspberry PI, I would like to present a brief overview of all the components that go into a Linux graphical desktop. This theoretical background information is optional. Feel free to skip to the next section to continue with the hands-on XFCE installation part on your Raspberry PI.
Refer to the following illustration for an overview of all components:
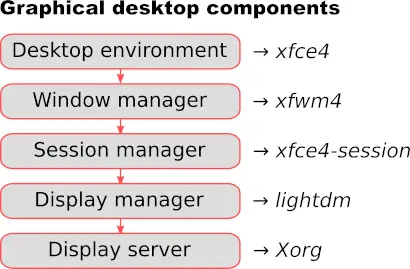
Note the added text after the arrow in the illustration. These are the specific components we’ll install for our XFCE desktop. For a Linux graphical desktop, the specific components can differ. For example, a Gnome desktop environment typically uses the gdm display manager instead of lightdm.
Display server
In order to do anything graphically, as opposed to just the basic command line, you need a display server. It provides the foundation needed by all the other components. It handles outputting pixels on the display and detecting input events from the mouse and keyboard.
Display manager
Think of the display manager as the login screen. It is the first thing that gets started if the operating system supports a graphical desktop. On this screen you enter your username and password to login. Furthermore, it offers you a choice of the desktop session to start.
Session manager
After logging in, the display manager hands control over to the session manager. Simply put, the session manager manages the state of the desktop of the logged in user(s). So which applications are running and what their window state and position is. Furthermore, the session manager makes it possible to save your desktop when you logout. Upon the next login it can automatically restore your desktop for you.
Window manager
The window manager controls the placement, movement and look of all windows and their controls (button, check box, etc). Its the one that draws the border around each window and adds the title bar. Additionally, the window manager enables you to tile, stack and move windows around.
Desktop environment
To have a fully functional graphical desktop you still need a bit more. For example an application menu, a task-bar panel showing running applications and notification icons. And then your basic suite of applications such as a file manager, terminal program, text editor, etc. The desktop environment combines all these parts. Its goal is to provide you with a cohesive and productive graphical user experience.
Install the XFCE desktop components
At this point you have a good understanding of what components you need, to install the XFCE desktop on your Raspberry PI. Time to get our hands dirty. We’ll install all the XFCE desktop components in one go on your Raspberry PI. This includes:
- Xorg display server
- lightdm display manager
- xfce4-session session manager
- xfwm4 window manager
- xfce4 desktop environment
Power up your Raspberry PI and login with your username and password at the console. Next, run the following command to install the XFCE desktop components on your Raspberry PI:
sudo apt install -y xserver-xorg xfce4 xfce4-goodies
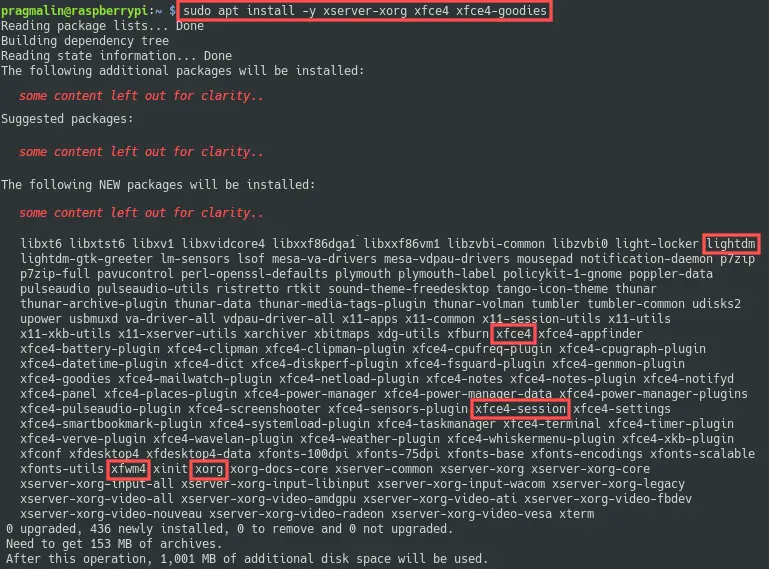
As you can see in the last line of the screenshot, all XFCE desktop components consume about 1 GB of disk space. With all the XFCE desktop components installed on your Raspberry PI, we continue with setting them up.
Setup the XFCE desktop components
In the previous section, we installed all XFCE desktop components on your Raspberry PI. As a next step we make sure the right desktop components are selected. If you started with a minimal install of the Raspberry PI operating system, this will most likely be the case already. However, if you previously installed a different desktop environment, we need to double-check this selection, to make sure it works for an XFCE desktop.
Select the display server
You probably only have one display server installed (Xorg), so you do not have to explicitly select one. However, it could be that you didn’t have a display sever installed before. In this case we need to verify that the display server gets started during boot.
Systemd should handle this for us. Without the presence of a display server, Systemd’s default boot target is the multi user shell. Also called multi-user.target. When installing a display server, Systemd’s default boot target should change to a graphical multi user shell. This one is called graphical.target.
To determine Systemd’s default boot target, run this command:
sudo systemctl get-default

It should output graphical.target. If it doesn’t, then you can set it manually by running the command:
sudo systemctl set-default graphical.target.
Select the display manager
The following component to select is the display manager. We want to select lightdm as the display manager. Easily achieved by running the following command:
sudo dpkg-reconfigure lightdm

Select the session manager
Next we’ll go ahead and select the session manager. Type this command in the terminal:
sudo update-alternatives --config x-session-manager
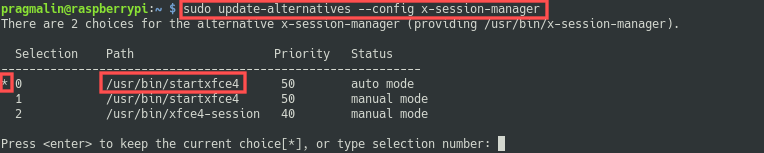
On this screen we need to make sure startxfce4 is selected as the session manager. Press Enter if startxfce4 is already selected, otherwise enter the number of the startxfce4 session.
A bit odd, right? In an earlier section I mentioned that we want the xfce4-session session manager. The selection menu lists xfce4-session, so why not pick it? The startxfce4 file consists of a script that initializes the XFCE session and under the hood calls the xfce4-session executable for us. This makes startxfce4 the better option here.
Select the window manager
Continue with the selection of the window manager. Run the following command:
sudo update-alternatives --config x-window-manager

On my Raspberry PI, xfwm4 is the only available window manager. Therefore no additional configuration is needed.
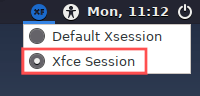
Select the desktop environment
You select the desktop environment on the login screen. So now would be the right time to reboot our Raspberry PI and wait for the login screen to show up. On the top right corner of the screen, there is a little icon you can click. Select Xfce Session from the drop-down menu:
Configure the XFCE desktop
At this point we completed installing and selecting the right components for the XFCE desktop on our Raspberry PI. In this section we’ll make some final configurations for our XFCE desktop. If you followed along step-by-step, you are now staring at the login screen. Go ahead and enter your username and password to login.
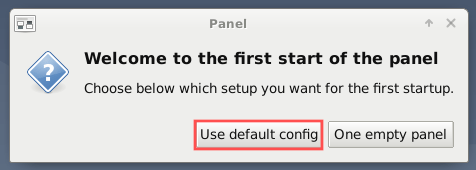
Panel layout
After logging in to your XFCE desktop for the first time, it presents you with a dialog. The dialog allows you to select a default panel layout for your desktop. Select Use default config here. This creates a traditional desktop layout with application menu with task bar that includes a notification area. It serves as a good starting point.
Remember username when logging in
Personally, I find it a bit cumbersome to enter my full username on the login screen every time. I would prefer it, if the lightdm display manager remembers the last logged in username. Ideally it would present me with a drop-down box to select my username, instead of me typing my username. Luckily, this is possible. We just need to change one setting in the lightdm configuration file.
Go ahead and edit the lightdm configuration file from the terminal with Nano. Refer to this article for a quick refresher on editing files with the Nano terminal text editor. Run the following command from the terminal:
sudo nano /usr/share/lightdm/lightdm.conf.d/01_debian.conf
Next change the value of greeter-hide-users to false:

Remove the black border around your screen
Depending on your monitor, you graphical desktop might not fill the entire screen. Just like in my case, you could see a black border around the screen. If your display does not present you with this problem, you can skip this section. Otherwise, follow along and we’ll fix it.
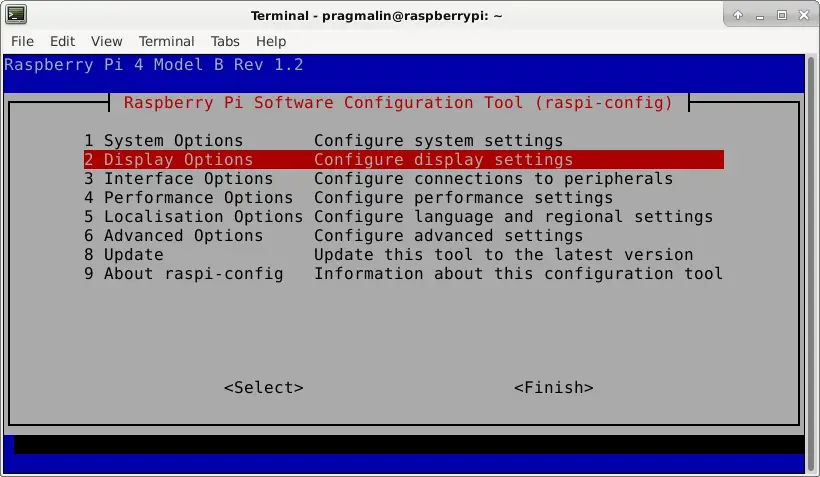
An incorrect setting for Underscan/overscan causes this problem. The good news is that we can easily change this setting with the raspi-config tool. Open up your terminal program and start the raspi-config tool:
sudo raspi-config
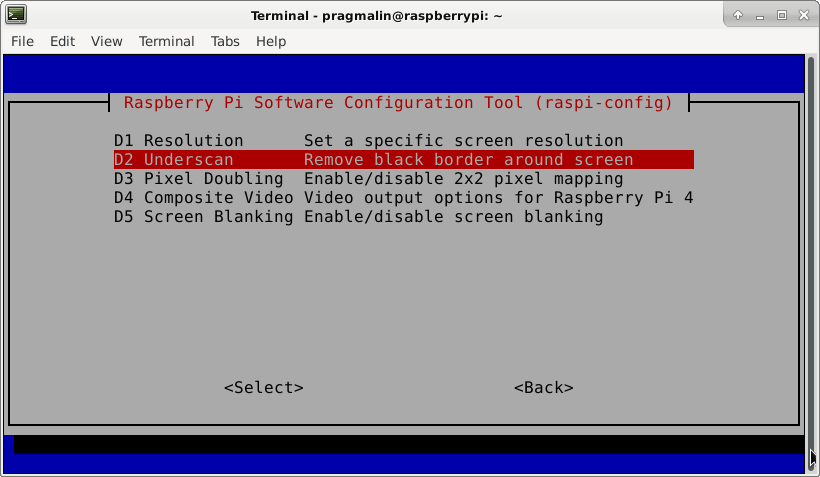
From the main menu, select Display Options:
On the next screen, select menu item Underscan from the menu:
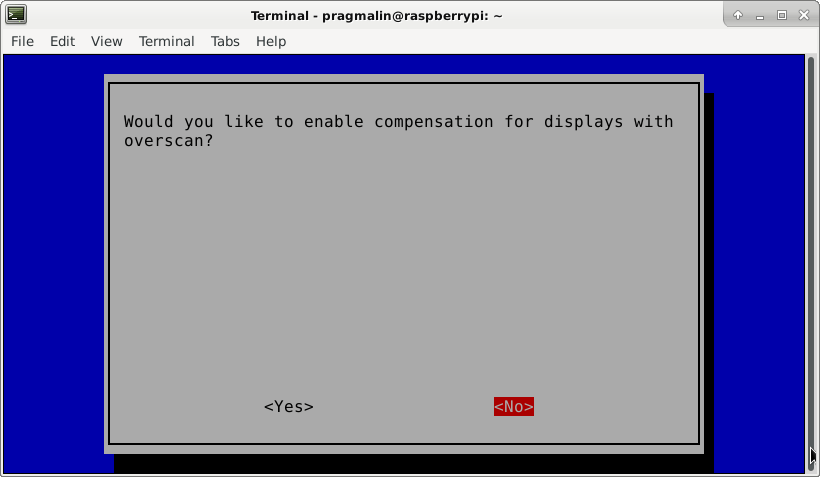
A dialog appears, allowing you to enable or disable compensation for displays with overscan. In my case, I had to select No here. I’m guessing the same is true for you. If it didn’t fix the problem, you can always go back into raspi-config and select Yes instead.
With the Underscan/overscan setting changed, reboot your Raspberry PI to verify that this configuration change fixed the problem.
Install additional desktop applications
Congratulations! You successfully completed the install of the XFCE desktop on your Raspberry PI. The XFCE desktop you installed, comes bundled with several applications. For example:
- Thunar file manager
- Mousepad text editor
- Terminal emulator
The XFCE desktop project offers several more applications for you to install. You can find an overview here: https://docs.xfce.org/apps/start. You can of course install other non XFCE specific applications as well. Which additional desktop application to install depends on your preference.
Personally, I prefer to have at least the following desktop applications:
- FireFox web browser
- Thunderbird e-mail client
- LibreOffice office suite
- GIMP and Inkscape for image editing
Here’s how I installed the above mentioned desktop applications:
sudo apt install -y firefox-esr thunderbird gimp inkscape libreoffice libreoffice-gtk3 libreoffice-gnome default-jdk
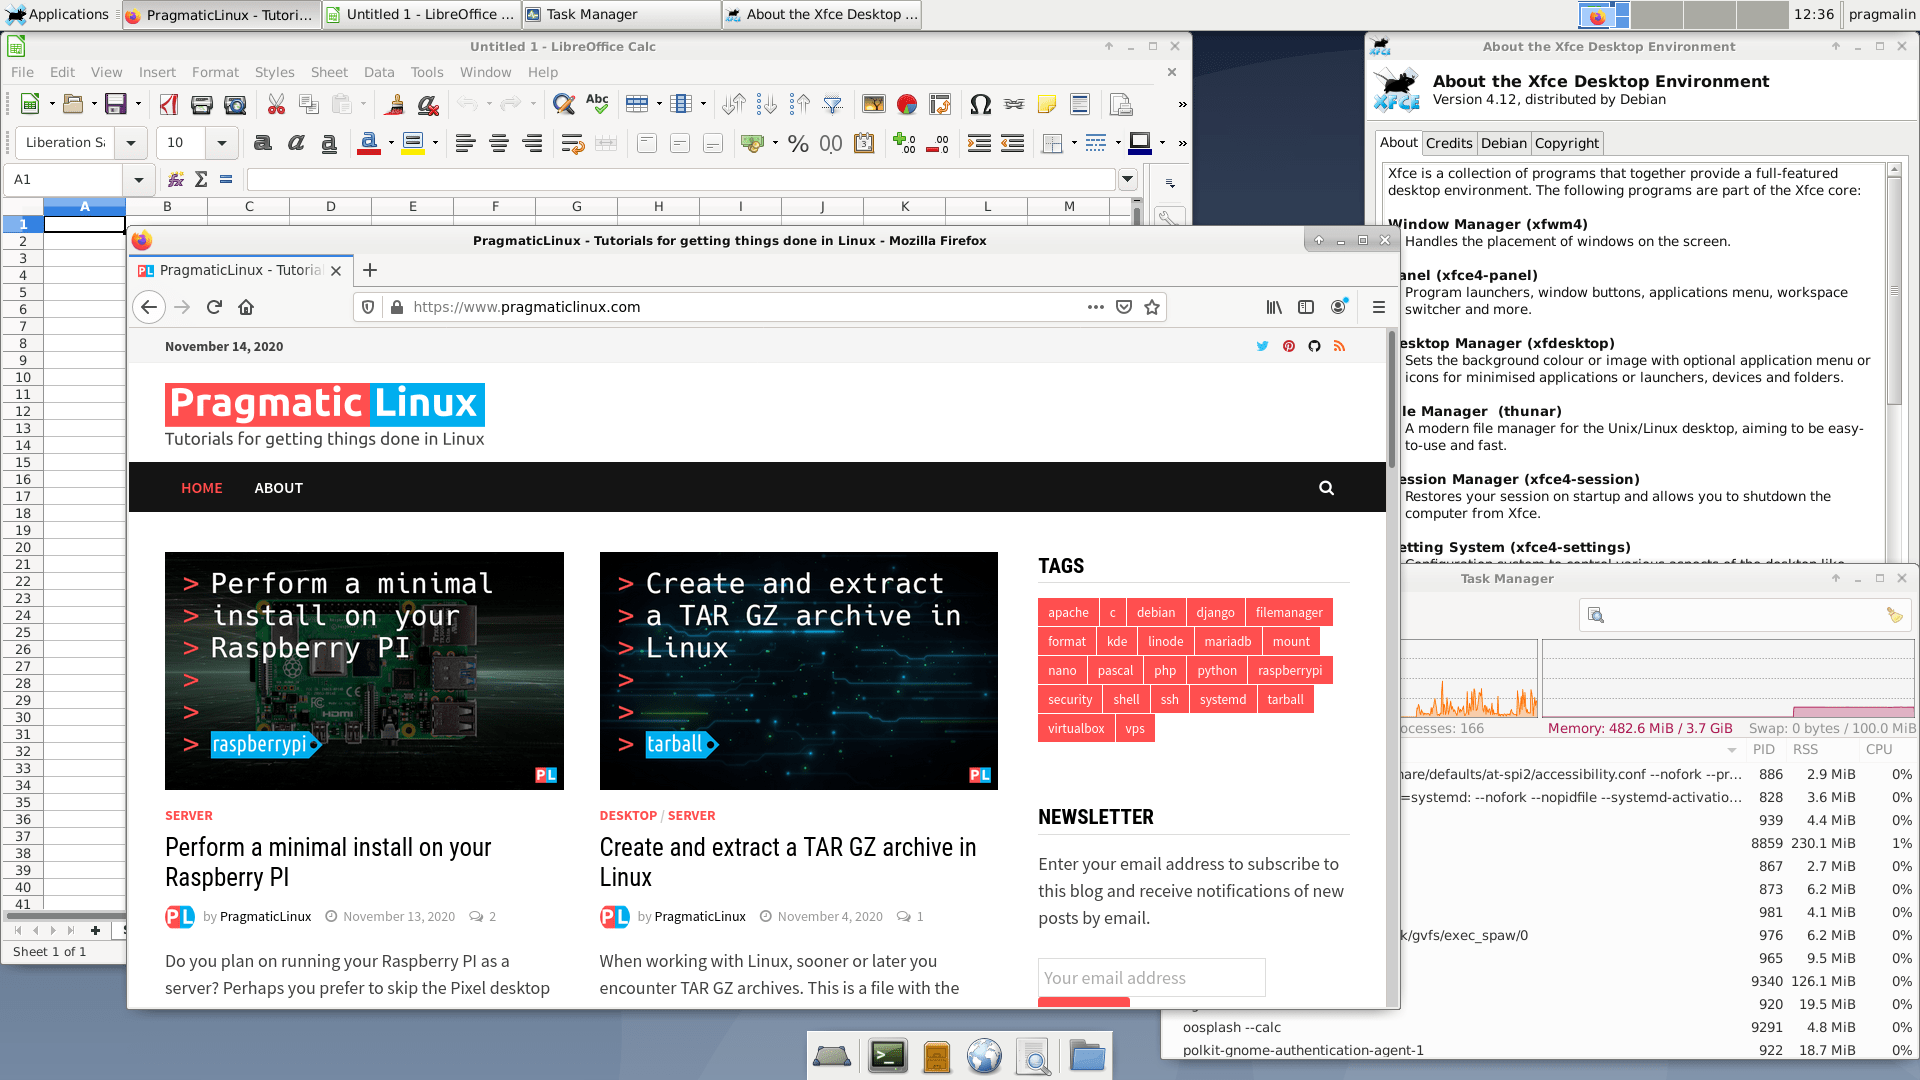
And to complete this section, here is a screenshot of my XFCE desktop in action on the Raspberry PI:
Wrap up
After going through this article, you now have the XFCE desktop installed and happily running on your Raspberry PI. This included the installation and configuration of all necessary building blocks:
- Xorg display server
- lightdm display manager
- xfce4-session session manager
- xfwm4 window manager
- xfce4 desktop environment
Where to go from here? Well, XFCE is highly configurable. The default layout looks a bit dated, but do not be fooled by this. With a bit of tweaking, you can make it look very modern and appealing. Start by changing your desktop background and installing a different theme, for example arc-theme. Next, install a different icon theme. The moka-icon-theme looks pretty good to me. The default application menu looks a bit simplistic and misses a search feature. Try replacing it with the whisker menu. Details on this can be found in the tutorial about how to install and configure the XFCE whisker menu.
Before installing new software on your Raspberry PI, consider making a snapshot of your current Raspberry PI operating system. The snapshot enables you to quickly switch between projects or restore your Raspberry PI operating system, in case something went wrong.


4 thoughts on “Install the XFCE desktop on your Raspberry PI”
Comments are closed.