
 by
by One of the first tasks when setting up a Linux web server is the installation of a LAMP stack. The acronym LAMP stands for Linux, Apache, MySQL and PHP. These components form the basic building blocks for pretty much any Linux based web server. For example, if you plan on installing a WordPress based website, you need a LAMP stack to run it. In this article you’ll learn how to install all the components of the LAMP stack step-by-step on a Debian 10 based server.
Background
Linux is the underlying operating system, where we install the remainder of the LAMP stack. Apache provides the HTTP server functionality, which makes it possible to serve web pages, when someone accesses the server through their web browser.
Sometimes a website needs access to an online database for data storage and retrieval. MySQL is such a database server. Although in this article, we will install MariaDB instead of the MySQL software. MariaDB offers a drop-in replacement with full MySQL compatibility. As opposed to MySQL, MariaDB is community developed and therefore preferred by most open source enthusiasts.
PHP forms the last component of the LAMP stack. PHP is a scripting language that can be embedded into HTML. As a so called hypertext preprocessor, the PHP code embedded into HTML executes on the server itself, before the HTTP server sends the resulting web page to the web browser. PHP offers a lot of functionality that is much needed to build dynamic websites. For example, without PHP your plain HTML page could not access a MySQL database.
What you need
To complete the installation of the LAMP stack, we need a Debian 10 based server. It doesn’t really matter where this server is located or what type of server it actually is. It just needs to run Debian 10 and should be accessible through SSH.
A previously published article shows you how to install a Debian 10 server as a VirtualBox virtual machine. If you do not yet have a Debian 10 server available to install the LAMP stack on, feel free to follow the instructions in that article to quickly set one up. For the remainder of this article, I’ll be using this exact same server as well. Its hostname is debianvm and my username on this server is pragmalin.
For those that prefer to build servers based on real hardware, consider using a Raspberry PI connected to your home network. You can refer to the article about how to setup your Raspberry PI 4 as a headless server to prepare your Raspberry PI for installing the LAMP stack. After all, the Raspberry PI operating system takes Debian as a foundation, so the instructions presented in this article will also work on a Raspberry PI.
If you’d rather build an actual online web server, you could setup a Debian 10 VPS with Linode. This option is especially interesting if you already have a domain name registered for your web server. In this case you can to follow the instructions about how to configure your domain name for your Linode VPS. Afterwards, you have everything you need to continue with installing the LAMP stack on your Debian 10 VPS.
Reconfiguring the firewall
Running a web server means that website visitors will need to access your server from the outside. They’ll open up their web browser and type in http(s)://your-fully-qualified-domain-name in order to view web pages. The HTTP protocol makes use of port 80 and the HTTPS protocol makes uses of port 443. If you have an active firewall on your Debian server, then we should first reconfigure it, to allow incoming connections on ports 80 and 443.
This leads us to the following question: Do you have a firewall running on your Debian server? The most commonly used firewall software on Debian is Uncomplicated Firewall (UFW). By querying its status, we can figure out if UFW runs on your Debian server. Open up a connection with your server via SSH and run the following command:
sudo ufw status
The output tells you if UFW is installed, inactive or active:
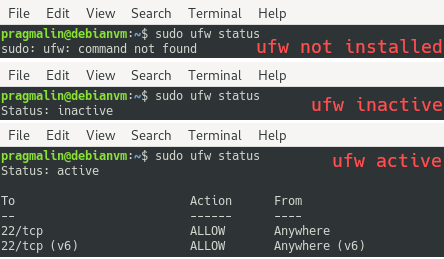
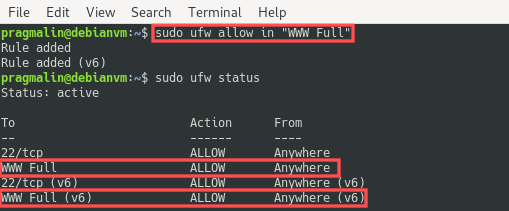
With an active UFW on your Debian server, run the following two commands to allow incoming connections on ports 80 and 443:
sudo ufw allow in "WWW Full"
sudo ufw reload
After making these changes, you can verify that it worked by running the sudo ufw status command again:
Installing Apache
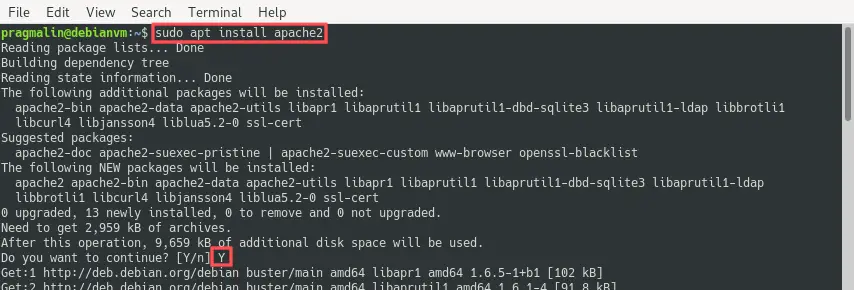
The first step to install the LAMP stack on our Debian 10 server, starts with the installation of the Apache HTTP server. Connect to your server via SSH and run this command:
sudo apt install apache2
During the installation, Debian automatically enables and starts the Systemd service. To double-check that Systemd properly started the Apache HTTP server, you could run the command:
sudo systemctl status apache2
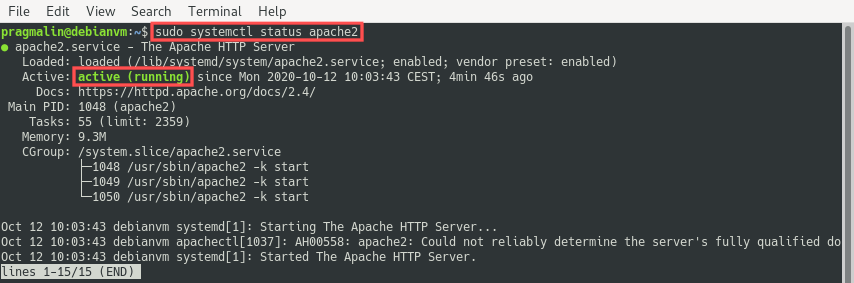
Pressing the q key, closes the command and gives you your terminal prompt back.
Note the warning message in the second to last line about “Could not reliably determine the server’s fully qualified domain name”. This Debian server runs on my local network for testing purposes only. Therefore I haven’t configured a Fully Qualified Domain Name (FDQN). With that in mind, this warning message can be ignored. If you run your server online and not just for testing purposes, make sure to properly configure the FQDN. Step-by-step instructions on how to achieve this, can be found in section “Configure the hostname and FQDN” towards the end of the article about how to configure a domain name for your Linode VPS.
Visiting the Apache test web page
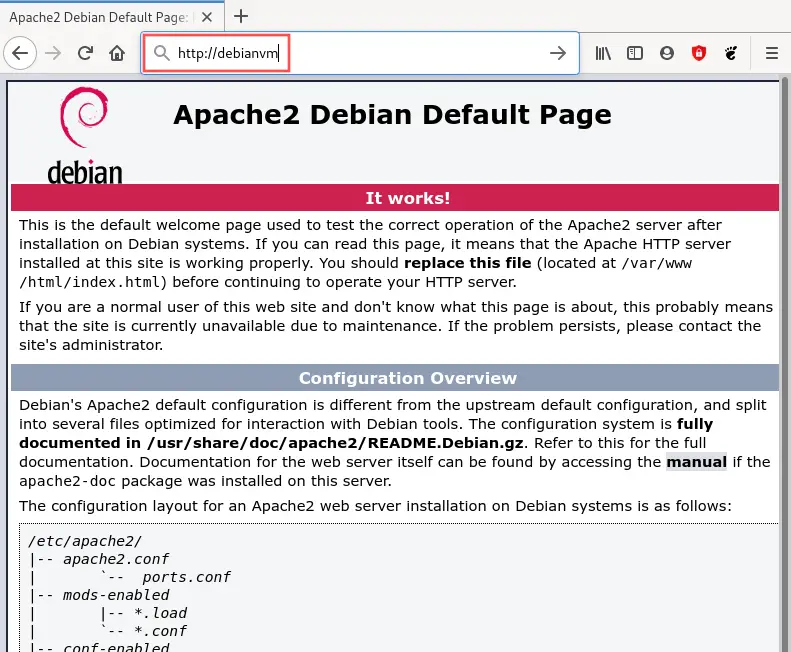
During the installation, Debian automatically enabled a default web site in the Apache configuration. It serves files from directory /var/www/html. If you list the files in this directory, you’ll find the file index.html there. This file serves as a test web page to verify the successful installation and enabling of the Apache HTTP server. As a final test to see if the Apache HTTP server runs as expected, open up your browser and visit the following URL:
http://<hostname> or http://<ip-address>
If you configured a FQDN and run your server online, you can visit this URL instead:
http://<fully qualified domain name> so typically something like http://www.yourdomain.com.
The hostname of my Debian 10 server, which runs on my local network as a VirtualBox virtual machine, is debianvm:
Feel free to delete the index.html file from directory /var/www/html now that you know the Apache HTTP server runs properly.
Disable directory browsing
The default Apache configuration on Debian allows directory browsing. This means that when a visitor accesses a specific directory of your website, which does not contain an index.html or index.php file, it will list all its contents:
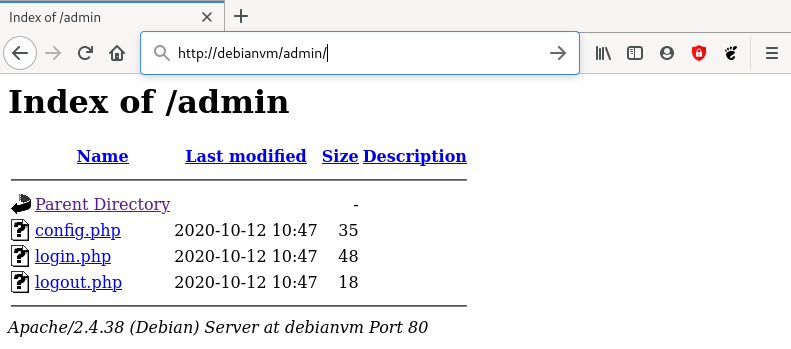
Personally, I do not want web site visitors to be allowed to see which files a specific directory holds. For this reason I always disable the directory browsing feature. This step is optional and depends on your own preference.
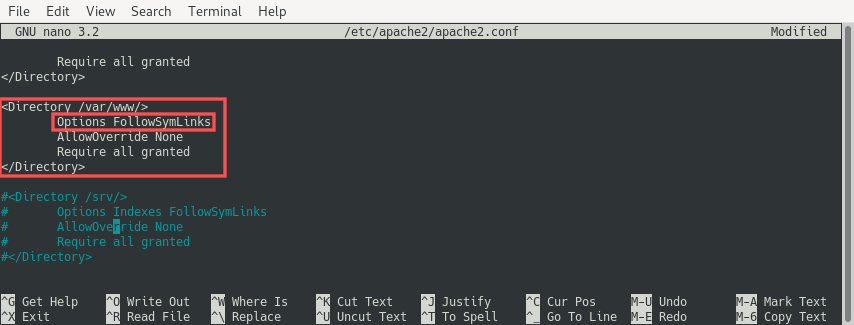
To disable directory browsing, edit the Apache configuration file with super user privileges. For example with the Nano terminal text editor:
sudo nano /etc/apache2/apache2.conf
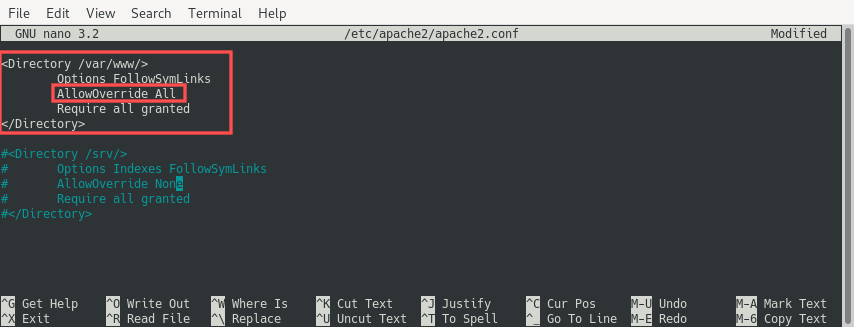
Find the Directory section for /var/www/ and remove Indexes from the Options. Afterwards, it should look like this:
Since we just changed the Apache configuration, restart the Apache HTTP server to activate the changes:
sudo systemctl restart apache2
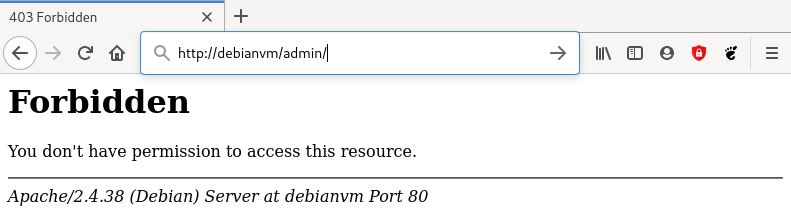
If a user now attempts to visit a directory to list the files it contains, access is denied:
Enable Apache module mod_rewrite
Apache ships with several modules to extend its default functionality. One popular module is called mod_rewrite. The mod_rewrite module enables you to rewrite URLs based on a regular expression in for example a .htaccess file. Several web applications, including WordPress, make use of this feature. Without the mod_rewrite module, permalinks in WordPress wouldn’t work. For this reason I highly recommend enabling the mod_rewrite module.
To enable the mod_rewrite Apache module, run the following command:
sudo a2enmod rewrite
At this point, the mod_rewrite module is enabled, but rewrite rules can only be added directly in the Apache HTTP server’s configuration file. A lot of web applications count on the fact that the Apache HTTP server can also read and process these rewrite rules from a .htaccess file. For this to work, we need to still make one minor update in the Apache configuration file:
sudo nano /etc/apache2/apache2.conf
Find the Directory section for /var/www/ again and change the AllowOverride None line to AllowOverride All. Afterwards, it should look like this:
Since we just changed the Apache configuration, restart the Apache HTTP server to activate the changes:
sudo systemctl restart apache2
All right, this completes the HTTP server installation. The next section continues with the PHP installation.
Installing PHP
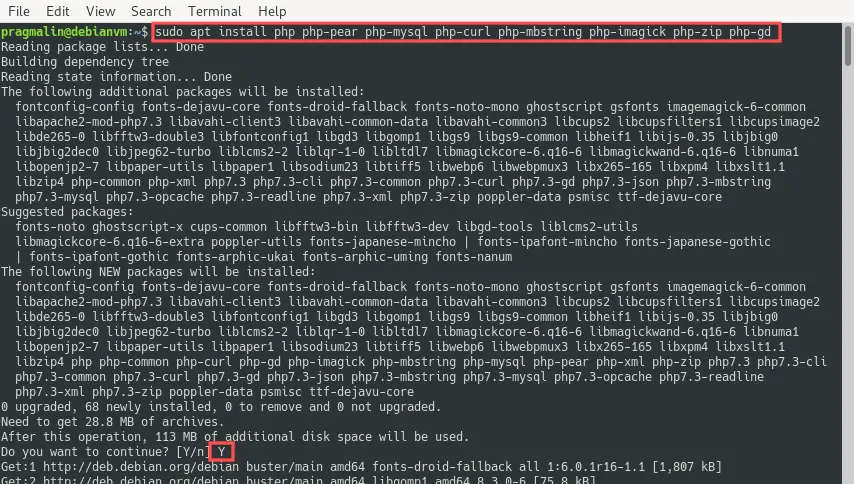
With the Apache HTTP server up and running, we can continue with the next component in the LAMP stack. The installation of PHP is straightforward. Simply run the following command to install PHP together with commonly use add-on modules:
sudo apt install php php-pear php-mysql php-curl php-mbstring php-imagick php-zip php-gd
When Debian installs PHP this way, it also installs and enables an extra module for the Apache HTTP server (libapache2-mod-php). For this reason we should restart the Apache HTTP server:
sudo systemctl restart apache2
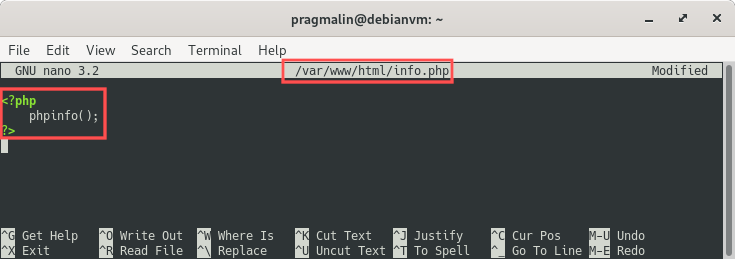
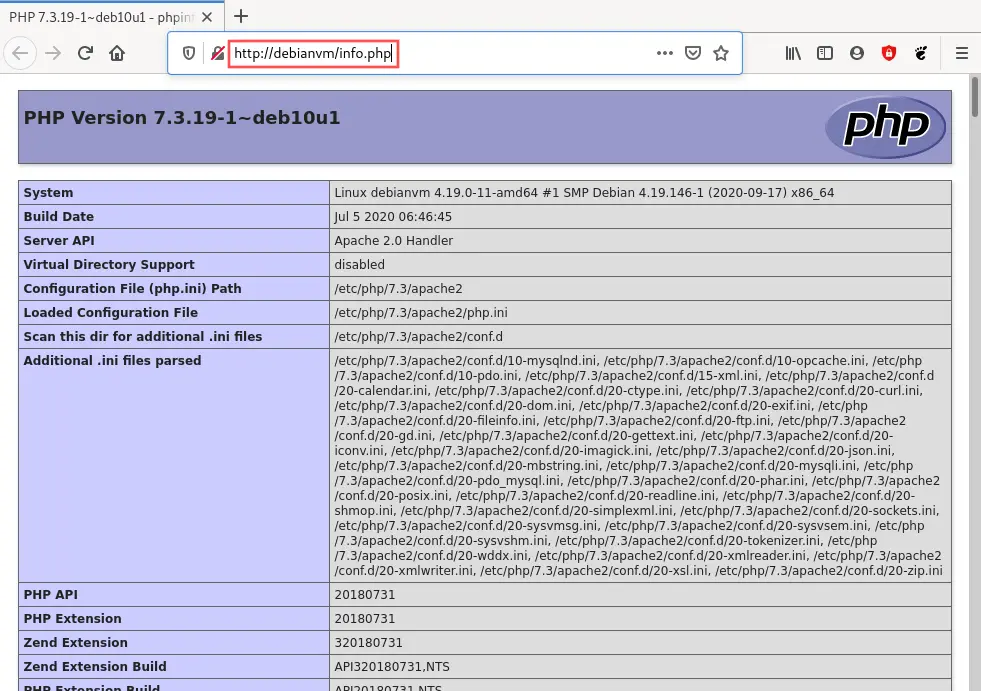
To test the successful installation of PHP, we can create a temporary PHP info page. Create the following new file with the Nano editor:
sudo nano /var/www/html/info.php
Add these contents:
<?php
    phpinfo();
?>
Once you saved the file, proceed by serving it up in your web browser by typing in the URL:
http://<hostname>/info.php or http://<ip-address>/info.php
In my case I used: http://debianvm/info.php. You will see a PHP info page that looks similar to this screenshot:
After completing this PHP installation verification, feel free to remove the PHP info file again:
sudo rm /var/www/html/info.php
Two components down, one to go. Continue with the next section for the MariaDB installation.
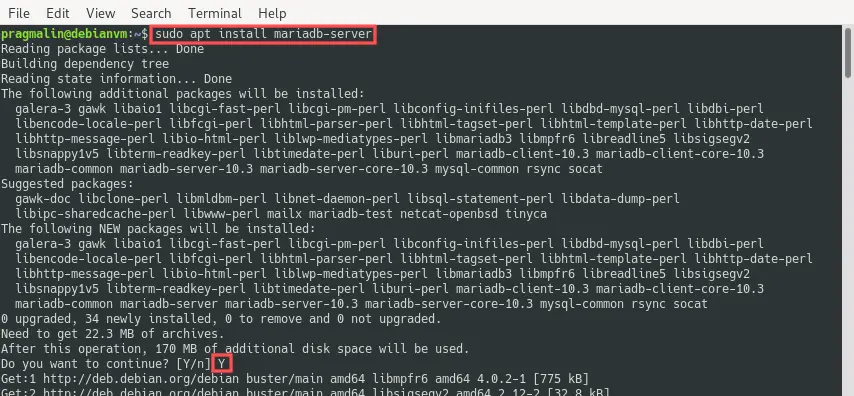
Installing MariaDB
MariaDB is the last LAMP component to install. Proceed with the MariaDB installation by running the command:
sudo apt install mariadb-server
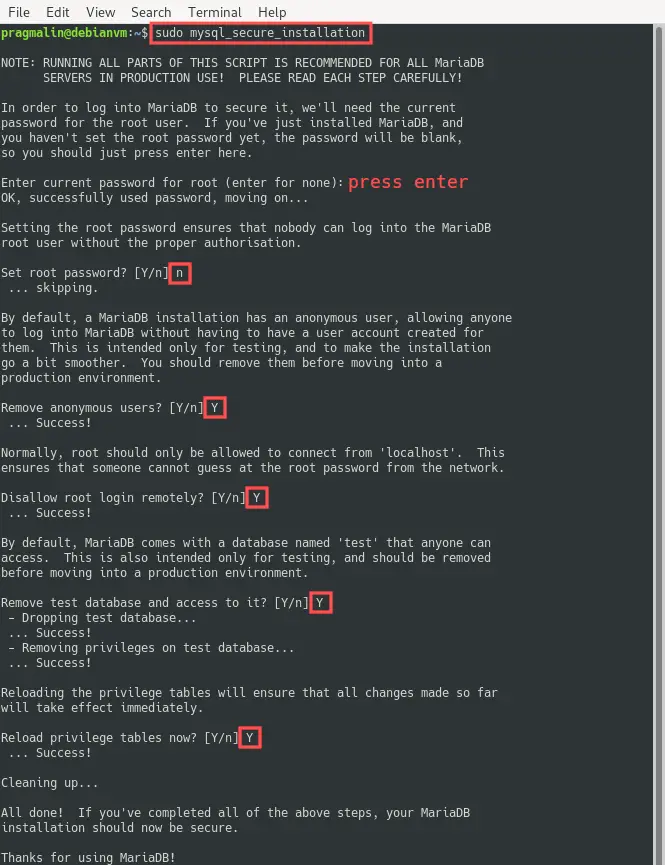
To further secure the MariaDB installation, execute the script:
sudo mysql_secure_installation
The script asks you several questions:
- “Enter current password for root (enter for none)”. Since we haven’t configured a password, simply press Enter.
- “Set root password? [Y/n]”. Debian uses the so called
unix_socketinstead ofpasswordauthentication method. For this reason we do not need to set a root password, so press n here. This essentially means that only Debian users with sudo privileges can log into MySQL. They can conveniently do so without having to specify a password. This is secure, because they still need to enter their password to obtain their super user privileges. - “Remove anonymous users? [Y/n]”. Allowing anonymous users access to the database system poses a security risk. Therefore, press Y here.
- “Disallow root login remotely? [Y/n]”. Theoretically this one doesn’t really matter, because thanks to the
unix_socketauthentication method, the MySQL root user cannot login with the usual username and password combination. In any case, I do recommend pressing Y here to further lock down the MySQL access. - “Remove test database and access to it? [Y/n]”. We have no use for the test database, so better to remove it by pressing Y here.
- “Reload privilege tables now? [Y/n]”. The security script made a few configuration changes, so proceed by pressing Y here.
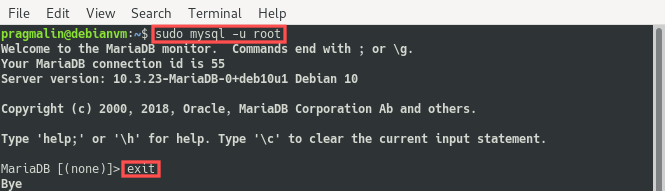
To verify the successful installation of MariaDB we can attempt to log in to it. From the SSH terminal, all users with sudo privileges can log in as the MySQL root user by running this command:
sudo mysql -u root
To exit, type exit.
MySQL database and user creation
Since this article covers the topic of how to install a LAMP stack on Debian 10, I assume your plan on installing a PHP web application that requires access to a MySQL database. Think of WordPress as an example. When a PHP script from a web application requires MySQL database access, it executes this script as user www-data on Debian. For security reasons, the www-data user of course does not have sudo access. Consequently, we would need to create a new database and user for this purpose.
Here follows an example of how you could create a new database and new user that can access the database. Let’s assume the following, but you can change these values to whatever you prefer:
- Database name: wordpress
- Database user: wp-user
- Database password: Passw0rd!
sudo mysql -u root
CREATE DATABASE wordpress CHARACTER SET utf8mb4 COLLATE utf8mb4_general_ci;
GRANT ALL ON wordpress.* TO 'wp-user' IDENTIFIED BY 'Passw0rd!';
exit

Online database management with Adminer
With a wordpress database and wp-user created for testing purposes, let’s verify that this user can actually access the database from a PHP script. For this purpose, I would like to introduce you to the Adminer PHP script. This single file allows you to manage your database completely from the web browser. Ideal for PHP web application developers, but also for PHP web application users. It enables you to quickly and conveniently backup and restore your entire database, to name just one benefit.
With an active SSH connection to your Debian server, you can download and install Adminer, by running the following command:
sudo wget -P /var/www/html/ -O adminer.php https://github.com/vrana/adminer/releases/download/v4.7.7/adminer-4.7.7-mysql-en.php
Once downloaded, you can access Adminer in your web browser by typing in the URL:
http://<hostname>/adminer.php or http://<ip-address>/adminer.php
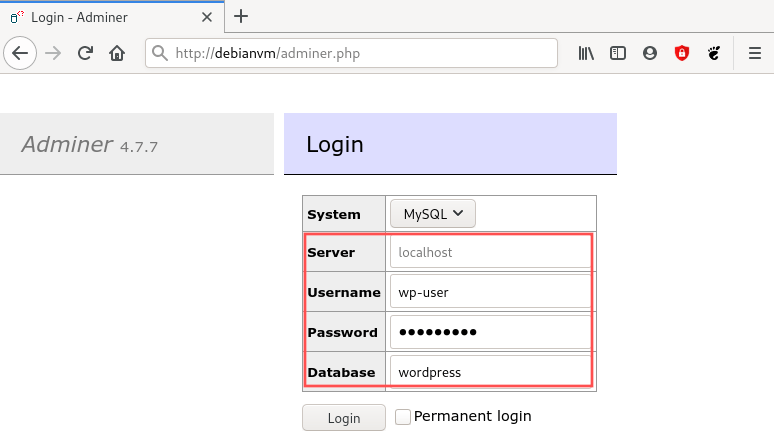
In my case I used: http://debianvm/adminer.php. On the login page, specify:
- Server: localhost
- Username: wp-user
- Password: Passw0rd!
- Database: wordpress
After a successful login, Adminer present you with the following page:
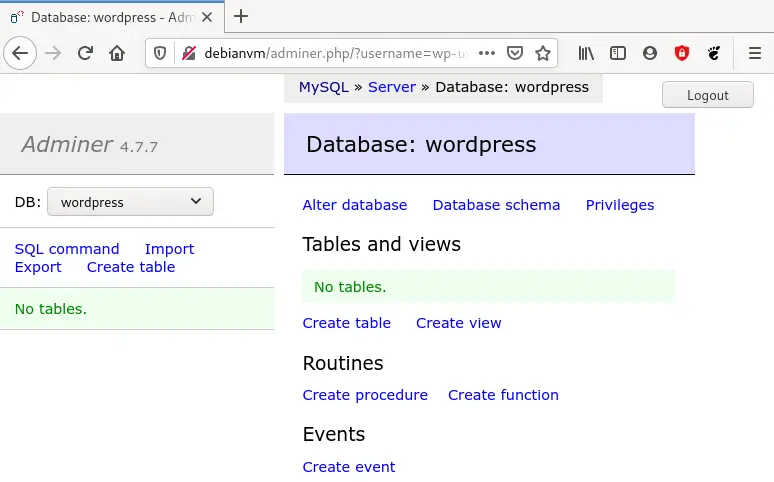
Sure, there are no database tables to see. This was expected. All we did was create an empty database table and database user to verify that this user can access the database from a PHP script, executed as the www-data user.
Feel free to keep the handy Adminer PHP script installed. If you no longer want it, the following command deletes it from your server:
sudo rm /var/www/html/adminer.php
Congratulations! This completes the tutorial on how to install a the LAMP stack on your Debian 10 server.
Wrap up
After working your way through this article, you managed to install a complete LAMP stack on your Debian 10 server. We started by installing the Apache HTTP server. Besides just the installation, we also disabled directory browsing and enabled the Apache mod_rewrite module. As a next step we installed the PHP scripting language and verified its functionality by creating a phpinfo() test script. The final step involved installing and securing MariaDB. For testing purposes, we create an example MySQL database and database user. To verify access to this database from a PHP script, we logged into the database via the web browser, with the help of the Adminer database management script.
With the full LAMP stack installed on your Debian 10 server, you can continue with installing or developing PHP web applications. Not sure where to go from here? Try installing one of these popular self-hosted web applications:
- WordPress – The number one blogging solution
- DokuWiki – Setup your own online Wiki
- InvoiceNinja – Online invoicing system for freelancers and small businesses
- Kanboard – Kanban project management software
You could also install the phpMyAdmin web application on your Debian 10 web server. phpMyAdmin makes it possible to administer your MySQL databases and users from the comfort of your web browser.
The installation of a free Let’s Encrypt SSL certificate would be another great follow-up idea. It secures all communication between your website visitors and the your web server. Additionally, it makes your web site available through HTTPS.
6 thoughts on “Install a LAMP stack on Debian 10 “buster””
Comments are closed.