 by
by In this article you learn step-by-step how to install phpMyAdmin on a Debian 10 web server. To the point that you can log in to phpMyAdmin from your web browser and have full access rights. This enables you to manage MySQL databases and users, conveniently from your web browser. Afterwards you no longer need to log in via SSH and use the MySQL monitor for these tasks.
Background
This article covers how to install phpMyAdmin on Debian 10. It’s a follow-up to the tutorial about installing a LAMP stack on Debian 10. phpMyAdmin is a web application for handling the administration of MySQL. As the name implies, phpMyAdmin is written in PHP.
MySQL monitor
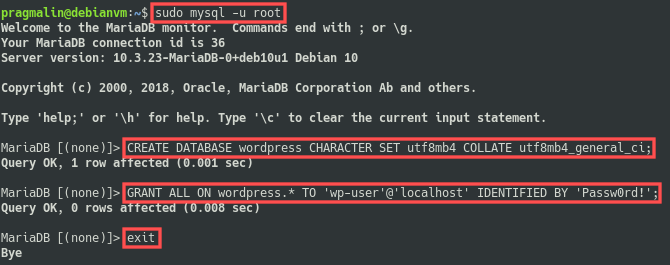
If you installed a LAMP stack, chances are that you plan on storing and accessing data in a MySQL database. Before being able to do so, you need to first create a MySQL database. Next, you need to create a user with granted access rights to the database. The MySQL monitor allows you to do this from the terminal. For example:
sudo mysql -u root
CREATE DATABASE wordpress CHARACTER SET utf8mb4 COLLATE utf8mb4_general_ci;
GRANT ALL ON wordpress.* TO 'wp-user'@'localhost' IDENTIFIED BY 'Passw0rd!';
exit
This approach with the MySQL monitor only works if you and all other MySQL administrators:
- Have SSH access to your web server.
- Are comfortable using the MySQL monitor from the terminal.
phpMyAdmin
If this is not the case, this article presents an alternative approach with phpMyAdmin. phpMyAdmin makes it possible to conveniently manage MySQL (and MariaDB) databases and users, through your web browser. It’s a quick-to-learn and easy-to-use web application that comes bundled with many features. For example:
- Create, browse, edit and drop databases and tables.
- Create and edit users and their granted access rights.
- Import and export databases.
- Execute SQL statements.
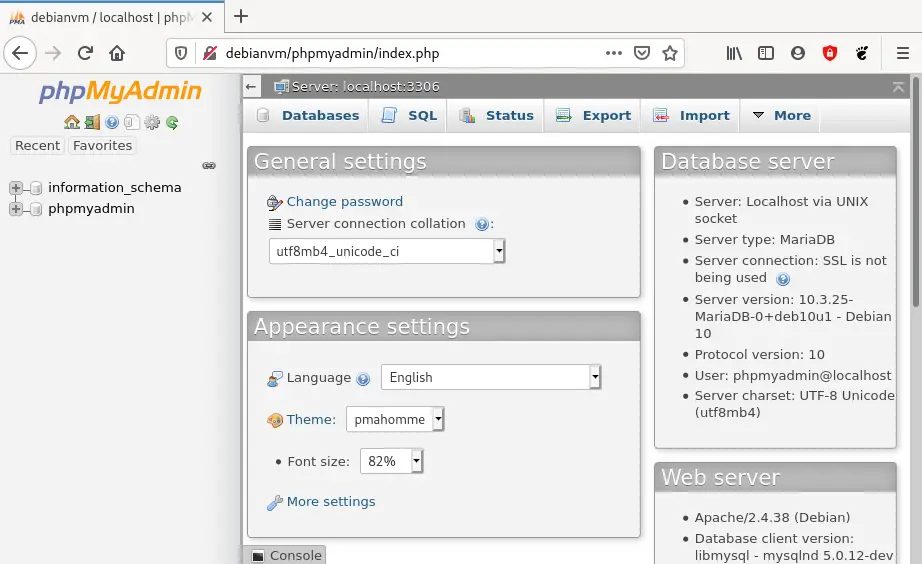
In this article you learn step-by-step how to install phpMyAdmin on a Debian 10 web server. To the point that you can log in to phpMyAdmin from your web browser and have full access rights. This enables you to manage MySQL databases and users, conveniently from your web browser. Afterwards you no longer need to log in via SSH and use the MySQL monitor for these tasks. It looks like this:
What do you need
For this article you need a Debian 10 based server with a LAMP stack already installed. The type of server doesn’t really matter. It could be a:
- Cloud server
- Raspberry PI
- Real server hardware
- Old PC or laptop
- Virtual machine
No worries if you do not have this yet. Simply install VirtualBox and follow the instructions in the following two articles. Afterwards you have a Debian 10 based web server with LAMP stack installed. All conveniently running as a VirtualBox virtual machine at no extra cost:
I’ll be using the exact same thing. The hostname of my Debian VirtualBox virtual machine is debianvm and my username on this virtual machine is pragmalin.
No password for the MySQL root user
If you installed the LAMP stack yourself, you just need to make sure that you did not set a password for the MySQL root user. Otherwise the installation of phpMyAdmin on Debian 10 unfortunately fails.
On Debian, the MySQL root user does not need a password. The created MySQL root user authenticates via the so called unix_socket method. This effectively means that the MySQL root user can never log in with its username and password. The only way for the MySQL root user to log in is with command:
sudo mysql -u root
Consequently, only users with sudo privileges can log in as the MySQL root user to the MySQL monitor. This approach is both secure and convenient. If you did set a root password for the MySQL user, I recommend re-running the sudo mysql_secure_installation script. The MySQL installation instructions in this article show you how to do this and not set a password for the MySQL root user.
Install the phpMyAdmin package on Debian 10
On Linux, including Debian 10, two approaches exist to install phpMyAdmin:
- Install phpMyAdmin from your distribution’s package manager.
- Install phpMyAdmin from source code.
The general recommendation is to install from the package manager. This way you automatically receive security fixes when upgrading your installed system packages. Two exceptions where installing from source code offers the better approach:
- You absolutely need a different version of the software, compared to what your distribution’s package manager offers.
- Your distribution’s package manager does not include the software you plan to install.
In this article we stick with the recommended approach. With other words, we will make use of the Debian 10 package repository to install phpMyAdmin. As a first step, log in to your web server via SSH.
Enable the Debian 10 backports repository
When you attempt to install the phpMyAdmin package the usual way, something unexpected happens:
sudo apt install phpmyadmin
The package manager reports that package phpMyAdmin is not available in Debian 10 and can therefore not be installed:
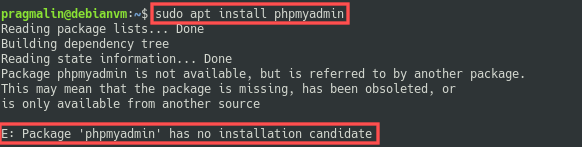
This surprised me. As a next step, I searched for the phpMyAdmin package on the Debian website. It turns out the Debian package repository includes phpMyAdmin for Debian 9 “stretch” and also for the upcoming Debian 11 “bullseye”, which is planned for release in 2021. This makes me think that phpMyAdmin must have had a bug or security issue that was not resolved at the release date of Debian 10 “buster”.
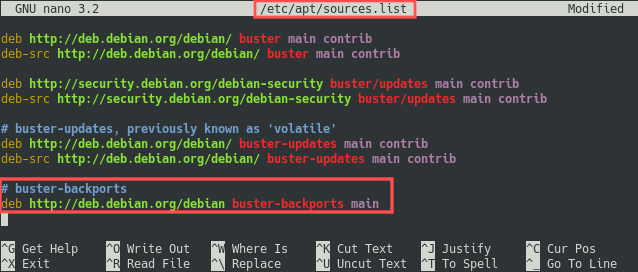
Luckily, the Debian 10 backports repository does include package phpMyAdmin. This means that we can simply install phpMyAdmin from the Debian 10 backports repository. Still easier and better than installing from source code. We just need to enable the Debian 10 backports repository first.
Go ahead and open the /etc/apt/sources.list file in the Nano text editor:
sudo nano /etc/apt/sources.list
Next, enter the backports repository towards the end of this file by adding this line:
deb http://deb.debian.org/debian buster-backports main
Install phpMyAdmin from the Debian 10 backports repository
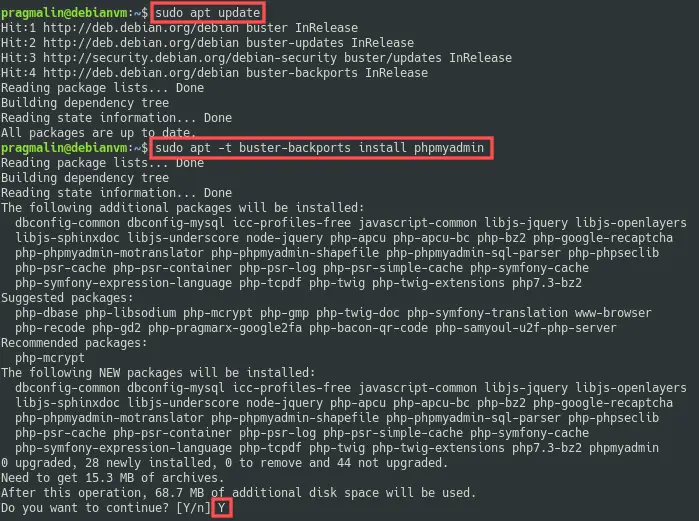
After making the backports repository available, we can install phpMyAdmin with the following commands:
sudo apt update
sudo apt -t buster-backports install phpmyadmin
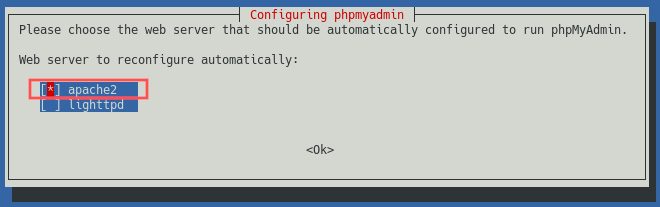
The phpMyAdmin package installer prompts you with a few questions. When asked which web server to configure automatically, select apache2 by pressing Space, followed by Enter to confirm:
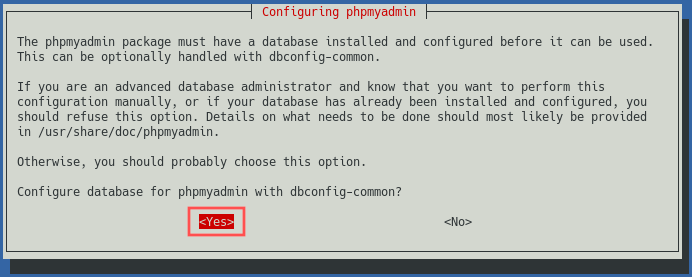
Following this, the phpMyAdmin package installer asks if you want to configure the database for phpMyAdmin with dbconfig-common. Select Yes by pressing the Enter key:
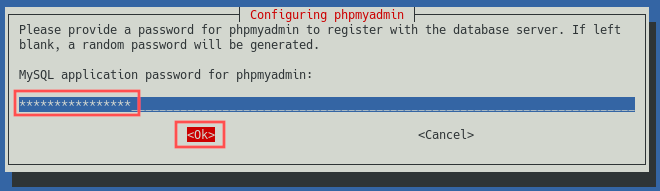
On the next screen, you can enter a password for the phpmyadmin MySQL user that the installer creates. Later on we’ll grant all available MySQL privileges to this phpmyadmin user, so make sure to enter a strong password. You can generate such a password with online tools such as this password generator. Once you entered the password, continue by pressing the Tab key to select the Ok button. Followed by pressing the Enter key to confirm:
Once the installer completes, finish up by restarting the Apache HTTP server:
sudo systemctl restart apache2
Create the MySQL super user
The installer automatically created the phpmyadmin MySQL user along with the password you provided. With these login credentials you can log in to the phpMyAdmin web application. However, soon you’ll find out that the phpmyadmin has limited privileges. This user cannot create new databases nor new users. This means that besides logging in to the phpMyAdmin web application, this user cannot do much. What we really need is a MySQL super user with whom we can fully administer all our databases. This includes the creation of new databases, new users and managing their access rights.
For phpMyAdmin, two options exist for creating a MySQL super user:
- We can grant these super user privileges to the already existing
phpmyadminuser. - We can create a brand new MySQL user to whom we grant super user privileges.
If an unwanted third party figures out that phpMyAdmin runs on your server, they can easily guess the phpmyadmin username. Next, they could repeatedly try out different passwords to attempt to login. Therefore option 2 provides better security, because they’d have a harder time guessing both the username and the password. However, if you run phpMyAdmin for testing purposes or do not need to have such tight security, option 1 works fine. The choice is yours.
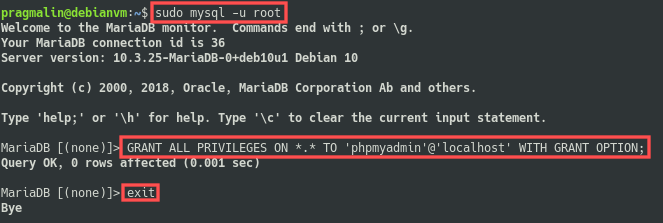
Option 1 – Grant super user privileges to the phpmyadmin user
Log in to the MySQL monitor:
sudo mysql -u root
Next, grant super user privileges to the phpmyadmin user by running these two statements:
GRANT ALL PRIVILEGES ON *.* TO 'phpmyadmin'@'localhost' WITH GRANT OPTION;
exit
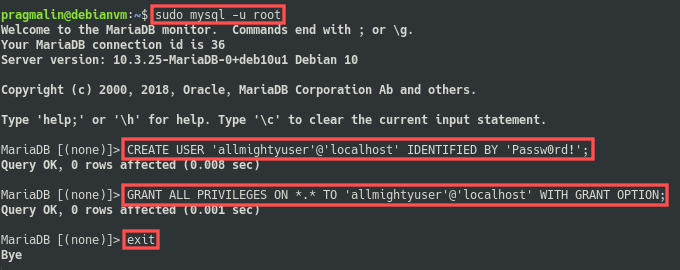
Option 2 – Create a brand new MySQL super user
Log in to the MySQL monitor:
sudo mysql -u root
Next, we create the new MySQL user. You can pick the username and its password yourself. For demonstration purposes, I selected allmightyuser as the username with Passw0rd! as the password. Make sure to change this and definitely pick a stronger password. Here’s the command to enter for creating the new user:
CREATE USER 'allmightyuser'@'localhost' IDENTIFIED BY 'Passw0rd!';
Similar as with option 1, we continue with granting super user privileges to this new user:
GRANT ALL PRIVILEGES ON *.* TO 'allmightyuser'@'localhost' WITH GRANT OPTION;
exit
Access the phpMyAdmin web application
Now that we made sure a MySQL super user is available, we can log in to the phpMyAdmin web application. The installer created and enabled an Apache configuration for phpMyAdmin. This configuration activates an alias for accessing the phpMyAdmin web application in the /phpmyadmin web directory. With other words, to access the phpMyAdmin web application, type the following URL into your web browser’s address bar:
http://<hostname>/phpmyadmin or http://<ip-address>/phpmyadmin
The hostname of my VirtualBox virtual machine is debianvm. Therefore I entered http://debianvm/phpmyadmin.
The phpMyAdmin web application presents you with a login page. Log in with your MySQL super user credentials. So either the username phpmyadmin if you went with option 1 previously, or the name of your own created MySQL super user for option 2. I went with option 2:
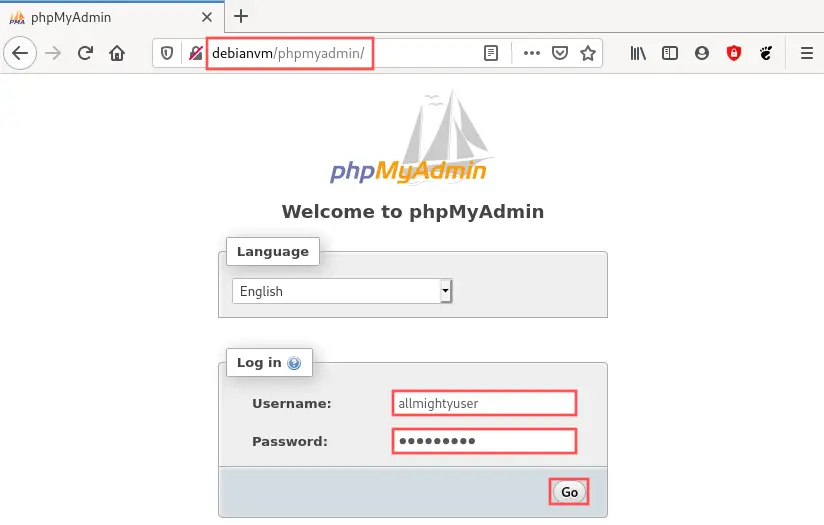
After logging in you now have full access to the phpMyAdmin web application.
Create an example MySQL database and user
In case you haven’t worked with the phpMyAdmin web application before, I’ll show you how to create a new MySQL database and user. This section is optional so feel free to skip it.
We’ll create the same database and user as was presented earlier in the introduction:
- Database:
wordpress - Username:
wp-user - Password:
Passw0rd!
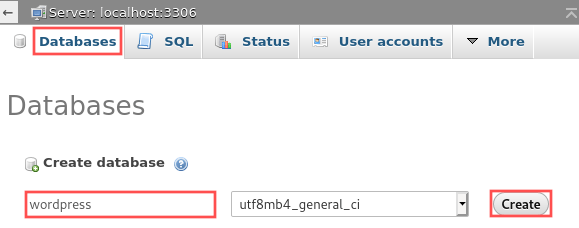
In the phpMyAdmin web application, click on the Databases link in the top menu. On the Databases screen, enter wordpress as the database name and click the Create button:
You are now in the newly created wordpress database. From this screen, we’ll continue with the creation of the wp-user. This user should have access to just the wordpress database. Click on the Privileges link in the top menu. Next, click on the Add user account link towards the bottom of the screen:
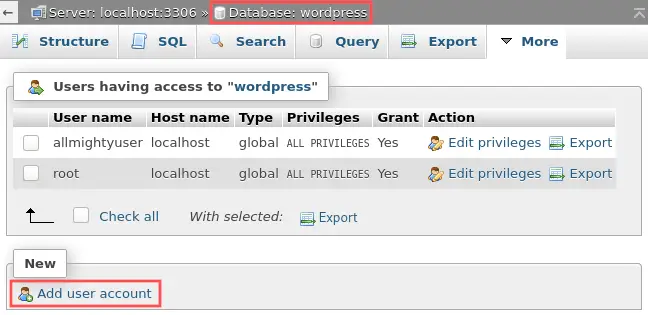
On the Add user account screen, perform the following actions:
- Enter
wp-userin the User name field. - Only allow logins from localhost by selecting Local from the host name drop-down box.
- Enter the desired password in the Password field. I used
Passw0rd!for demonstration purposes. - Retype the password in the field below.
- Make sure the Authentication plugin is set to Native MySQL authentication.
- Make sure check-box Grant privileges on database wordpress is checked.
- Click the Go button at the bottom of the screen to go ahead with creating this user account.

That’s it. You now completed your first steps with the phpMyAdmin web application. A new database wordpress was creation together with a new user wp-user. The new wp-user only has access to the wordpress database when attempting to do so from the localhost. So for example when you were to actually install WordPress on the same web server. Or when you log in to the phpMyAdmin web application, since this one also runs on the same web server. Feel free to test this out. You can logout your current user and then log back in as the wp-user. You’ll see that this now works and that wp-user can only access the wordpress database in phpMyAdmin.
Securing your phpMyAdmin installation
Personally, I do not like the idea of someone else being able to see the phpMyAdmin log in page on my web server. Let alone them being able to attempt logging in. For this reason I prefer to add an extra layer of security. In this section I’ll show you how to use a feature of the Apache HTTP server to add password protection to the /phpmyadmin web directory. It’s optional so feel free to skip this step, if you do not need this added layer of security.
Create the password file
As a first step, we’ll create a password file with the help of the htpasswd program. The password file holds the username and encrypted password. You can freely select the username and password. For demonstration purposes, I’ll use pragmalin as the username and Passw0rd! as the password. Run the following command on your web server to create the password file:
sudo htpasswd -c /etc/phpmyadmin/.htpasswd pragmalin
The htpasswd program simply prompts you to enter your desired password twice. Afterwards, it stores the username and encrypted password in /etc/phpmyadmin/.htpasswd:

Password protect the phpMyAdmin web directory
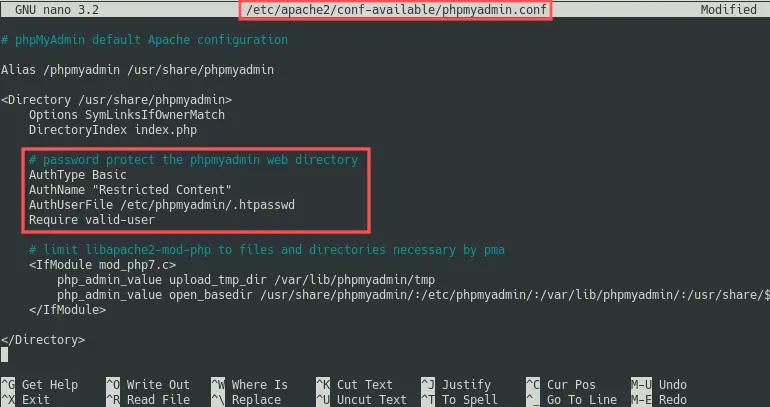
With the password file created, we now use this file to password protect the /phpmyadmin web directory. You can do this directly in phpMyAdmin’s Apache configuration file. Edit this file with the Nano text editor:
sudo nano /etc/apache2/conf-available/phpmyadmin.conf
Add the following lines to the <Directory /usr/share/phpmyadmin> section:
AuthType Basic
AuthName "Restricted Content"
AuthUserFile /etc/phpmyadmin/.htpasswd
Require valid-user
After saving the changes, we just need to restart the Apache HTTP server:
sudo systemctl restart apache2
Verify that the password protection works
Open up the phpMyAdmin web application in your web browser again. This time you’ll see the extra security layer in action:
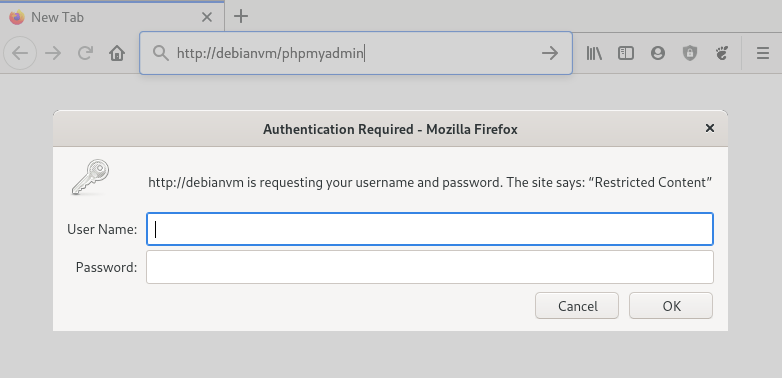
The Apache HTTP server only now allows you access to the /phpmyadmin web directory, if you specify the login credentials stored in the /etc/phpmyadmin/.htpasswd file. Afterwards, you’ll still need to log in to the phpMyAdmin web application the usual way. So double authentication.
Wrap up
While working your way through this tutorial, you completed the install of the phpMyAdmin web application on your Debian 10 web server. Gone are the days where you had to fiddle around with funky SQL statements in the MySQL monitor on the terminal. From now on you can conveniently manage all your MySQL databases and users, from the comfort of your web browser. With the phpMyAdmin web application you can:
- Create, browse, edit and drop databases and tables.
- Create and edit users and their granted access rights.
- Import and export databases.
- Execute SQL statements.
As extra whip cream, you learned how to install a package from the Debian 10 backports repository and how to add an extra security layer, on top of your phpMyAdmin install.