
 by
by Trying to figure out how to manually mount your USB drive in Linux? Look no further. This article explains step-by-step how to manually mount a USB drive in Linux, to a mount point directory of your choice. We’ll do everything directly in the terminal. So you can use this approach not only on your Linux desktop PC, but also when SSH-ed into your Linux server. We’ll cover how to configure write permissions for accessing your USB drive as well.
Background
Mounting a USB drive, maps its contents to a specific directory in your Linux file system. This directory is called the mount point. With other words, after mounting you can browse the files and directories on the USB drive, by going to the mount point directory. For example using your desktop environment’s file manager.
Most Linux desktop distributions automatically create the mount point directory for you. Its exact location depends on the Linux distribution:
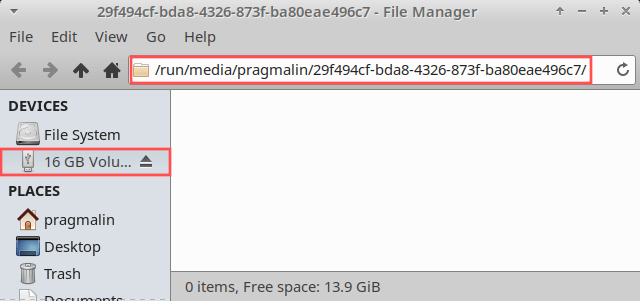
/media/<username>/<device UUID>(for Debian and Ubuntu)/run/media/<username>/<device UUID>(for Fedora and openSUSE)
UUID stands for universal unique identifier. When partitioning and formatting your USB drive, a UUID is automatically generated and assigned to each partition. A UUID consists of a 128-bit number, represented in the hexadecimal format.
Refer to the following screenshot for an example of where my USB drive got mounted, on an openSUSE virtual machine:
In certain situations you might want to use a different mount point directory. It could simply be a personal preference or because you are using a Linux server distributions. Linux server distributions typically do not support an automount feature for USB drives. This means that you would need to create the mount point directory yourself and figure out how to manually mount the USB drive in Linux.
This tutorial teaches you how to manually mount a USB drive in Linux, to a mount point directory of your choice. The instructions show you how to perform these steps directly in the Linux terminal. That way this article applies to both Linux desktop and server setups.
What do you need
To complete the steps presented in this article, you’ll need:
- Any type of Linux system. A desktop, server or even a Raspberry PI will do just fine.
- A USB drive with an EXT4 formatted partition.
Refer to the article about how to format your USB drive with GParted for more details on preparing your USB drive for this article.
Personally, I’ll use my Ubuntu based virtual machine with Budgie desktop environment throughout this article.
Determine the device name of your USB drive partition
Before we can mount a partition on the USB drive, we first need to determine its partition’s device name. Whenever you plug in your USB drive, the Linux kernel automatically assigns a device name to the disk and all its partitions. Let’s figure out the device name of the USB drive partition that we want to mount. Open the terminal and run the following command. It lists all disks and partitions on your Linux system:
lsblk -p | grep "disk\|part"
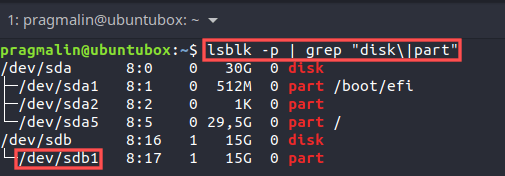
Inspecting the output tells me that Linux detected two disks: /dev/sda and /dev/sdb. The first disk (/dev/sda) represents my Linux hard drive itself. I can tell, because it contains the root (/) partition. This means that the other drive (/dev/sdb) must be my USB drive. The USB drive lists one partition with device name /dev/sdb1. This is the device name we wanted to find.
The device name of the partition on your USB drive might differ. Make sure to replace
/dev/sdb1with the device name of your USB drive partition for the remainder of this article.
When unsure about the device name of the partition on your USB drive, try this approach:
- Unplug the USB drive and run
lsblk -p | grep "disk\|part". - Plug the USB drive back in an run
lsblk -p | grep "disk\|part"on more time. - Compare the two command outputs to see which new disk and partition showed up.
Create the mount point directory
A mount point is nothing more than a regular directory. This means that to create a mount point, we just create a directory. Theoretically, you can create this directory anywhere in the file system. However the recommended practice on Linux is to create mount points in the /mnt directory.
Let’s create a mount point for our USB drive inside the/mnt directory. Open up the terminal and run this command:
sudo mkdir -p /mnt/usbdrive
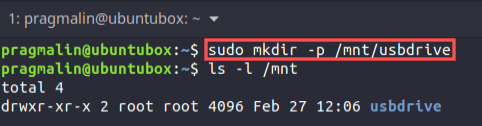
We use sudo here, because only the root user has permission to create directories inside /mnt. Note that you can select a different mount point name. I picked usbdrive just as an example. Feel free to change it so something more applicable, e.g. mybackupdrive.
Mount your USB drive in Linux
I’ll show you two different approaches to mount your USB drive in Linux:
- Mount by device name
- Mount by UUID
Which approach to select depends a bit on your situation. The Linux kernel typically assigns device names to disks and their partitions, based on the order they are plugged in. If you often plug in different USB drives, then the device name of your specific USB drive partition might not always be /dev/sdb1. It could also be /dev/sdc1, /dev/sdd1, etc. In this case, select mounting by UUID instead of device name.
In other cases, the mount by device name might be preferred. My example: I run a Linux file server on my home network. It has a USB drive attached for daily automated backups. I never attach other USB drives and I know for certain that Linux always assigns its partition the /dev/sdd1 device name. Here’s the thing though: I periodically swap the USB drive out for another identical one. The spare one I store off-site for emergency recovery purposes. Even though the drives themselves are the same, they each have their own UUID. Therefore I prefer mounting by device name, since this one is always the same for both drives.
Mount by device name
The command syntax for mounting the partition on your USB drive by device name:
sudo mount [DEVICE NAME] [MOUNT POINT]
With the /dev/sdb1 device name and /mnt/usbdrive mount point, I can mount the partition on my USB drive with command:
sudo mount /dev/sdb1 /mnt/usbdrive

After mounting, you can access the files on the USB drive by going to the /mnt/usbdrive directory in the Linux file system.
The mount program implements smartness to automatically detect the file system type on the USB drive’s partition. If for some reason this does not work, you can specify it on the command line with the -t parameter. For example:
sudo mount -t ext4 /dev/sdb1 /mnt/usbdrive
Other common file type option values are vfat for FAT32 and ntfs for NTFS.
Mount by UUID
If you prefer mounting by UUID instead of device name, you can use this command syntax:
sudo mount --uuid [UUID] [MOUNT POINT]
Now we encounter a small challenge. We need to find out the UUID of the partition on our USB drive. Luckily, your Linux system offers the blkid program for this. With the blkid program, we can obtain the UUID of a specific device name. The syntax is:
sudo blkid [DEVICE NAME] -sUUID -ovalue
In my case the device name is /dev/sdb1. To obtain the UUID, I simply ran this command:
sudo blkid /dev/sdb1 -sUUID -ovalue

Alright, at this point we know the UUID of the partition on our USB drive. As a next step we can mount it using this UUID:
sudo mount --uuid 29f494cf-bda8-4326-873f-ba80eae496c7 /mnt/usbdrive

Unmount your USB drive in Linux
The syntax to unmount the partition of our USB drive:
sudo umount [MOUNT POINT]
With /mnt/usbdrive as the mount point, you can unmount by running this command from the terminal:
sudo umount /mnt/usbdrive

Note that Linux automatically unmounts the USB drive when booting down. If you want to unplug your USB drive, while Linux still runs, you should manually unmount first.
Obtain write permissions to your USB drive
In this article I mounted the partition on my USB drive, which holds an EXT4 file system. An EXT4 file system stores owner and permission information for each file and directory. When mounted, the original owner and permissions remain intact and simply become accessible through the mount point. Run the following command to inspect who currently owns the root directory on the mounted USB drive partition:
ls -l /mnt
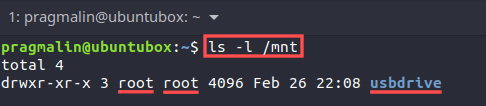
The root user currently owns the root directory. This means I would need root privileges to store a file on the USB drive or to create a new directory on it. In retrospect, this makes sense. In preparation for this article, I freshly created this EXT4 partition with GParted. While doing so, I needed root privileges and consequently, the root user became the owner.
Change the owner of the root directory on the USB drive
How does your own user obtain write permissions to the USB drive partition? Well, the same way as you would normally do on a regular directory. Use the chown command. Run the following command to make your user the owner of the partition’s root directory:
sudo chown $USER: /mnt/usbdrive
Remember that $USER gets replaced automatically with your user name, in my case pragmalin:
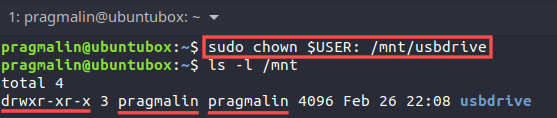
As you can see in the output, my user obtained full write permissions to the USB drive.
Change the owner of all files and directories on the USB drive
If your USB drive already contains files and directories, its owner and permissions remained unchanged. When you know up-front that you are the only one using these files and directories, you might want to become the owner of these as well. In this case you can run the chown command with the -R parameter. This recursively changes the owner of all files and directories on the USB drive:
sudo chown -R $USER: /mnt/usbdrive
In most cases, this is what you want. Give this some thought though. For example, if you used your USB drive to backup the home directory of a multi-user system, then you probably do not want to recursively changes the owner. This would result in incorrect ownership of files and directories when restoring the backup.
Wrap up
After working your way through this article, you learned how to manually mount a USB drive in Linux. A summary of all the completed steps:
- Determine the device name and UUID of the partition on the USB drive.
To list all drives and partitions:lsblk -p | grep "disk\|part"To obtain a device’s UUID:sudo blkid [DEVICE NAME] -sUUID -ovalue
- Create a custom mount point directory.
sudo mkdir -p [MOUNT POINT]
- Mount and unmount the partition of the USB drive from the Linux terminal.
To mount by device name:sudo mount [DEVICE NAME] [MOUNT POINT]To mount by UUID:sudo mount --uuid [UUID] [MOUNT POINT]- For unmounting:
sudo umount [MOUNT POINT]
- Obtain write permission to the files and directories on the USB drive.
sudo chown $USER: [MOUNT POINT]for just the root directory on the USB drive.sudo chown $USER: [MOUNT POINT]for all files and directories on the USB drive.
From now on working with a USB drive in Linux no longer poses a challenge. Feel free to bookmark this article for future reference.

2 thoughts on “Manually mount a USB drive in the Linux terminal”
Comments are closed.