
 by
by This tutorial shows you how to setup your Raspberry PI 4 as a headless server. This is a server without a monitor, keyboard and mouse connected to it. With this approach all you need is a network connection to control and administer your Raspberry PI 4.
Why would you want to do this? Sometimes you might not have an extra monitor, keyboard or mouse available. Other times you just do not feel like setting it all up. In my case I simply forgot to order the micro HDMI to HDMI adapter. Therefore I couldn’t hook it up to my monitor or TV, yet I still wanted to get my shiny new Raspberry PI 4 up and running.
After following the instructions in this tutorial, you have a clean Raspbian based server installed that is accessible over your network with SSH. All you need is a Raspberry PI 4, a micro SD-card and a power supply. The estimated time to complete this tutorial is 15 to 30 minutes.
Note that if you do have a keyboard and monitor connected to your Raspberry PI, perhaps the tutorial on how to perform a minimal install on your Raspberry PI is of interest to you.
Write the Raspbian image to your SD-card
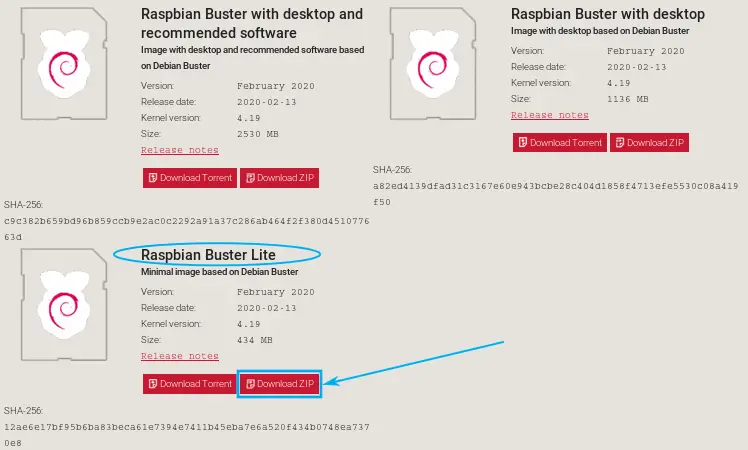
Raspbian is a Debian based distribution specifically for the Raspberry PI. The Raspberry PI foundation created and maintains the Raspbian distribution. As a first step, download the Raspbian distribution. The intent is to setup your Raspberry PI 4 as a headless server. Therefore you do not need a desktop environment and the minimal Raspbian distribution, called “Raspbian Lite”, will do just fine. Visit this site to download the Raspbian Lite version in ZIP-file format, as illustrated in the following image:
Next, open up your terminal in the directory that holds the donwloaded ZIP-file. On my PC the ZIP-file is called 2020-02-13-raspbian-buster-lite.zip and is located in directory /home/pragmalin/Downloads. Run this command to extract the ZIP-file:
unzip 2020-02-13-raspbian-buster-lite.zip

If the unzip utility is not yet installed on your PC, you can install it with sudo apt install unzip.
After extracting the ZIP-archive, the file with the *.img extension shows up in the same directory. The next step is writing this file to the micro SD-card for your Raspberry PI 4. You just need to determine the disk name of the SD-card on your PC. Assuming that you inserted the SD-card into your PC, run this command to get an overview of the known disks on your PC:
lsblk -p | grep "disk"

On my PC there is just the hard disk /dev/sda and the SD-card /dev/mmcblk0. Note that the disk name of the SD-card on your PC might be different. Whenever I write /dev/mmcblk0 in the remainder of this article, simply replace this text with the disk name of the SD-card on your PC.
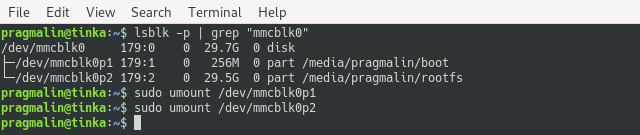
In case there are partitions already present on the SD-card, your PC’s operating system mounted them automatically upon insertion. Therefore, these partitions need to be unmounted first. Find the mounted partitions with the command:
lsblk -p | grep "mmcblk0"
If any partitions were found, unmount them one by one with the umount command, while replacing <partition name> with the actual name of the partition:
sudo umount <partition name>
At this point, the SD-card is inserted into your PC, you know its disk name, and all of its partitions are unmounted. This means that everything is ready for the downloaded and extracted Raspbian image to be written to the SD-card. Open up your terminal in the directory that holds the IMG-file and enter the command below to write the Raspbian image to the SD-card. Double-check that you specify the correct SD-card disk name and name of the IMG-file.
sudo dd bs=4M if=2020-02-13-raspbian-buster-lite.img of=/dev/mmcblk0 conv=fsync

Note that it can take a few minutes for the command to complete. Depending on your SD-card, it could be that it does not support a block size of 4 MB, in which case the command reports an error. Simply change the block size from bs=4M to bs=1M in the command and try again.
Enable SSH and optionally configure WiFi access
By default Raspbian disables remote access by means of SSH. This is a deal-breaker when you intent to setup your Raspberry PI 4 as a headless server. Luckily, a solution exists to enable SSH. When Raspbian boots, it searches for a file named ssh on the boot-partition. When found, the SSH access is enabled and Raspbian automatically deletes the ssh file afterwards.
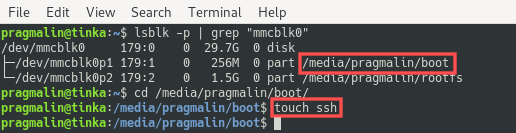
To create the ssh file, the boot-partition needs to be mounted on your PC, since we unmounted it in the previous section. Removing the SD-card from your PC and inserting it again, automatically mounts the partitions on your SD-card. Run the following command again to determine the mount point of the boot-partition:
lsblk -p | grep "mmcblk0"
After you determined the mount point of the boot-directory, change to this directory and run this command to create an empty file named ssh:
touch ssh
If you plan on connecting your Raspberry PI 4 to your local network router with an Ethernet cable, then you can skip the remainder of this section. However, if you prefer wireless communication between your Raspberry PI 4 and your local network, it is necessary to configure WiFi access. Create the file wpa_supplicant.conf in the boot-partition the same way the ssh file was created:
touch wpa_supplicant.conf
Next, edit the file from the terminal with a text editor such as Nano. Refer to this article for a brief tutorial on editing files in the terminal with Nano.
nano wpa_supplicant.conf
Enter the following text into this file. Afterwards, update the values assigned to country, ssid, and psk such that they match those for your wireless network:
ctrl_interface=DIR=/var/run/wpa_supplicant GROUP=netdev
update_config=1
country=<Insert 2 letter ISO 3166-1 country code here>
network={
ssid="<Name of your wireless LAN>"
psk="<Password for your wireless LAN>"
}
Note that you can find a list of ISO 3166-1 country codes here.
Boot the Raspberry PI 4 and connect with SSH
With the SD-card preparation completed, double-check that you disconnected the power supply from your Raspberry PI 4. Next, go ahead and remove the SD-card from your PC and insert it into the SD-card slot on your Raspberry PI 4. Finally, connect the power supply to your Raspberry PI 4. This boots Raspbian for the first time. Give it a few minutes or so for the booting to complete.
Once your Raspberry PI 4 completed booting Raspbian, you can remotely connect to it with SSH. Open your terminal and type this command:
ssh pi@raspberrypi
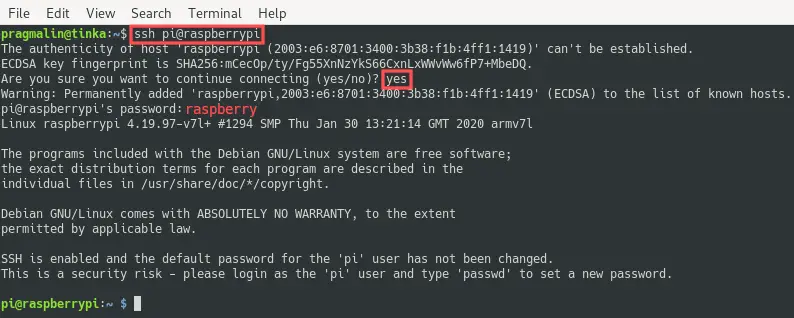
This logs in the pi user. Keep in mind that the default password is raspberry.
Create a new user and delete the pi user
As you noticed in the previous section, the default user in Raspbian is pi with password raspberry. Everyone that ever played with a Raspberry PI knows this. Thus it is highly recommended to change the password for the pi user as soon as possible. My personal recommendation is to take this a step further: create a new user and delete the pi user altogether.
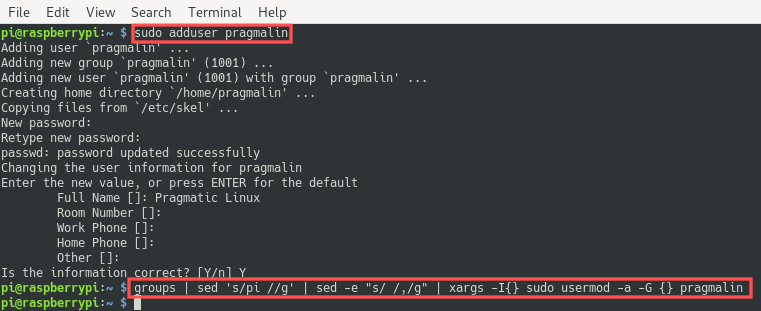
To create a new user, run the command:
sudo adduser <newusername>
Replace <newusername> with the username of your preference. Just make sure to not pick an obvious one that hackers might guess. Visit an online username generator, if you need inspiration. The command prompts you to enter some basic information about the new user, including the password. The password should be a strong one. You can generate such a password with online tools such as this password generator.
As a next step, add the new user to the same groups as the pi user belongs to (just excluding the pi group itself). The following one-liner pipes together a few commands to achieve this.
groups | sed 's/pi //g' | sed -e "s/ /,/g" | xargs -I{} sudo usermod -a -G {} <newusername>
Before actually removing the pi user, close the current SSH connection and establish a new one. This time login as the newly created user:
ssh <newusername>@raspberrypi
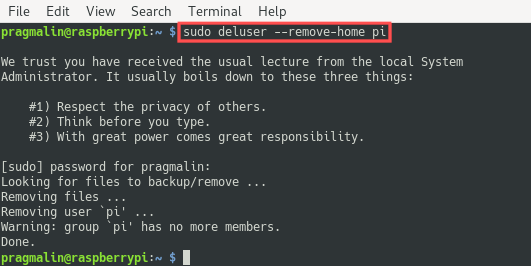
After verifying that you can login as the new user, it is time to remove the pi user, including its home directory:
sudo deluser --remove-home pi
Congratulations! Your new Raspbian based Raspberry PI 4 server is ready and remotely accessible with SSH. You can continue installing whatever application you had in mind for it. For example, you could install a LAMP stack and host your own WordPress blog on it, make it a local game server, install Samba and turn it into a network attached storage device, etc.
Note that if you plan on running your Raspberry PI 4 24/7 all year round, sooner or later the SD card gets corrupted during a write operation. Moving the root file system of your Raspberry PI to an external USB drive bypasses this problem. Continue reading in this blog article for detailed instruction on how achieve this.
Before installing new software on your Raspberry PI, consider making a snapshot of your current Raspberry PI operating system. The snapshot enables you to quickly switch between projects or restore your Raspberry PI operating system, in case something went wrong.
7 thoughts on “Setup your Raspberry PI 4 as a headless server”
Comments are closed.