
 by
by Wouldn’t it be convenient if you could use your own domain name to access your server, instead of its IP address? This article describes how you can configure your own domain name for your Linode virtual private server. It includes easy to follow instructions accommodated with clearly annotated screenshots.
Background
Thanks to companies such as Linode, it has never been easier and cheaper to run your own Linux server on the Internet. Setting up your own virtual private server (VPS) only takes a few minutes and can cost as little as a few bucks a month. What can you do with it? Well, you could: host your own WordPress based website on it, share files between all your devices everywhere in the world with NextCloud or make it a VPN server to securely browse the web when connected to the Internet through a public WiFi hot-spot to just name a few examples.
The one task that can be a bit tricky is to configure your own domain name for conveniently accessing your server. This article contains clear step-by-step instructions on how you can configure a domain name for your Linode VPS. In covers all the necessary steps including: registering the domain name, setting the nameservers to use, adding DNS records and configuring the hostname and fully qualified domain name (FQDN) on the server.
A minimal Debian Linode VPS serves as a starting point for this article. A previously published article covers all the steps needed for setting up such a server on the Linode cloud infrastructure. Once you have this server up and running, you can continue with the instructions in this article , which show you how to configure the domain name for your Linode VPS.
In this article I use GoDaddy for registering the domain name and Linode for hosting the VPS. Note that I am not affiliated with either one of these companies nor did they sponsor this article. I simply like the services these companies offer and they do so at affordable rates. Feel free to choose alternatives such as Namecheap and DigitalOcean.
Register your domain name
This tutorial assumes that you already registered your domain name. In case you haven’t registered a domain name yet, go ahead and visit GoDaddy to register one. While going through the domain name registration process, you’ll be asked if you want to purchase additional website or e-mail hosting. You do not need this for the purpose of this article. Just a plain domain name suffices. For demonstration and testing purposes, I registered the domain name theplblog.com. For the remainder of this article I will use this domain name. So everywhere you see theplblog.com in this article, replace it with the domain name that you registered.
Set the nameservers with your domain registrar
On the Internet, nameservers handle the translation between domain name and IP address. Linode operates nameservers where we can add the configuration of our domain name and connect it to the IP address of our server. We just need to inform our domain registrar (GoDaddy) about the Linode nameservers that our domain name should use. That way all DNS related configurations can be conveniently made through the Linode manager.
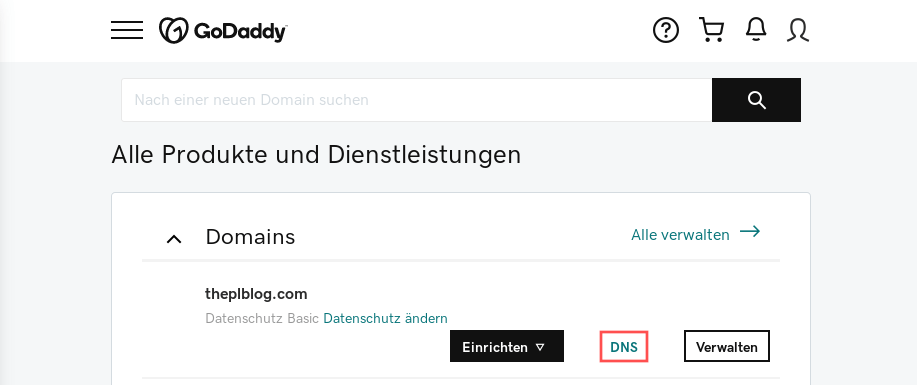
Log in to your GoDaddy account and go to the overview with Domains. Next, click on the DNS link for your domain. Here’s a screenshot how it looks for my account. Unfortunately, I can’t seem to change the language from German to English for the GoDaddy user interface, but it should look similar for English:
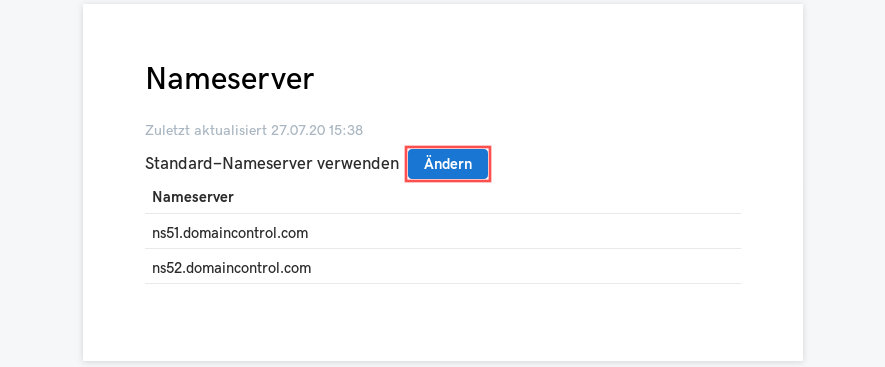
On the DNS page, scroll down to the section with heading Nameserver and click the blue button. I assume it is labeled Change in English. In German it is labeled Ändern:
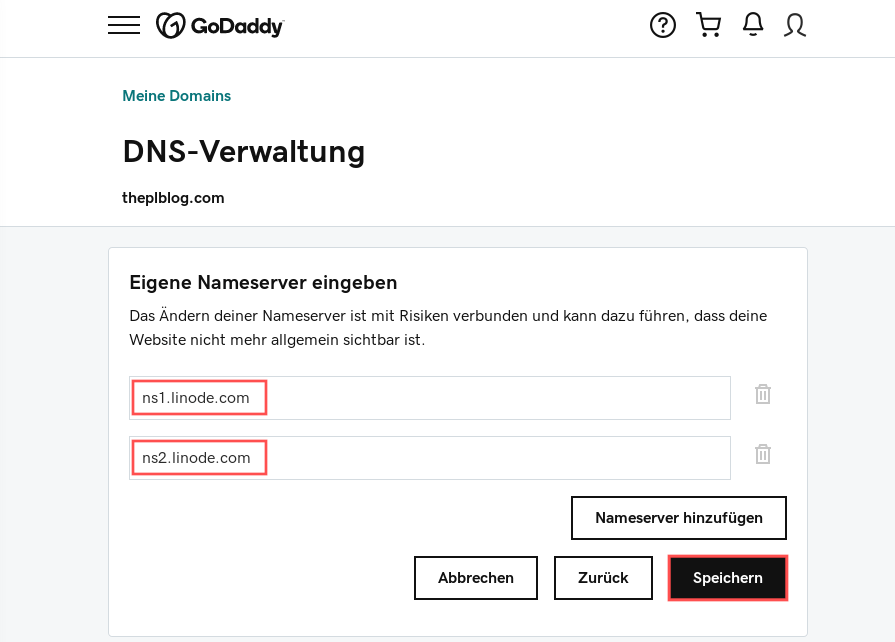
Next you’ll get asked if you want to connect your domain with a website or if you want to enter your own nameserver. Go for option two, so the one that enables you to enter your own nameservers. Once the next page appears, you can enter the Linode nameservers. They are:
ns1.linode.comns2.linode.comns3.linode.comns4.linode.comns5.linode.com
By default GoDaddy allows you to enter two nameservers, which suffices. However, you can opt to enter more than two if you desire. I decided to enter just two. After entering the nameservers, click Save (Speichern in German):
That’s all we have to do in our GoDaddy account. Keep in mind though that this change of nameservers with the domain registrar can take up to 24 hours to propagate through the Internet. In my experience so far it is a lot faster than that. Sometimes only a few minutes or hours. To be on the safe side, wait up to one day before continuing with the next steps in this article.
Add domain and DNS records
After pointing our domain name to the Linode nameservers, we now need to configure the DNS records on the Linode nameservers. You can think of such DNS records as instructions for the Linode nameservers. These instructions hold information allowing the Linode nameservers to map the domain name to our server’s IP address. Luckily for us, the Linode manager can automatically create a default set of DNS records that work fine for our server.
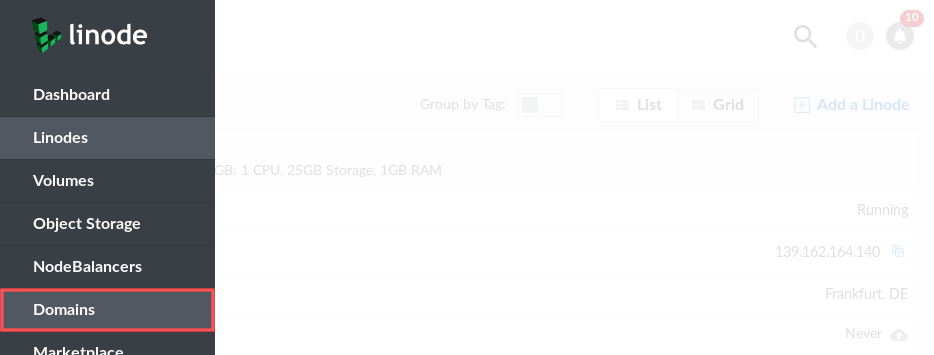
To gets started with the DNS records configuration, log into your online Linode account. After logging in, the Linode manager appears. Select the Domains section from the menu:
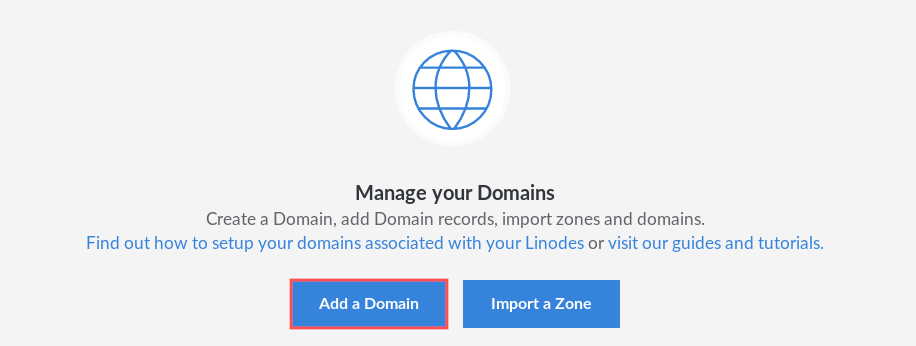
Once the Domains section appears in the Linode manager, select the option to Add a domain:
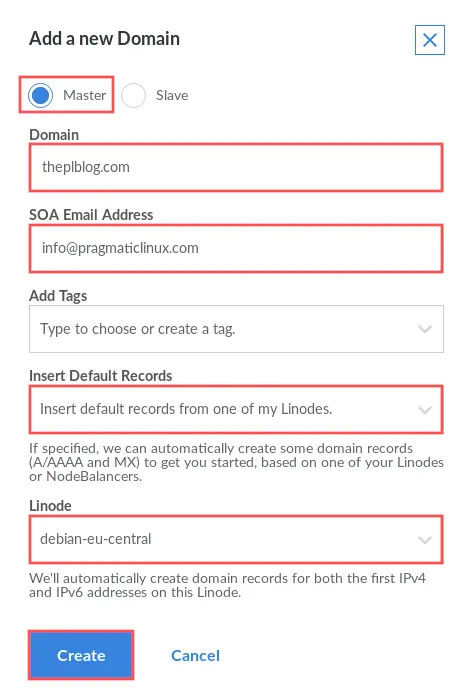
The Linode manager presents you with a form that we need to fill out. Select Master and continue by filling out the boxes for Domain and SOA Email address. Enter the domain name your registered and your e-mail address, respectively. The following two steps are important, because they allow the automatic creation of DNS records for our server. From the Insert Default Records drop-down box, select Insert default records from one of my Linodes. Then in the Linode drop-down box, select your Linode VPS server that you want to use the domain name for. Once you completed filling out the form, click the Create button:
When the Linode manager completed the creation of the domain, it presents an overview with the automatically created DNS records:
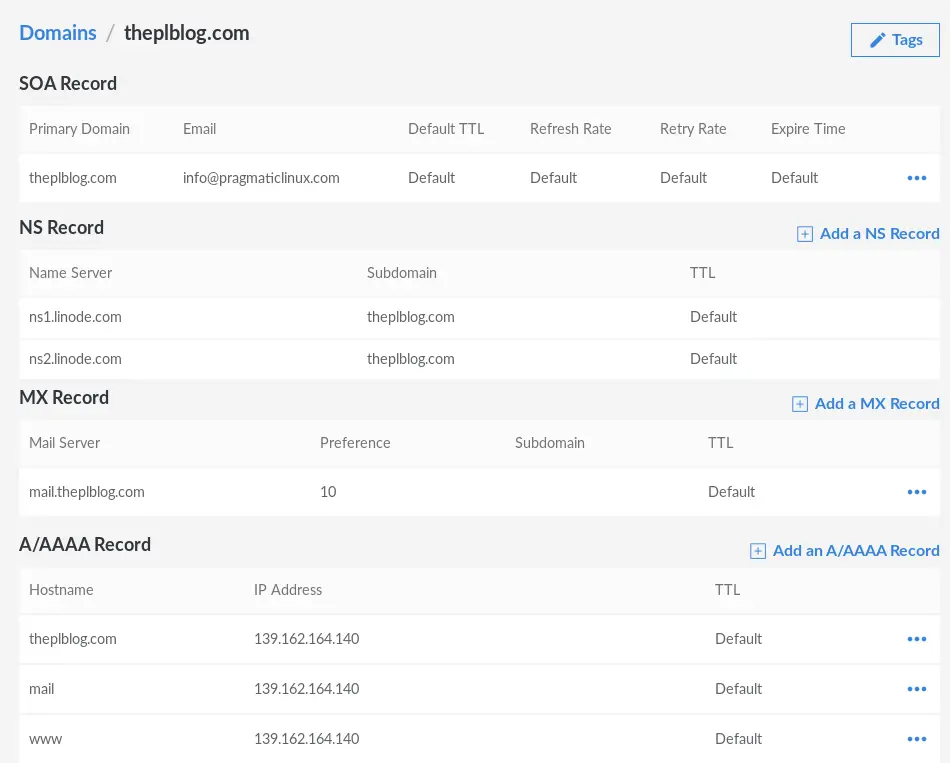
This might look complex and confusing if you never created DNS records before, so let me briefly explain this further.
DNS records explained
The SOA Records configures the high level domain name and the e-mail address of the person responsible for its configuration.
The NS Record shows the nameservers that this configuration is stored on. So basically these should match the ones we entered earlier with our domain registrar.
The MX Record specifies that mail server (mail.theplblog.com) responsible for accepting e-mail messages for this domain name. Our VPS server does not have a mail server configured, so this is not yet used.
The more interesting ones are the A Records, since an A-record does the actual mapping of the IP address to a domain name. You’ll notice that Linode automatically entered the IP address of our VPS server (139.162.164.140 in my case). This means that the entire Internet can now access our server through theplblog.com, www.theplblog.com and mail.theplblog.com. The first two A-records are perfect for when we intend to use our server as a web server and to connect to our server via SSH. We need the last one if we plan on configuring our server as a mail server.
You can easily add more A-records if you so desire to. One interesting use for this is when you have a second server that you want to access through a sub-domain. For example testserver.theplblog.com. You then simply create an additional A-record for testserver and specify the IP address of this second server. Its FQDN would then be testserver.theplblog.com.
Configure the server’s reverse DNS
The DNS configurations we made so far are intended to find our server’s IP address, if someone attempts to connect to it through the domain name. Finding the domain name that an IP address belong to, so the other way around, is not yet configured. This is called reverse DNS. Although it is not an actual requirement, it is highly recommended to configure the reverse DNS.
For example, many e-mail servers will actually reject incoming e-mails from an IP address that does not have a matching reverse DNS. So if I installed Postfix on my server for sending e-mails and my server tries to send an e-mail from let’s say info@theplblog.com to whomever, the recipients e-mail server most likely rejects the message, unless the reverse DNS was properly configured.
To configure your Linode’s reverse DNS, select your Linode server in the Linode manager and go to the Networking tab:
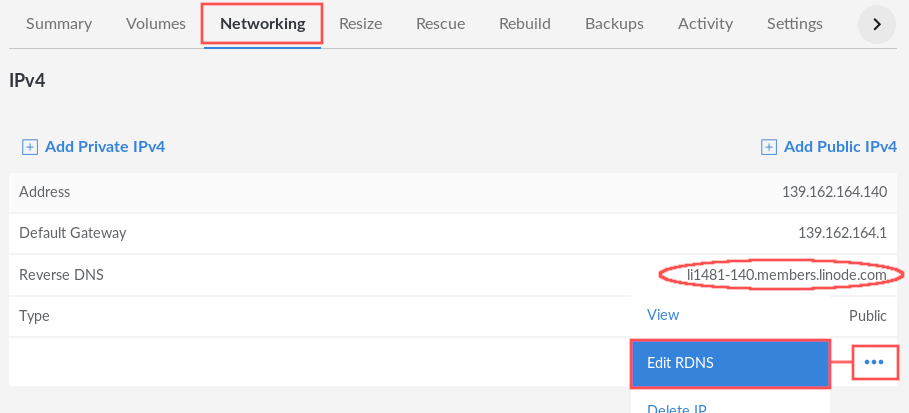
Here you’ll see the currently configured Reverse DNS. In my case it is set to li481-140.members.linode.com. Click the three dotted button and select Edit RDNS from the popup-menu. In the dialog that appeared, enter the domain name:
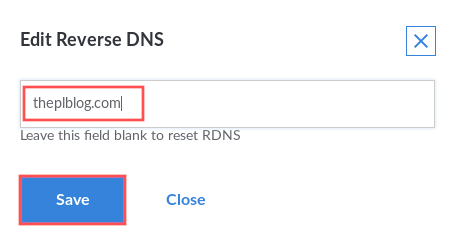
Finally, click the Save button to complete the configuration of the server’s reverse DNS.
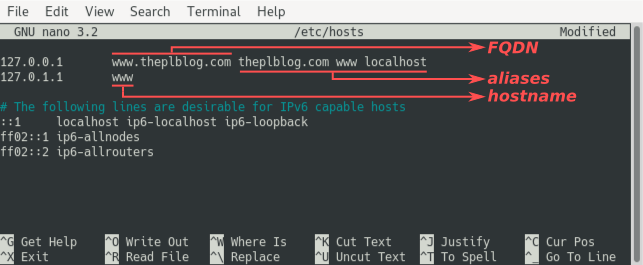
Configure the hostname and FQDN
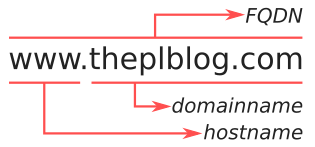
In the previous sections we added the domain and DNS records for the server and configured its reverse DNS. This way the Linode nameservers (nsX.linode.com) know what to do. The last piece of the puzzle configures the hostname, domain name and FQDN on the actual server. The following image illustrates the meaning of the terms hostname, domain name and FQDN for the server:
The command from a Linux terminal on your PC to connect to the server is: ssh <username>@ip-address or ssh <username>@hostname. Since we are in the middle of configuring the hostname, the better option right now would be to connect using the IP address. In my case I have a user account setup on the server for username pragmalin and the IP address of the server is 139.162.164.140. This means that I can log into this server via SSH with the command:
ssh pragmalin@139.162.164.140
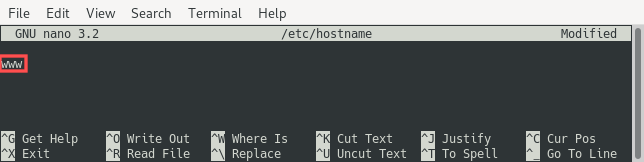
Once logged in to your server via SSH, configure the hostname by editing the /etc/hostname file on the server. Set the hostname to www:
sudo nano /etc/hostname
The remainder of the configuration is made by editing the /etc/hosts file on the server. Update the lines that start with 127.0.0.1 and 127.0.1.1:
sudo nano /etc/hosts
For these configuration changes to take effect, the server needs to be rebooted:
sudo reboot
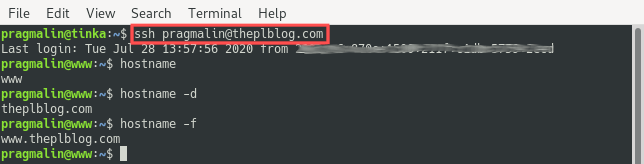
After issuing the reboot, give the server a few minutes to finish rebooting and then login via SSH again. This time you can connect to www.theplblog.com or even theplblog.com, since we specified this one as an alias:
ssh pragmalin@theplblog.com
You can run the following commands to verify the correct configuration of the hostname, domain name and FQDN, respectively:
hostname
hostname -d
hostname -f
Wrap up
After following the instructions in this article, you: registered your own domain name, set the name servers to use, added DNS records and configured the hostname and fully qualified domain name (FQDN) on the server. That’s all there is to configure your own domain name for your Linode VPS. You can now conveniently access your server through the domain name, instead of having to remember its IP address. Interested in making it a web server? The article about how to install a LAMP stack on Debian 10 would be a nice follow-up for you.
2 thoughts on “How to configure a domain name for your Linode VPS”
Comments are closed.