

 by
by Interested in running your own Linux server and curious about where to get started? This article guides you step-by-step with creating a new virtual machine in VirtualBox and performing a minimal server installation based on Debian 10, codenamed “buster”. It can serve as an ideal foundation for all your Linux server experiments and installations. The created Debian server will have 2 GB RAM, 2 CPUs and 20 GB disk space. This is comparable to an entry level online Virtual Private Server (VPS). With clear instructions and clarifying screenshots, you can have your own Debian based Linux server running within half an hour of your time.
Background
A virtual machine is an emulated computer that can run on your own computer. With the freely available VirtualBox software, you can easily create a virtual machine. The remainder of this article assumes that you already installed VirtualBox on your PC. While writing this article, version 6.1 is installed on my trusty Thinkpad T450s laptop, also running Debian 10.
Instead of a virtual machine, you could choose to dedicate actual hardware such as an old PC or laptop, or you could rent a VPS and host the server online in the cloud. The benefit of running your Debian server as a virtual machine is that you do not need any hardware in addition to your own PC, it doesn’t cost you anything, and your server is not exposed to the Internet. Additionally, VirtualBox has a build-in feature that enables you to create snapshots of your server that you can roll back to at any time. This means that you do not have to worry about making a mistake once you start experimenting with installing software on your server.
Why did I pick Debian as the distribution for the Linux server? Theoretically, you can build a Linux server with any Linux distribution. Practically, you want to select a stable distribution that is supported for at least three years, as opposed to a rolling release distribution. This makes Debian, Ubuntu, CentOS and openSUSE good candidates. I selected Debian for this article simply because it is my personal favorite and has never let me down or caused me problems over the past years.
Download
If you were to install Debian on real hardware, the first thing you would do is download the installation image, burn it onto a DVD and boot from it. This procedure is similar for a virtual machine, except that you can skip the DVD burning part. Go ahead and download the installation image from the Debian website. The small installation image for 64-bit PCs is the one you want to go for:
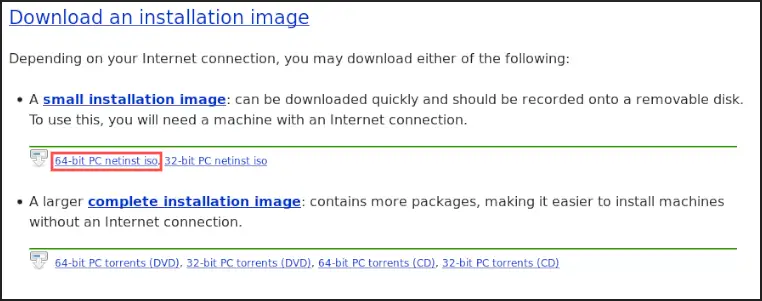
On my PC, the installation image is now available at: /home/pragmalin/Downloads/debian-10.3.0-amd64-netinst.iso.
Create the virtual machine
After completing the installation image download, it is time to create a new virtual machine in VirtualBox. Start the VirtualBox program and follow the steps as outlined in the following slide show of screenshots:


Slide 1 – Click the New toolbar icon.
Slide 2 – Set the name to Debian Server or any other name of your preference. Specify Linux as the operating system type and select Debian (64-bit) from the version drop-down box.
Slide 3 – Configure 2048 MB of RAM, which is 2 GB. You are of course free to assign more or less, just keep in mind that the assigned RAM will not be available anymore to the host operating system on your PC. My recommendation is to keep as least 50% of RAM for the host operating system.
Slide 4 – Select the option to create a new virtual hard disk.
Slide 5 – Select VDI as the hard disk file type. The hard disk of the virtual machine will be a stored in a single file with .vdi extension on your PCs hard disk.
Slide 6 – Select to option to dynamically allocate storage on the physical disk. This way the VDI-file will automatically grow in size as needed.
Slide 7 – Configure 20 GB for the hard disk of your virtual machine. This is sufficient for most server installations. Feel free to assign more if you have plenty of free space on your PCs hard disk.
Slide 8 – After creation of the new virtual machine, we are going to change a few more settings. Click the Settings toolbar button to open the virtual machine’s settings dialog.
Slide 9 – By default VirtualBox allocates only 1 CPU to the virtual machine. Most PCs nowadays have a multi core CPU, making it possible to allow the virtual machine to use 2 CPUs or more. Select 2 CPUs to give the virtual machine a bit more processing power.
Slides 10 + 11 – This is where we connect the downloaded Debian ISO file to the virtual machine. Think of it as inserting a DVD into your virtual machine.
Install Debian as a server
Go ahead and start the virtual machine by clicking the green Start button on the toolbar in VirtualBox:
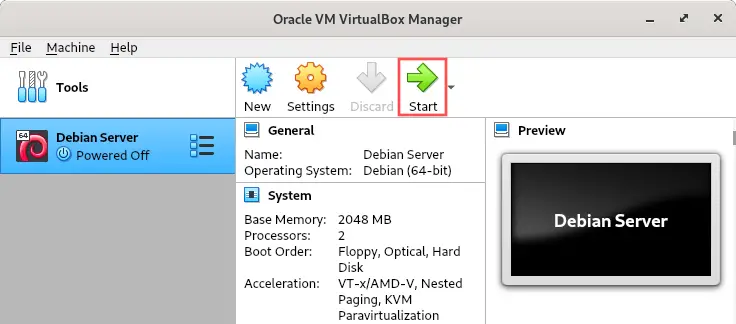
This starts the new virtual machine, boots from the attached ISO that holds the Debian installation image, which enables you to perform the Debian server installation as illustrated in the following slide show:


Slide 1 – Go with the default Graphical install option. This way you can use your mouse to select items instead of having to do everything with the keyboard.
Slides 2 to 5 – Configure the preferred language, your location, locale and keyboard layout.
Slide 6 – Enter the hostname for the server. This can be anything to your liking. It is just a name to refer to the server.
Slide 7 – Leave the domain name empty. The server is not facing the Internet and we did not register a domain name for it.
Slide 8 – For security reasons you do not want to enable the root account. To achieve this, do not enter a password for the root user.
Slide 9 – Enter your own name here.
Slide 10 – Enter your preferred user name here. This is the name you enter later on to log into your server.
Slide 11 – Enter your preferred password here. Note that this will also be the password for executing sudo commands. These are commands that run with root privileges.
Slides 12 to 16 – Go with the default proposed hard disk partition layout. This creates one EXT4 partition for storing all files and another partition for the swap. When your server consumed all available RAM it will place RAM data in the swap. Think of it as a low speed emergency RAM.
Slides 17 to 21 – Configure the package manager as shown on the slides. With the help of the package manager, you can install and update software on your server. The package manager connects to an online package repository for this.
Slide 22 – Only select standard system utilities and SSH server here. This is basically where you tell the installer that it will be a server and not a desktop installation. The server only needs the basic utilities and an SSH server. SSH stands for Secure Shell and offers functionality to remotely login to your server, for example from your host PC.
Slides 23 + 24 – Configure the GRUB bootloader installation as shown on the slides. Your server cannot start without a bootloader. Therefore the installer should install the bootloader for your.
Slide 25 – The Debian server installation is now complete. Finally, click the Continue button to start your shiny new Debian server.
Run your server
After completion of the steps in the previous section, the installer automatically starts your freshly installed Debian server. In case your server isn’t yet running, click the green Start button on the toolbar in VirtualBox. Once the server booted a login prompt appears. Login to the server by entering the username and password you specified on slides 10 and 11 in the previous section. Some commands you can run for getting to know your server:
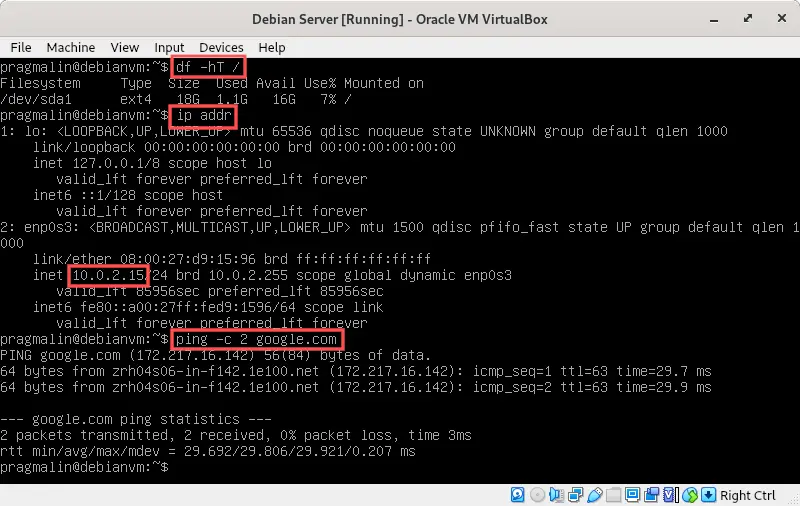
The df -hT / command lists the disk usage of the root file system. Inspecting the output of the ip addr command, tells you that the assigned IP address is 10.0.2.15. Running the ping -c 2 google.com command checks if the server has Internet access.
To shutdown the server, you can issue the sudo poweroff command. Note that this command needs to run with super user privileges, hence the sudo prefix. The command therefore prompts you to specify your password as a security measure.
Access your server remotely
You typically connect remotely to the server via SSH to interact with it. The command from a Linux terminal on your host PC to create such a connection is: ssh <username>@ip-address or ssh <username>@hostname. For example: ssh pragmalin@10.0.2.15 or ssh pragmalin@debianvm in the case of the server configuration presented in the slide show earlier. If you try this, you’ll notice that this does not work. The reason is that the network type of the virtual machine is Network Address Translation (NAT) by default. The illustration below provides more information regarding the NAT network type.

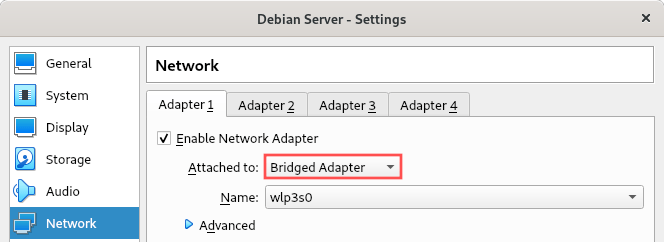
If the network type is set to NAT, the VirtualBox program itself acts as a router between your host PC and the virtual machine, which blocks connections to the virtual machine. Therefore, you would have to configure port forwarding in the virtual machine’s NAT settings. This is definitely an option, however there is an easier solution: you can change the virtual machine’s network type to Bridged as is illustrated on the right side of the previous illustration.
With the Bridged network type, the virtual machine piggy backs on your host PC’s network interface to connect directly to your home router. The result is that the virtual machine shows up on your local network as if it is physically connected to your home router. The benefit of this is that your server can be seen and accessed from all other computers on your local network. This is exactly what you want for a server.
To change the network type to Bridged, make sure the server is turned off (sudo poweroff). In your virtual machine’s settings dialog, navigate to the Network page and select Bridged Adapter from the Attached to drop-down box. After that select your host PC’s active network interface in the Name drop-down box. In the example is it wlp3s0, which is the wireless network interface on my laptop:
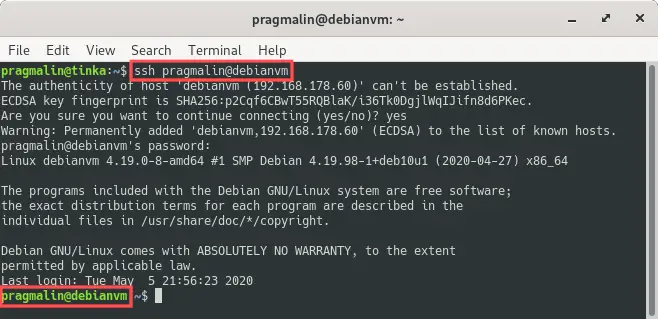
After booting up, skip the login part. Instead, open your terminal on the host PC and attempt to login remotely via SSH by entering the command ssh <username>@hostname. You’ll notice that it now works:
On my network there is still one little issue and you might be affected by this as well: after switching to the Bridged network type, the Debian server no longer has Internet access. You can test this by running the command ping -c 2 google.com. If you get a ping response, then all is good and you are done. If you do not get a ping response, disable IPv6 by running the following command on one line:
echo 'net.ipv6.conf.all.disable_ipv6 = 1' | sudo tee -a /etc/sysctl.d/70-disable-ipv6.conf > /dev/null
After a reboot, all should be okay:
sudo reboot
Configure Apt sources
With your new Debian server installed, sooner or later you’ll want to update the installed packages to apply possible security fixes. You can do so with the follow set of terminal commands:
sudo apt update
sudo apt upgrade
If you run the first command, you’ll notice it generates an error:
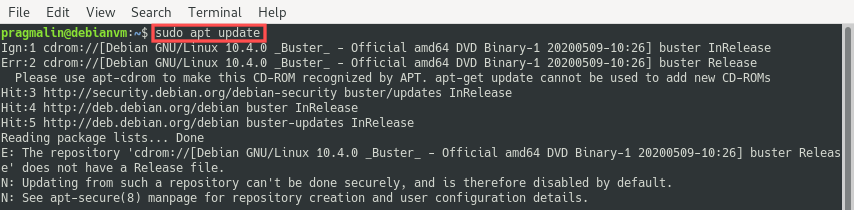
While running this command, Debian connect to the package repositories listed in file /etc/apt/sources.list. Since we initially installed Debian from a DVD image that we virtually connected to our virtual machine, Debian wants to access this DVD to look for new package versions there. Upon completion of the Debian server installation, this DVD was automatically disconnected from our virtual machine. This causes the error as can be seen in the previous terminal screenshot.
Luckily, there exists an easy and quick fix for this. We just need to edit the /etc/apt/sources.list file and remove the lines that refer to the installation DVD. While we are at it, we might as well add the contrib package repository to access even more software packages. You can edit this file from the terminal with the help of the Nano editor. Refer to this tutorial for a brief introduction on how to use Nano editor in the terminal.
Run the following command to configure the Apt sources:
sudo nano /etc/apt/sources.list
Delete the first two lines that refer to the DVD and make sure contrib is enabled in additional to the already enabled main package repository. Once done, the file contents should like similar to this:

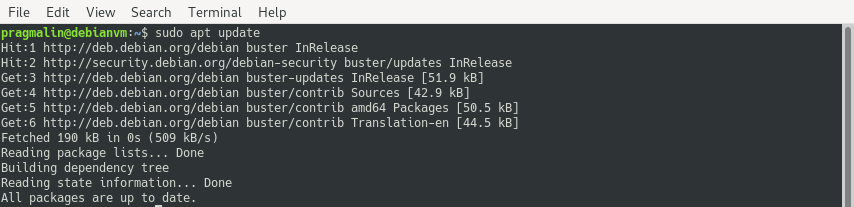
After saving and closing this file in Nano, you can run the sudo apt update command one more time to verify that the previously reported error is no longer present:
Create a server snapshot
A snapshot represents a specific state of the virtual machine, including its settings and its hard disk (VDI-file) contents. VirtualBox stores snapshots on your host PC’s hard disk. You can take as many snapshots as you want and you can revert the state of the virtual machine to a snapshot at any time. You can even clone your virtual machine into a new one, based on a specific snapshot.
It is highly recommended to make a snapshot after the initial installation and each time before you are about to make changes, perform a system update, or want to just experiment a bit. In case something goes wrong, you can then simply rollback to the previous state that was still working.
At this point your newly installed Debian server is ready, which means now would be an excellent time to create a snapshot. It is best to make a snapshot when the virtual machine is turned off (sudo poweroff). The following slide show presents how to create the snapshot:


Slide 1 – Click on the icon located at the right side of your virtual machine entry. Select Snapshots from the pop-up menu to open the snapshots view.
Slide 2 – With the snapshots view opened, click the Take toolbar button.
Slide 3 – Enter a snapshot name. This can be anything you want. Optionally, you could add a brief description of the snapshot. Click the OK button to create the snapshot.
Slide 4 – The snapshots view now lists your newly created snapshot. You can restore this snapshot by selecting it and then clicking the Restore toolbar button.
Wrap up
After following the steps in this article, you now have a freshly installed Debian server virtual machine that is accessible from anywhere on your local network. It is an excellent foundation to install and experiment with server applications. If something goes wrong, you can always undo your modifications by restoring the created snapshot.
What can you do with the current server? Here are just a few ideas:
- Install a LAMP stack and then a WordPress blog.
- Make it a local game server such as a Minecraft server.
- Install Samba to turn it into a network attached storage (NAS).
- Develop your own Django web application and install it on this server.
Visit this blog regularly as more articles are planned that take this server as a starting point. Consider subscribing to the blog if you would like to receive new articles automatically by Email. Was something missing or incorrect in this article? Feel free to leave your feedback in the comment section below.
5 thoughts on “Debian 10 “buster” server installation in VirtualBox”
Comments are closed.