
 by
by This article explains how to setup a virtual private server (VPS) on the Linode cloud infrastructure. Debian 10 “buster” is the Linux distribution of choice for this VPS server. After the creation of the VPS, the article teaches you how to further secure the server. You’ll learn how to create a new user with sudo access, how to disable the root user from logging in via SSH, how to install an SSH key pair and finally how to disable password logins via SSH.
After the setup of this Linode VPS server, you can use it as a foundation for all your server projects. Not only for hobby, testing and learning purposes, but also as a production server. Note that PragmaticLinux is not affiliated with Linode nor is this article sponsored by Linode. I am simply just a fan of the services that Linode provides and prefer Linode over others such as DigitalOcean and Vultr.
VPS creation
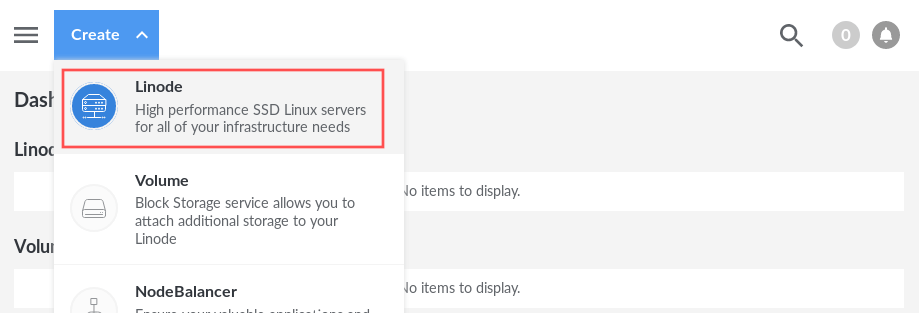
As a first step we create the actual VPS. Visit the Linode website and log yourself in with your account. Once logged in you can see a blue drop-down button, labeled Create. This button is located in the top bar. Click the button and select Linode from the drop-down menu:
Select Linux distribution and VPS region
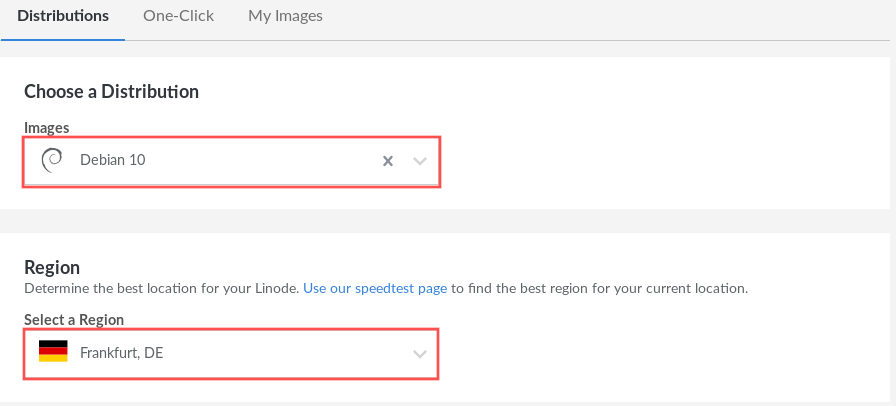
Linode offers you a few choices regarding the Linode you want to create. The first choice is the Linux distribution. Since this article covers Debian 10 “buster”, select Debian 10 from the drop-down box, labeled Images. Next you can select the region where you want your VPS to be located. Since I am located in Germany, I selected Frankfurt, DE, but you can of course change this to whatever region you prefer. Ideally you select a region closest to where the majority of the server users are located:
Select Linode plan
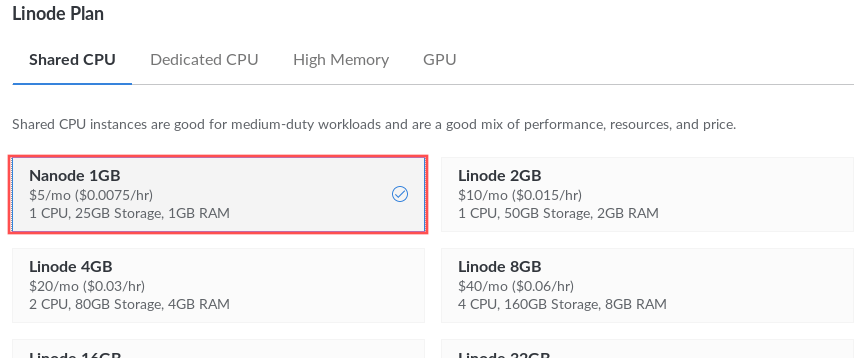
The Linode plan determines the CPU and memory resources made available to your server. The more resources you enable, the higher the monthly cost. For this article the smallest Nanode 1GB suffices. Note that with Linode, you can upgrade or downgrade your Linode plan at a later point.
Set Root password
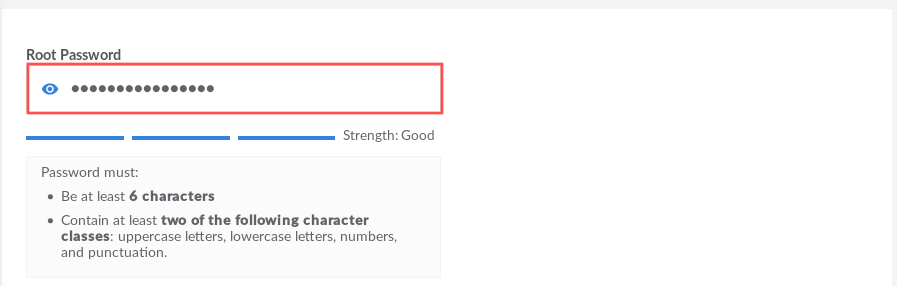
As a last step in the configuration of your Linode VPS, enter the root password. A root password should be a strong password. You can generate such a password with online tools such as this password generator. We need this to login to the server via SSH after the VPS creation. For this reason, make sure to write the password down somewhere for future reference.
Finalize the VPS creation
After making the basic VPS configuration, it is time to request Linode to complete the initial setup of the VPS server on their cloud infrastructure. Scroll down to the bottom of the page to the section with heading Linode Summary. Click on the Create button to kick off the automatic VPS creation.
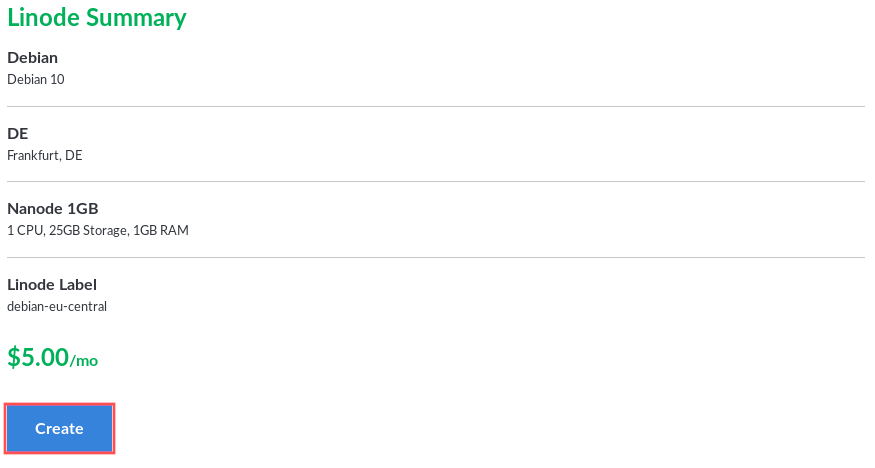
The Linode manager presents you with a progress bar that shows the status of your VPS creation. When the VPS creation process completes, Linode automatically boots your new server.
Finding the IP address and FQDN and login via SSH
After completing the initial setup of the VPS server on the Linode cloud infrastructure, it is time to verify that it actually works. For this we can log into the server via SSH. However, we need to first know either the IP address or the fully qualified domain name (FQDN). Fortunately, the Linode manager offers this information on the Networking tab:
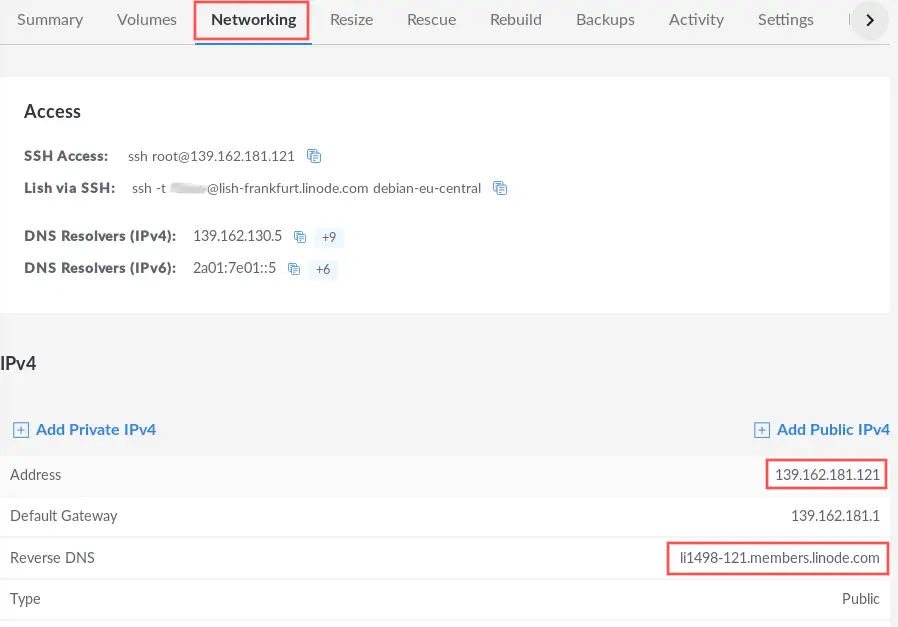
In my case, the assigned IP address is 139.162.181.121 and the assigned FQDN is li1498-121.members.linode.com. The remainder of this article makes use of these values. Keep in mind that you need to replace these values with the ones that Linode assigned to your server.
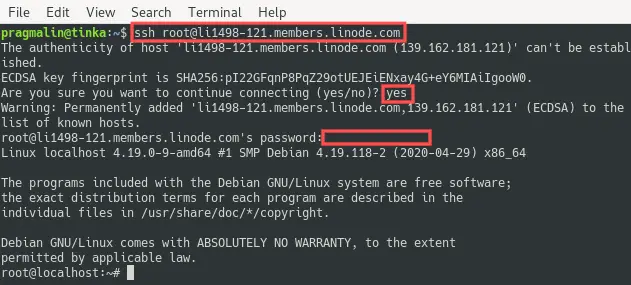
The command from a Linux terminal on your PC to connect to your server is: ssh <username>@ip-address or ssh <username>@hostname. Currently only the root user exists so that will be the username. This means that we can log into this server via SSH with the command:
ssh root@139.162.181.121
or
ssh root@li1498-121.members.linode.com
Specify the root password that you entered in a previous step during the VPS creation:
Note that you can close the SSH connection at any time by typing the exit command.
Configure the package manager and update the server
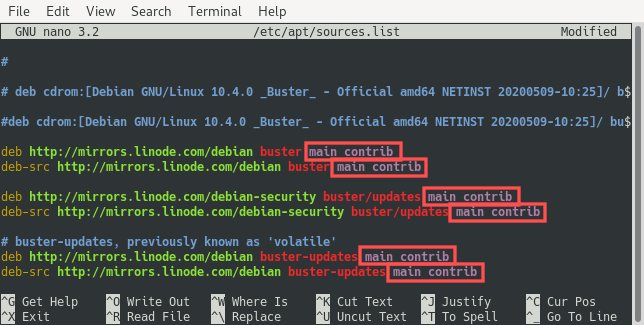
Before making any configuration changes and installing new software, the package manager should be configured, followed by an update of the currently installed software. Let’s start with the configuration of the apt package manager. Edit the file that configures the apt repositories with the Nano text editor. Refer to this article for a brief refresher on editing text files from the command line with the Nano text editor.
nano /etc/apt/sources.list
Enable both the main and contrib repositories as can be seen here:
After saving the changes to this file, update the currently installed software packages by running these two commands:
apt update
apt upgrade
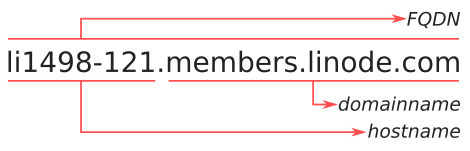
Configure hostname and FQDN
As seen in a previous section, Linode automatically assigned a fully qualified domain name (FQDN) to our server, namely li1498-121.members.linode.com. In this section we configure our server accordingly. The following image illustrates the meaning of the terms hostname, domainname and FQDN on a Linux server:
If you registered your own domain name, then you could of course configure this one instead. So myserver.mydomain.com instead of li1498-121.members.linode.com. You just need to make sure you configured it properly with the help of the Linode DNS manager. How to do this is outside the scope of this article, but is covered in another article.
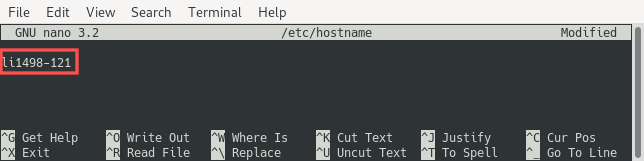
Configure the hostname by editing the /etc/hostname file. Set the hostname to li1498-121:
nano /etc/hostname
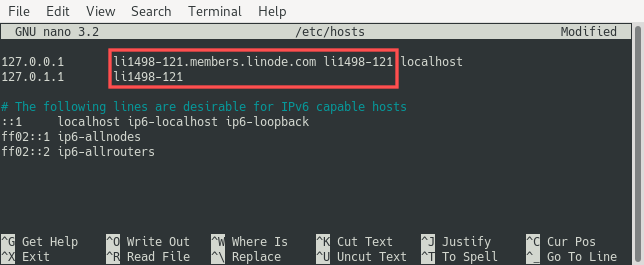
The remainder of the configuration is made by editing the /etc/hosts file. Update the line that starts with 127.0.0.1 and add a new line that starts with 127.0.1.1:
nano /etc/hosts
For these configuration changes to take effect, the server needs to be rebooted:
reboot
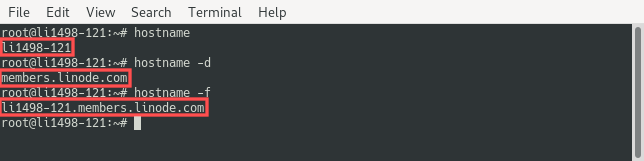
After issuing the reboot, give the server a few minutes to finish rebooting and then login via SSH again. You can run the following commands to verify the correct configuration of the hostname, domainname and FQDN, respectively:
hostname
hostname -d
hostname -f
Create a new user with sudo access
Up until this point we logged in directly with the root user. Hackers can easily guess this username and then try out all sorts of different passwords to try and connect via SSH. For security reasons, we should therefore disable SSH connections for the root user. Before we do this, we need to make sure to create another user; One that we allow to run commands with sudo privileges. In this article I create the user pragmalin, but you can of course change this username to whatever you prefer.
Run the following two commands to create the pragmalin user and allow it to run commands with sudo privileges. Make sure to give the new user a strong password as well:
adduser pragmalin
adduser pragmalin sudo

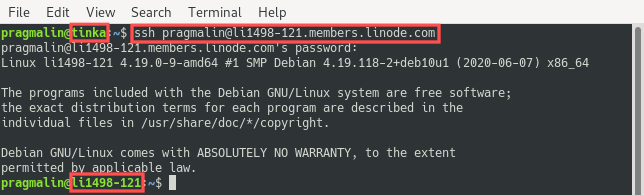
Close the current root SSH connection and connect again via SSH, but this time log in as the new user pragmalin, just to verify that it works. The remainder of the article assumes that you logged in as this new user:
ssh pragmalin@li1498-121.members.linode.com
After verifying that you can login via SSH as the new user, logout again before continuing with the next section:
exit
Generate and copy SSH key to the server
Logging in with a username and password via SSH poses a security issue. Any hacker with enough patience and perseverance could guess your login credentials. For an Internet facing server, logging in with an SSH key pair instead is therefore the recommended practice. At the same time it adds convenience for you, because it enables password-less login.
Prerequisites of logging in with an SSH key pair are that we need to first generate the key pair. Next we copy the public part of the SSH key pair to the server. Finally we can register the private part of the SSH key pair on our own PC. A previously published blog article provides in-depth details on how to perform these steps. In this section, I’ll just list the commands needed without going into all the details.
Generate the SSH key pair
Note that you perform this step on your local PC, so not on the server. The SSH key pair should be generated in the ~/.ssh directory. So we make sure that this directory exists, then go to this directory and call the ssh-keygen command. We’ll give the SSH key the name debian_server, but you can adjust this to whatever you prefer:
mkdir -p ~/.ssh && cd ~/.ssh && ssh-keygen
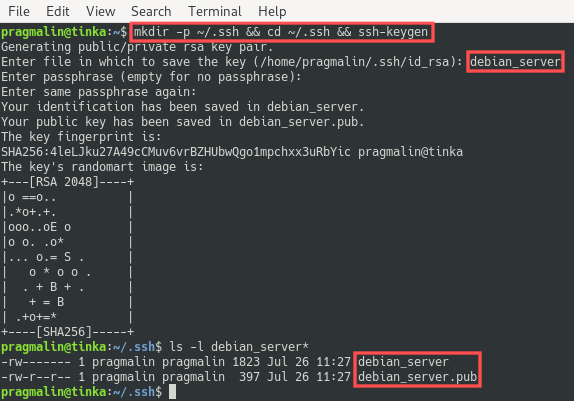
The private key file is called debian_server and the public key file is called debian_server.pub.
Copy the public SSH key to the server
The public part of the SSH key pair needs to be copied from your PC to the server. The command ssh-copy-id helps out with this step:
cd ~/.ssh && ssh-copy-id -i debian_server.pub pragmalin@li1498-121.members.linode.com
Register the private SSH key on your PC
If you register your newly created private SSH key file with the SSH authentication agent, you no longer have to specify the name and location of the private SSH key file each time you connect to your server via SSH. So this step is not absolutely necessary, but it makes your life as a server administration just one tiny step more convenient:
eval "$(ssh-agent -s)" && ssh-add ~/.ssh/debian_server
Login with the SSH key
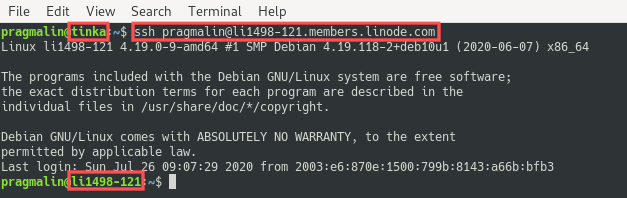
At this point we completed all steps that enable the login with the SSH key pair. The only thing left to do is to verify that we can now actually connect to the server with SSH and authenticate with the new SSH key pair. You can run the usual command to connect to your server with SSH. After a successful setup of the SSH key pair, you’ll notice that you no longer get asked to enter your password:
ssh pragmalin@li1498-121.members.linode.com
Disable root and password login via SSH
In the previous sections we created our own user account on the server and made it possible to login using an SSH key pair. To reap the security benefits of these measures we should reconfigure the SSH server. It should be such that logins with the root user are no longer allowed and that logins with a password are no longer allowed.
Login to the server and use the Nano editor to edit the file /etc/ssh/sshd_config:
sudo nano /etc/ssh/sshd_config
In this file make sure the following variables are configured. If these variables are not yet present, add them on a new line:
PermitRootLogin no
ChallengeResponseAuthentication no
PasswordAuthentication no
UsePAM yes
Next, save the changes to the file and exit the Nano editor. As a final step, restart the SSH server to activate the new configuration settings:
sudo service ssh restart
To verify the improved security measures, you can attempt to login as the root user. You’ll see that it no longer works:

Wrap up
This completes the setup of your Linode VPS server. It runs Debian 10 “buster” and can be accessed via SSH using your own created user account. Thanks to the security measures you implemented, you can rest assured that no unwanted third parties can access your server.
After the setup of this Linode VPS server, you can use it as a foundation for all your server projects. Not only for hobby, testing and learning purposes, but also as a production server. Not sure where to get started? Consider turning it into a web server. The article about how to install a LAMP stack on Debian 10 would be a great starting point.
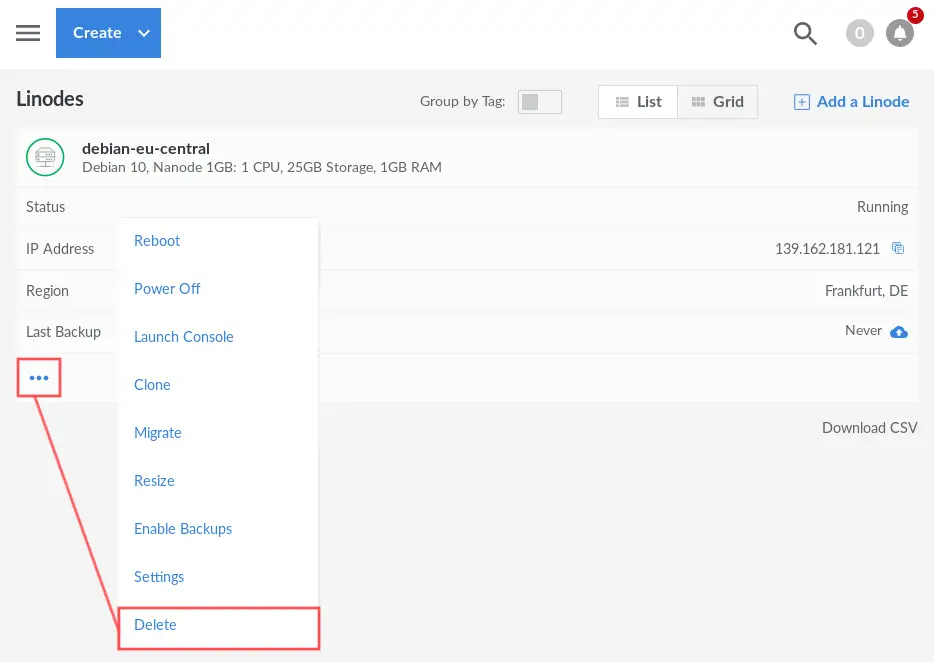
As a final note, keep in mind that Linode charges you for your server the moment it got created. So it doesn’t matter if the server is running or not. This makes sense, because after creating the server, Linode reserves CPU and memory resources on their cloud infrastructure for you. To stop the accruing charges, simply delete it through the Linode manager, once you no longer need the server:
4 thoughts on “Setup a minimal Debian 10 “buster” server as a Linode VPS”
Comments are closed.