
 by
by Curious about how you can automatically start your VirtualBox VM server on PC or server boot? Then you came to the right place. Grab a cup of coffee and get comfy. In this article you learn how to create a Systemd service unit for your VirtualBox server VM, such that it automatically starts on booting your PC or server hardware.
Background
A lot of Linux users try out different Linux distributions in the comfort of a VirtualBox virtual machine (VM). We have all done our fair share of distro hopping. Another great purpose of virtual machines is for running multiple servers on the same hardware. Sure, you could install Proxmox on your server and have Proxmox manage your VMs. But as a Linux tinkerer, isn’t it more fun to figure out how you can do this all yourself?
You could install your own base Linux operating system of choice on your server hardware. Then create virtual machines with the help of VirtualBox. While happily going down this path, eventually you’ll get to the point where you wonder: “Wait a minute. How do I automatically start all these VirtualBox VMs each time I boot the server?” In this article you learn how to create a Systemd service unit for your VirtualBox server VM, such that it automatically starts on booting your server hardware.
Brief Systemd introduction
Systemd software manages the initialization of the system during startup. Systemd is the one that starts all the key processes to get your Linux system properly running. This includes for example the mounting of the file systems, setting up networking and getting the display manager up-and-running. As such, it makes sense to outsource the task of starting your VirtualBox VMs on boot, to Systemd. For a basic introduction of Systemd, refer to this previously published tutorial about how to run a startup script on a Raspberry PI using Systemd.
Headless server VirtualBox VM
The Systemd service unit presented in this article, starts your VirtualBox VM on server boot in headless mode. With other words it is assumed that your VirtualBox VM does not require a monitor, keyboard and mouse. Consequently, this solution works best for server VMs and not so much for desktop VMs. You typically administer a headless server via an SSH connection or through an admin web page.
What you need
To complete the steps presented in this article, you need two things:
- A PC with Linux and VirtualBox installed. It can be a server PC or simply your own desktop or laptop PC.
- A VirtualBox server virtual machine.
Throughout this article I’ll be using my trusty Thinkpad T450s. It currently runs Debian 10 “buster” with the GNOME desktop environment and has VirtualBox version 6.1 installed. If you do not yet have a headless server VM available in VirtualBox, simply follow the steps in the article about installing a minimal Debian 10 “buster” server in VirtualBox. I’ll be using this same server VM in this article.
Add your user to group vboxusers
The approach outlined in this article assumes that your user belongs to the group vboxusers on your PC. Let’s first verify if this is the case. On my PC I am user pragmalin. Open your terminal and type the groups command to see a list of groups that your user belongs to:

As you can see, the list does not contain vboxusers. If the group list for your user excludes vboxusers as well, then we need to first add our user to group vboxusers. This is easily accomplished by running the following command from the terminal:
sudo usermod -a -G vboxusers $USER
Note that $USER is the equivalent of your username. So in my case I could have typed pragmalin instead of $USER as well.
This change of group belonging only takes effect after a reboot. So go ahead and reboot your PC. Afterwards, type the groups command again in the terminal to verify that your user now belongs to the vboxusers group:

Systemd template unit to start and stop VirtualBox VMs
We can take two different approaches for configuring Systemd to start our VirtualBox VM on PC boot. With the first approach we would create a single Systemd service unit. Quick and easy. However, if you want to start multiple VirtualBox VMs on PC boot, you would have to create a Systemd service unit for each one.
With the second approach we would create a Systemd template unit. With the Systemd template unit in place, we can reuse it for each VirtualBox VM that we want to start on PC boot. Personally, I find this approach with the Systemd template unit the better one and will therefore go with this approach in this article.
The Systemd template unit to start and stop a VirtualBox VM when booting up and down a PC looks like this:
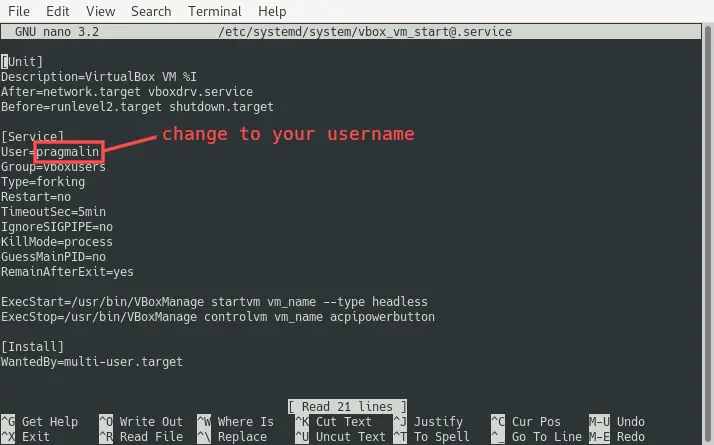
[Unit]
Description=VirtualBox VM %I
After=network.target vboxdrv.service
Before=runlevel2.target shutdown.target

[Service]
User=pragmalin
Group=vboxusers
Type=forking
Restart=no
TimeoutSec=5min
IgnoreSIGPIPE=no
KillMode=process
GuessMainPID=no
RemainAfterExit=yes

ExecStart=/usr/bin/VBoxManage startvm %i --type headless
ExecStop=/usr/bin/VBoxManage controlvm %i acpipowerbutton

[Install]
WantedBy=multi-user.target
Name this file vbox_vm_start@.service and store it in directory /etc/systemd/system/. To save you the effort of typing in the service-file contents, you can download this service-file directly from the PragmaticLinux GitHub repository. To do so, open up the terminal and run the following command:
sudo wget -P /etc/systemd/system/ https://raw.githubusercontent.com/pragmaticlinuxblog/systemdstartvboxvm/main/source/vbox_vm_start%40.service
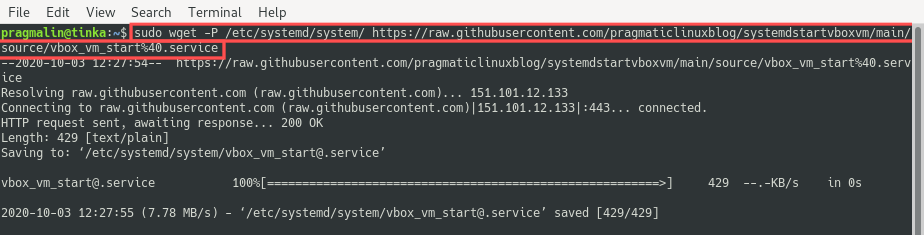
This downloads the Systemd template unit directly to the /etc/systemd/system directory. Note that the root user owns the /etc/systemd/system directory. Hence the necessity to run the command with sudo.
As a final step to complete the installation of the Systemd service unit, we need to edit the file to change the User setting. The first line in the Service section now reads:
User=pragmalin
This works great for me, since that resembles my username on this PC. However, this is undoubtedly not your username on your PC. So go ahead and edit this file, for example with Nano, and change it to your username:
sudo nano /etc/systemd/system/vbox_vm_start@.service
Enable the Systemd service for your VirtualBox VM
With the Systemd template unit in place, we can enable the Systemd service for a particular VirtualBox VM. All we need is the name of the VirtualBox VM. You can open up VirtualBox and read the name of the VM on the main screen. Alternatively, you can run the following command in the terminal to obtain a list with available VMs:
VBoxManage list vms

As you can see on the screenshot, I currently have two VMs. I would like to autostart the Debian Server VirtualBox VM on PC boot. To enable the Systemd service unit for this VM, based on our Systemd template unit, we can use this command syntax:
sudo systemctl enable vbox_vm_start@<name of VM>
We just need to replace <name of VM> with the name of our VM. There is one little snag though. The Debian Server VM name contains a space. If yours also has a space of a special character in it, you should first rename your VM such that it no longer contains a space or special characters. The VBoxManage command can assist with renaming your VM:
VBoxManage modifyvm <original name> --name <new name>
In my case, I decided on renaming Debian Server to Debian_Server. So with an underscore instead of a space:

After making sure the VM’s name does not contain spaces or special characters, we can continue by enabling the Systemd service. For my Debian_Server VM the command is:
sudo systemctl enable vbox_vm_start@Debian_Server

Note that if you ever want to disable Systemd starting your VirtualBox VM on PC boot, you can use a similar command, just replace the enable with disable:
sudo systemctl disable vbox_vm_start@Debian_Server
With the Systemd service enabled for our VirtualBox VM, we just need to reboot our PC. Afterwards we can verify that Systemd actually started our VM. Go ahead and reboot your PC now.
Verify that Systemd started your VirtualBox VM
After rebooting your PC, Systemd should have started your VirtualBox VM, but how to verify this? If your VirtualBox VM runs an SSH server you could of course attempt to connect with it. Alternatively, you can open up the VirtualBox user interface, which indicates if a VM runs or not.
Executing the systemctl command from the terminal offers another method, which provides more information. Its format is:
sudo systemctl status vbox_vm_start@<name of VM>
So pretty much a similar command syntax as for enabling and disabling the Systemd service. In my case I ran:
sudo systemctl status vbox_vm_start@Debian_Server
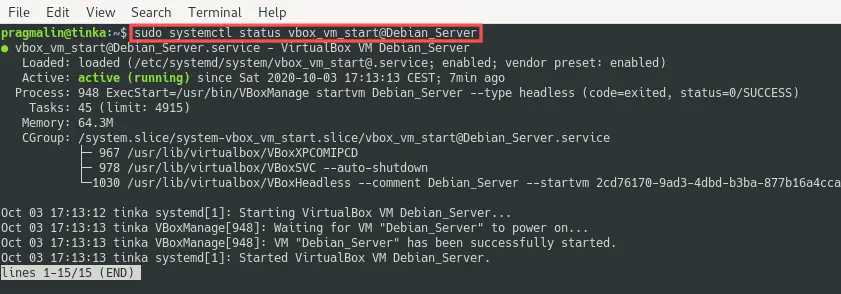
Note that pressing the q key, closes the command and gives you your terminal prompt back.
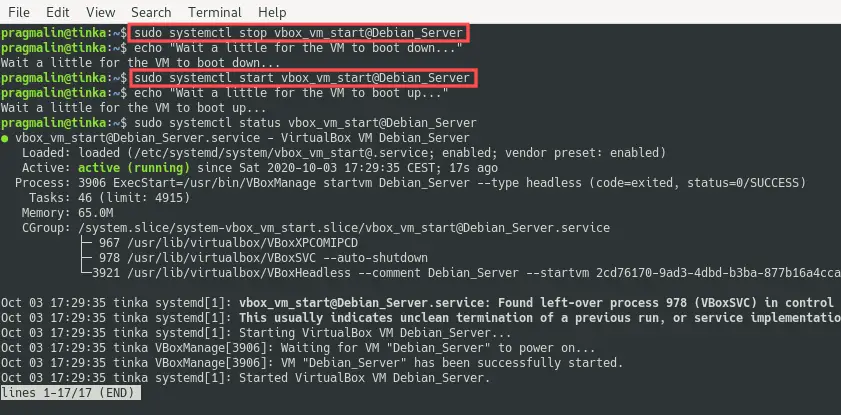
Reboot your VirtualBox VM with Systemd
At this point everything works as expected. But what if you want to reboot your VM? For example if a new kernel was installed during a system update on the VM. Sure, you can login to it via SSH and issue a reboot command. However, the Systemd can assist here as well.
To power off the VM, issue the command:
sudo systemctl stop vbox_vm_start@<name of VM>
Now give the VM a little time to actually boot down. Next power up the VM again by issuing command:
sudo systemctl start vbox_vm_start@<name of VM>
Example in my case:
Wrap up
This article showed you step-by-step how you can automatically start a VirtualBox VM on PC boot. The presented solution leverages the Systemd software functionality for managing the VirtualBox VM during PC boot and shutdown.
Instead of creating a single Systemd service unit for the VirtualBox VM, we created a Systemd template unit. With the Systemd template unit we assured that we can reuse the same solution for starting multiple VirtualBox VMs on PC boot.
Once we got the Systemd template unit installed via a direct download from the PragmaticLinux GitHub repository, we enabled the Systemd service for your VirtualBox VM based on the Systemd template unit. Afterwards we rebooted our PC to verify that everything actually works as expected, with the help of the systemctl status.
I hope you enjoyed working your way through this article and that everything worked out for you as expected. Feel free to contact PragmaticLinux if you have a specific topic that you would like us to cover in a future article.


One thought on “Start a VirtualBox VM on boot with Systemd”
Comments are closed.