 by
by Looking for a way to connect your Raspberry PI to a Controller Area Network (CAN) bus? With the help of the low-cost Waveshare RS485/CAN hat, you can augment your Raspberry PI such that it can communicate with the traffic on the CAN bus. This article explains how to configure the Waveshare RS485/CAN hat as a SocketCAN interface on your Raspberry PI.
Background
Anytime you think of doing something with CAN on a Linux device, you need to think of SocketCAN. SocketCAN consists of drivers and a network protocol stack to bring Controller Area Network support to the Linux kernel. A previous tutorial already covered how to automatically bring up a SocketCAN interface. That tutorial assumed that you own a USB-to-CAN adapter, supported by SocketCAN. For example a Peak PCAN-USB or a Kvaser Leaf Light.
Those USB-to-CAN adapters work great and if you happen to own one, by all means use it! When using the Raspberry PI, a low-cost alternative exist: the Waveshare RS485/CAN hat. At the time of this writing, it is priced at only $14. Definitely a much cheaper option to connect your Raspberry PI to the CAN bus, compared to a SocketCAN supported USB-to-CAN adapter.
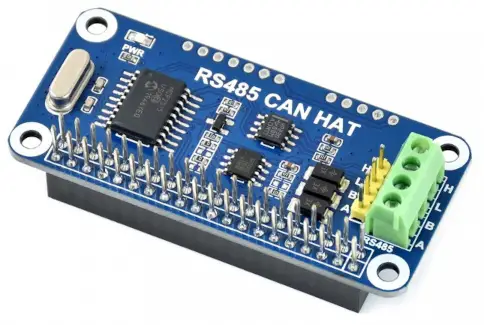
The Waveshare RS485/CAN hat attaches to the 40-pin GPIO connector on your Raspberry PI. The add-on board contains a Microchip MCP2515 CAN controller and a Texas Instruments SN65HVD230 CAN transceiver. The screw terminal connector and the 2.54 male header connector, expose the CAN transceiver’s CAN high and CAN low signals. You need those to connect to the actual CAN bus. The CAN transceiver translates the CAN high and low signals to the right signal and voltage levels for the CAN controller’s transmit and receive pins. SPI communication enables the Raspberry PI to communicate with the CAN controller itself. In this article you’ll learn how to configure your Raspberry PI, such that the Linux SocketCAN kernel functionality can use the Waveshare RS485/CAN hat for communication on the CAN bus.
What do you need
As illustrated in the image below, you need four things to complete this tutorial:

- A Raspberry PI with installed Raspberry PI operating system.
- One Waveshare RS485/CAN hat.
- A CAN bus with proper termination.
- At least one other CAN node for testing.
For this article, I used my Raspberry PI 4. Theoretically, any Raspberry PI works. However, the SPI communication with the Microchip MCP2515 does cause some CPU overhead. So the faster your Raspberry PI, the better. I assume that you already installed the Raspberry PI operating system on it. It can be a minimal install without desktop environment or full install including desktop environment. Personally, I prefer running the XFCE desktop on my Raspberry PI, so that’s what I’ll be using.
While preparing for this tutorial, I created a small 30 cm (1 ft) CAN bus. In consists of two wires with 120 Ohm termination resistors between them at each end. One wire, I labeled CAN high and the other one CAN low. The CAN high and low wires from the one end, I connected to the connector pins H and L one the Waveshare RS485/CAN hat, respectively.
On the other end of the CAN bus, I attached an STM32 microcontroller. I programmed firmware on the microcontroller that sends out a periodic message on the CAN bus, for testing purposes. You can use whatever CAN node you prefer. Ideally something that already transmits CAN messages or that you can program yourself accordingly. Alternatively, you can attach a second Raspberry PI with Waveshare RS485/CAN hat and use that as the CAN node for testing.
Waveshare RS485/CAN hat installation
As a first step, physically attach the Waveshare RS485/CAN hat to the 40-pin GPIO connector on your Raspberry PI. A properly installed Waveshare RS485/CAN hat looks like this on my Raspberry PI 4:

The Linux kernel of the Raspberry PI operating system can handle a CAN device, based on the Microchip MCP2515. We just need to enable it with the help of a device tree overlay. Assuming that your Raspberry PI is all booted up, run the following command to edit the config.txt file in the boot partition:
sudo nano /boot/config.txt
Add this line to the file:
dtoverlay=mcp2515-can0,oscillator=12000000,interrupt=25,spimaxfrequency=2000000

This assumes the manufacturer installed a 12 MHz crystal oscillator on your Waveshare RS485/CAN hat. It’s the shiny silver colored and oval shaped component on the edge of the board. The number on it should read 12.000. Older versions of the board come with an 8 MHz crystal oscillator. If you own such an older version, set oscillator=8000000 and spimaxfrequency=1000000.
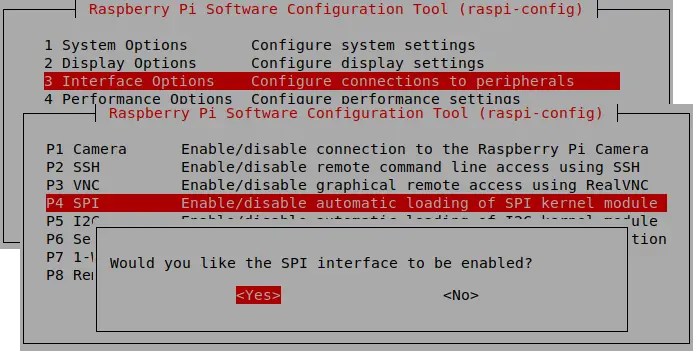
One more step, before we can use the Waveshare RS485/CAN hat as a SocketCAN interface on the Raspberry PI: We need to enable SPI communication with the help of the raspi-config tool. Open it by running command:
sudo raspi-config
Go to section Interface Options → SPI and select Yes to enable the SPI interface.
This completes the installation of the Waveshare RS485/CAN hat on the Raspberry PI. Reboot your Raspberry PI, before continuing with the next section, where we set it up as a SocketCAN interface.
Verify the detection of the Waveshare RS485/CAN hat
In the previous section, we prepared our Raspberry PI to the point that the Linux kernel should:
- Detect the presence of the Waveshare RS485/CAN hat.
- Recognize its Microchip MCP2515 CAN controller as a CAN device that the Linux kernel can work with.
Probably a good idea to verify this, before moving forward. Run the following command to list all CAN devices that the Linux kernel detected:
ip addr | grep "can"

In the previous screenshot, you can see that the Raspberry PI operating system detected and recognized the Waveshare RS485/CAN hat. Furthermore, we can deduce that the Linux kernel assigned it the can0 network interface name and that it’s in the DOWN state. All good so far.
Load the SocketCAN kernel modules
Before our Raspberry PI can bring the can0 SocketCAN network interface in the UP state, we need to first load the SocketCAN related kernel modules. Open up the terminal again and run these commands:
sudo modprobe cansudo modprobe can_raw
To verify that the SocketCAN related kernel modules loaded properly, run:
lsmod | grep "can"

Configure and bring up the SocketCAN network interface
After loading the CAN related kernel modules, we continue with the final step: Bring the can0 SocketCAN network interface in the UP state. It is a two step process:
- Configure the SocketCAN network interface.
- Transition the SocketCAN network interface to the UP state.
Commencing with the first step, open up the terminal and run the command:
sudo ip link set can0 type can bitrate 500000 restart-ms 100
This configures the can0 network interface for a CAN communication speed of 500,000 bits/second. Feel free to adjust this to match the CAN communication speed on your CAN bus. Furthermore, it configures can0 to automatically re-initialize the CAN controller in case of a CAN bus off event, after 100 milliseconds. Feel free to adjust this if needed, but 100 milliseconds works fine in most cases.
With the can0 SocketCAN network interface configured, we can attempt to transition it to the UP state. From the terminal run the command:
sudo ip link set up can0
To verify that the can0 SocketCAN network interface successfully transitioned to the UP state, you can run the ip addr | grep "can" command one more time:

Verify the CAN communication with can-utils
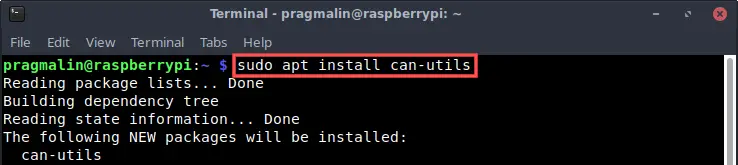
In a nutshell, that’s it. Your Raspberry PI can now participate with the communication on the CAN bus, using the SocketCAN network interface can0. To verify this, we can use the command-line programs of package can-utils. Before we can use these programs, we just need to install the can-utils package on our Raspberry PI system:
sudo apt install can-utils
Receive a CAN message
For receiving and displaying CAN messages, we run the candump program from the terminal:
candump -tz can0
While running, it lists all received CAN messages. I prefer to add the -tz parameter to show a timestamp for each received CAN message:
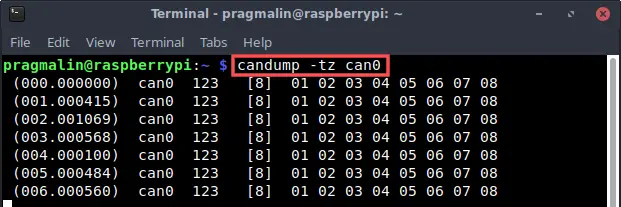
To close the program, press CTRL + c.
In the screenshot you can see that the other CAN node on my CAN bus periodically sends a CAN message. One with identifier 123 (HEX) and 8 data bytes.
Send a CAN message
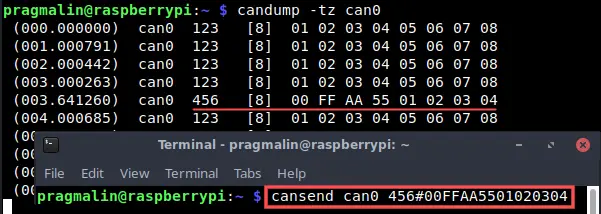
We send a CAN message with the cansend program. For example this CAN message:
- CAN identifier: 456h
- CAN data: 00h FFh AAh 55h 01h 02h 03h 04h (8 bytes)
To send this CAN message using our can0 CAN network interface, run this command in the terminal:
cansend can0 456#00FFAA5501020304
Note that you can run candump in another terminal at the same time, to see the transmitted message on the CAN bus:
Wrap up
This tutorial explained step-by-step how to perform CAN communication on the Raspberry PI with SocketCAN. We used the low cost Waveshare RS485/CAN hat. However, the instructions also apply if you already own USB-to-CAN adapter, supported by SocketCAN. In that case, simply skip the first few sections of this article and start where we loaded the SocketCAN kernel modules.
Note that you need to perform these steps each time you reboot your Raspberry PI:
- Loading the kernel modules:
sudo modprobe cansudo modprobe can_raw
- Configuring the SocketCAN network interface:
sudo ip link set can0 type can bitrate 500000 restart-ms 100
- Bringing the SocketCAN network interface in the UP state:
sudo ip link set up can0
Luckily, you can automatic these steps. Refer to the tutorial about how to automatically bring up a SocketCAN network interface for more information.
During this tutorial, we performed all steps directly in the terminal. This means that the approach also works, when running your Raspberry PI as a headless system.
Where to go from here after configuring a SocketCAN network interface on your Linux system? If you feel like coding, try building your own SocketCAN node application in the C or C++ programming language with the CAPLin framework:
For more SocketCAN and Raspberry PI related articles on the PragmaticLinux blog, follow these links: