
 by
by Wouldn’t it be great, if you can make a snapshot of the current state of your Raspberry PI operating system? At any point in time you can then grab the snapshot, write it back to your SD card and restore your Raspberry PI operating system to its previous state. This article teaches you how you can clone your Raspberry PI SD card on your Linux PC to build such as snapshot. Perfect for quickly switching between projects or restoring your Raspberry PI operating system in case you broke something.
Background
A Raspberry PI serves as a wonderful Linux learning platform. It packs a decent amount of processing power. It doesn’t cost a lot. Only requires little space. On top of that it consumes little energy. You can use the Raspberry PI for a plethora of different purposes. To name just a few:
- Building Linux servers. Some ideas: a NAS server, a web server or a game server.
- Playing retro games. I particularly enjoy playing old Super Nintendo games on RetroPie.
- Hobby electronics. For example for home automation.
- A low-cost desktop PC, especially with the Raspberry PI 400. Perfect for educational institutions with a small IT budget.
Wouldn’t it be great though, if you can make a snapshot of the current state of your Raspberry PI operating system? Before you start a new project or try installing or configuring something new? Otherwise you need to install the Raspberry PI operating system anew, each time you start a different project or goofed something up while tinkering.
This article teaches you how you can clone your Raspberry PI SD card on your Linux PC. We’ll work from the Linux terminal, to clone your Raspberry PI SD card contents to an image file. As extra whip cream on top, you’ll also learn how to shrink the file system contained inside this image file. In a way that it automatically expands when you boot your Raspberry PI, after you restored the image to the SD card.
After you clone your Raspberry PI SD card, you’ll probably end up storing the snapshot somewhere on your Linux PC. I’ll show you how you can compress the image file into a TAR GZ archive, to make the snapshot even smaller.
Snapshot library
The procedure to clone your Raspberry PI SD card, enables you to build a library of snapshots on your Linux PC. At any point in time you can then grab one of these snapshots, restore them to your SD card, and quickly start new Raspberry PI projects. Here’s a list of some snapshots that I created and use regularly myself:
- A minimal install of the Raspberry PI operating system. Pre-configured for my home WiFi network and with my own
pragmalinuser account, instead of the defaultpiuser account. This snapshot offers a starting point for new server builds. - A customized desktop version of the Raspberry PI operating system. One that runs the XFCE desktop environment instead of the default Pixel desktop environment.
- A RetroPie snapshot that comes pre-installed with my favorite retro games and pre-configured for my game controller.
- A snapshot with a pre-installed LAMP stack. The perfect foundation for quirking around with PHP and MySQL database driven web applications.
What do you need
Since we intend to clone the operating system, currently installed on your Raspberry PI SD card, to your Linux PC, you need the following:
- The SD card of your Raspberry PI.
- A PC with Linux installed that also has an SD card slot.
The instructions that follow in this article work on pretty much any Linux distribution. So it doesn’t really matter, which Linux distribution runs on your PC. Throughout this article you’ll be guided by multiple screenshots. I took these on my trusty little Thinkpad T450s laptop, running Debian 10 “buster”.
The type and size of SD card also doesn’t really matter. As long as it works for your Raspberry PI. Although you might need one of those micro SD to SD card adapters to insert the SD card into your PC’s card slot.
Copy SD card contents to an image file
In this section we start with copying the contents of the SD card to an image file on your PC. Power off your Raspberry PI, remove the SD card and insert the SD card into your PC.
Determine the SD card device name
Before we can copy the SD card contents, we need to first figure out its device name on your Linux PC. Otherwise we do not now how to access it. We can do so by running this command from the terminal:
lsblk -p
On my PC the command output looks like this:
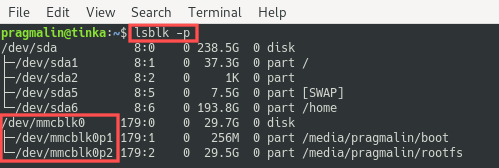
In my case the device name of the SD card is /dev/mmcblk0. How do I know this? For starters, the only other device name is /dev/sda/ and this one is my PC’s disk drive. Furthermore, I know that the SD card stores the Raspberry PI operating system. The Raspberry PI operating system always consists of two partitions:
- Boot partition (
/dev/mmcblk0p1) - Root file system partition (
/dev/mmcblk0p2)
Therefore, the device name of my SD card must be the other one: /dev/mmcblk0. The exact name might be different on your PC. Make sure to write down the device name on your PC for later reference. Then every time I mention /dev/mmcblk0 in the remainder of this article, replace it with the device name of your SD card.
Before moving on, double-check that you got the correct device name for your SD card. When unsure, you could temporarily remove the SD card from your PC. Next, run the lsblk -p command again to determine which device name disappeared. This one was your SD card device name.
Dump the SD card data to an image file
At this point we can start with the actual clone operation of the Raspberry PI SD card to your Linux PC. The dd program allows us to make a data dump of the entire SD card contents into a file. The command syntax is as follows:
sudo dd bs=4M if=[SD CARD DEVICE NAME] of=[IMAGE FILE NAME] conv=fsync
Keep in mind that the image file size equals the size of the SD card itself. Before running the dd command, verify that you have sufficient free space on your PC’s hard disk.
I would like to name the image file raspi_lite_pragmalin.img and store this file in my user’s Download directory. You can of course adjust the name and location of the image file to whatever you desire. Just remember to change the SD card device name to what it is called on your PC. Here’s the command I ended up running:
sudo dd bs=4M if=/dev/mmcblk0 of=~/Downloads/raspi_lite_pragmalin.img conv=fsync
To view progress of the dd command, you can add status=progress at the end of the command. Note that this command can take several minutes to complete, depending on the size of your SD card:

We ran the command with sudo for super user privileges. This way we know for sure that the dd program can access the SD card. As a result, the root user owns the created image file. We’ll change the image file owner to our own user with this command:
sudo chown $USER: ~/Downloads/raspi_lite_pragmalin.img

Further processing of the image file now no longer requires super user privileges.
Shrink the root file system inside the image file
Step one of cloning your Raspberry PI SD card to your Linux PC is now complete. You now have an exact copy of the SD card contents inside an image file on your PC. The size of the image file equals the size of the SD card. However, your Raspberry PI operating system probably did not require that much space. As a next step, we’ll shrink the image file down to exclude space that was not yet occupied by the Raspberry PI root file system.
Download script from GitHub
Recently I came across a GitHub repository with a gem of a Bash-script for shrinking down the Raspberry PI image file. The project is called PiShrink. While performing the shrink operation, it configures the image file such that the root file system automatically expands again. So after writing the image file back to the SD card and booting up the Raspberry PI again.
Let’s continue by downloading the PiShrink script to /usr/local/sbin. We’ll do this in a few small steps:
- Download the script from GitHub to your user’s home directory.
- Make the script executable.
- Move the script to
/usr/local/sbin.
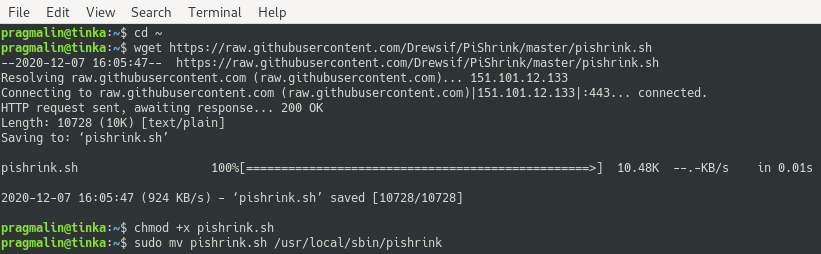
Run the following commands from the terminal to download the PiShrink script from GitHub and install it into /usr/local/sbin:
cd ~
wget https://raw.githubusercontent.com/Drewsif/PiShrink/master/pishrink.sh
chmod +x pishrink.sh
sudo mv pishrink.sh /usr/bin/pishrink
Personally, I use the PiShrink script regularly, so I keep it installed. If you ever want to remove it again, simply run the command sudo rm /usr/local/sbin/pishrink.
Shrink the root file system
With the PiShrink script installed on your PC, shrinking the image file is easy. The command syntax:
sudo pishrink [IMAGE FILE NAME]
I stored the image file as raspi_lite_pragmalin.img in my user’s Download directory. Consequently, the following command shrinks it:
sudo pishrink ~/Downloads/raspi_lite_pragmalin.img
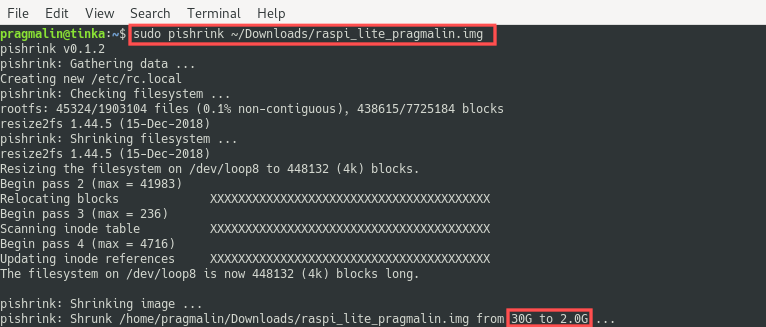
As you can see in the output, PiShrink managed to shrink the image file down from 30 to 2 Gigabyte. How much your image file shrunk, depends on how much space your Raspberry PI root file system occupied.
Compress the image file to create the snapshot file
We arrived at the final step of cloning your Raspberry PI SD card to your Linux PC. We’ll take the shrunk image file as a starting point, compress it and create a TAR GZ archive from it. If you are not familiar with TAR GZ archives, briefly glance over the article about how to create and extract a TAR GZ archive.
To command syntax for creating a TAR GZ archive from a single file:
tar -czf [ARCHIVE NAME] [FILE TO PACK]
My shrunk image file is stored as raspi_lite_pragmalin.img in my user’s Download directory. I ran the following commands to compress and pack it into a TAR GZ archive:
cd ~/Downloads/
tar -czf raspi_lite_pragmalin.tar.gz raspi_lite_pragmalin.img
Note that it can take a little while for the TAR GZ archive creation. Be patient. In my case it took about half a minute:

I refer to the compressed image file, so the TAR GZ archive, as the snapshot. As you can see the compression operation reduced the snapshot size down to about 800 Megabyte. After creating the snapshot, you can remove the original image file:
rm raspi_lite_pragmalin.img
This completes the clone operation to create a snapshot of your Raspberry PI SD card, on your Linux PC.
Restoring a snapshot
In the previous section, we created the snapshot of your Raspberry PI SD card. There comes a time when you want to restore the snapshot again. This section outlines the procedure for restoring the snapshot onto your Raspberry PI.
Extract the snapshot file
The snapshot file is nothing more than a plain TAR GZ archive. For this reason, the first step consists of extracting the image file from the TAR GZ archive. The syntax for extracting a TAR GZ archive:
tar -xzf [ARCHIVE NAME]
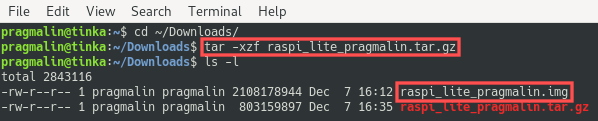
On my PC, the TAR GZ archive is called raspi_lite_pragmalin.tar.gz and located in my user’s Download directory. Therefore, the following commands extract the snapshot:
cd ~/Downloads/
tar -xzf raspi_lite_pragmalin.tar.gz
Write the image file to the SD card
After extracting the snapshot, the image file now resides at ~/Downloads/raspi_lite_pragmalin.img on my PC. As a next step, we write the image file back to the SD card. We initially executed the dd program to copy the SD card contents to an image file. This time we want to do the exact opposite. So copy the image file contents to the SD card. We can use a similar syntax of the dd command. We just need to swap the if (input file) and of (output file) parameters:
sudo dd bs=4M if=[IMAGE FILE NAME] of=[SD CARD DEVICE NAME] conv=fsync
Double-check that you specify the correct device name for your SD card! Refer to an earlier section in this article for details. In my case it is /dev/mmcblk0, so I executed command:
sudo dd bs=4M if=~/Downloads/raspi_lite_pragmalin.img of=/dev/mmcblk0 conv=fsync
It might take a little while for the write operation to your SD card to complete. On my PC it took about two minutes:

By the way, you can also use Balena Etcher to write the image file to the SD card. Balena Etcher offers a graphical user interface. It might be more intuitive than using dd in the terminal. Refer to the article about performing a minimal install on your Raspberry PI, which features Balena Etcher.
Boot the Raspberry PI
At this point we restored the image file to the SD card. To verify the successful snapshot restoration we simply:
- Insert the SD card into the Raspberry PI.
- Power up the Raspberry PI.
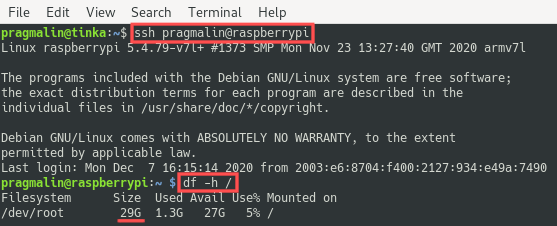
Afterwards your Raspberry PI operating system is in the exact same state as when you created the snapshot. You can run the following command to verify that the root file system was expanded again:
df -h /
On my Raspberry PI it should be somewhere close to 32 GB, as that is the size of my SD card:
Wrap up
In this article you learned how to clone your Raspberry PI SD card on your Linux PC. Basically a technique for taking snapshots of the current state of your Raspberry PI operating system. In a nutshell, it involved the following steps:
- Write the SD card contents to an image file on your PC, with the
ddcommand. - Shrink the root file system contained within the image file, with the PiShrink script.
- Compress the image file into a TAR GZ archive to create the actual snapshot file.
At any point in the future you can then grab the snapshot, write it back to your SD card and restore your Raspberry PI operating system to its previous state. Perfect for quickly switching between projects or restoring your Raspberry PI operating system in case you broke something.

3 thoughts on “How to clone your Raspberry PI SD card in Linux”
Comments are closed.