
 by
by Developing your own program for a Raspberry PI, which you want to automatically start each time your Raspberry PI boots? Not sure how to do this? Well, you came to the right place. This article contains detailed instructions on how you configure a script or program using Systemd to automatically startup each time you power up your Raspberry PI.
Background
When developing a Raspberry PI based solution, this often involves the development, configuration and/or customization of software programs. Take for example a home automation solution. You typically have a basic web interface for obtaining user input. Based on the user input, the GPIO ports need to be controlled. You can develop all of this in Python. Once done, you want to automatically start your newly developed Python program each time you power up your Raspberry PI. But how do you achieve this?
This article aims to answer exactly this question. I’ll explain step-by-step how you can automatically startup a script on your Raspberry PI using Systemd. Note that when I write script, I do not just mean a shell script, but basically any sort of program. For example a Python program or your own compiled C/C++ program.
What do you need
To complete the examples described in this article, you need an operational Raspberry PI. The exact type doesn’t really matter. It can be a small Raspberry PI Zero or a more powerful one, such as the Raspberry PI 4. In addition to the Raspberry PI hardware itself, you would need a suitable power supply and a micro-SD card where you already installed the Raspberry PI operating system.
Throughout this article, I’ll use my Raspberry PI 4 with a freshly installed Raspberry PI operating system, including graphical desktop environment. This means that I also needed a monitor, monitor cable, keyboard and mouse. If you do not have these extra parts available, you could setup your Raspberry PI as a headless server instead. A previously published article provides detailed instructions for setting up your Raspberry PI as a headless server.
Systemd introduction
What is this funky Systemd thing I just mentioned? Well, in Linux and therefore also on the Raspberry PI, the so called Systemd software manages the initialization of the system during system startup. Systemd is the one that starts all the key processes to get your Linux system properly running. This includes for example the mounting of the file systems, setting up networking and getting the display manager up-and-running.
Besides managing the system initialization, Systemd also provides a services manager that assists with keeping your Linux system running. Think of automatically restarting processes, when they failed and running periodic tasks.
After reading this brief Systemd introduction, you can imagine that Systemd is a key component in Linux. As such it makes Systemd the perfect tool for configuring a script to execute each time you startup your Raspberry PI.
Example startup script
To explain the steps involved with configuring Systemd for starting up a script each time you boot your Raspberry PI, we would need a script for testing purposes. I created the following shell script, which I named testscript.sh:
#!/bin/bash
# Store first parameter in a variable, which should be the log file location.
LOG_FILE="$1"

# Set a default log file location if the parameter was empty, i.e. not specified.
if [ -z "$LOG_FILE" ]
then
  LOG_FILE="/var/log/testlog.txt"
fi

# Append information to the log file.
echo "----------------------------------------" >> "$LOG_FILE"
echo "System date and time: $(date '+%d/%m/%Y %H:%M:%S')" >> "$LOG_FILE"
echo "Kernel info: $(uname -rmv)" >> "$LOG_FILE"
The test script simply appends the current system date/time and the version of the currently installed kernel to a log-file. By default, the test script stores the log-file in /var/log/testlog.txt. However, by specifying a different location as a parameter when called the script, you can override the default location of the log-file.
Download the script
As a next step we need to get the testscript.sh file onto your Raspberry PI. Fortunately, you can download all files related to this article from a PragmaticLinux GitHub repository. Assuming that you logged into your Raspberry PI already, open up the terminal program. Next, run the following two commands:
sudo wget -P /usr/local/bin https://raw.githubusercontent.com/pragmaticlinuxblog/systemdstartupscript/master/source/testscript.sh
sudo chmod +x /usr/local/bin/testscript.sh
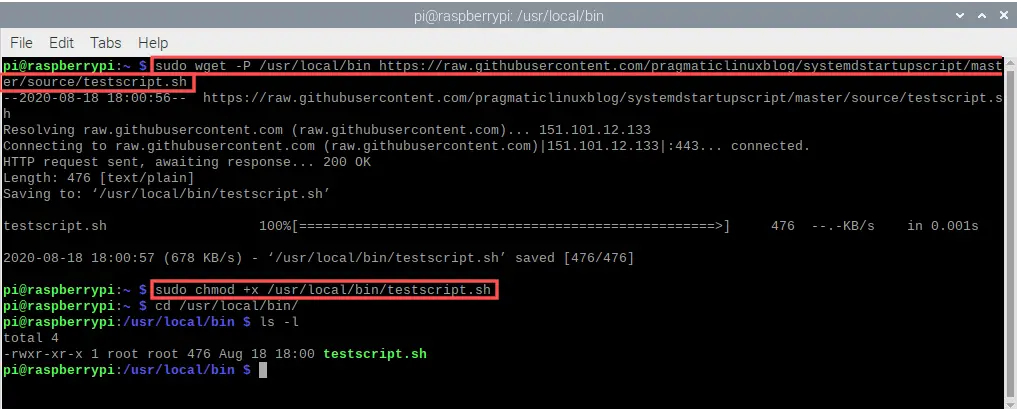
This directly downloads the testscript.sh from the GitHub repository with the help of the wget program. The testscript.sh file is stored in the /usr/local/bin directory. The chmod command makes the script executable. Note that the root user owns the /usr/local/bin directory. Hence the necessity to run the commands with sudo.
Manually run the script
Before configuring this script to startup automatically when the Raspberry PI boots, let’s first play around with it a bit to see how it works. We stored the script in the /usr/local/bin directory. This directory is on the default Linux path. In other words, all users can directly run this script without having to specify its full path.
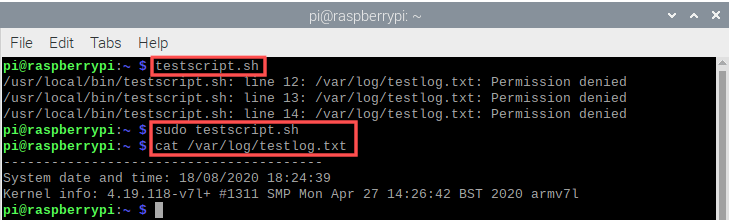
If you run the script as the pi user, you get a permission error. This makes sense because by default, the script wants to write to the /var/log/testlog.txt log-file. The root user owns the /var/log directory and the pi user does not have write permission to this directory. To bypass this permission problem, simply run the script with sudo to execute it with super user privileges:
sudo testscript.sh
You can check the contents of the log-file with the help of command:
cat /var/log/testlog.txt
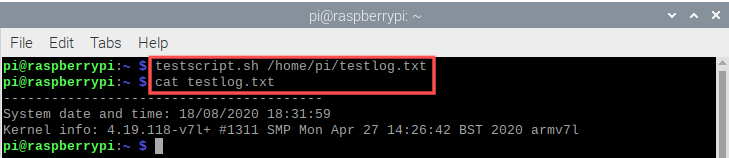
If we really want to run the script as the pi user, we can simply specify a log-file location where the pi user has write permissions. For example its home directory at /home/pi. The script allows you to override the default log-file location by specifying a different location in the first parameter:
testscript.sh /home/pi/testlog.txt
Alright, now that we learned how the test script works, let’s continue after quickly cleaning up the created log-files:
rm /home/pi/testlog.txt
sudo rm /var/log/testlog.txt
Run the script at startup as the root user
So called unit-files contain instructions for Systemd. The unit-file formatting resembles that of an ini-file. Systemd supports different types of unit-files. For example a startup target, an (auto)mount point, a timer and a service to name just a few.
Installing the service-file
We want Systemd to run a script at system startup on our Raspberry PI. With this goal in mind, the service unit fits our purpose the best, because a service unit describes how to manage a service or application on a Linux system. I created the following Systemd service-file called logsysteminfo.service:
[Unit]
Description=Systemd service for logging system info at startup

[Service]
ExecStart=/usr/local/bin/testscript.sh

[Install]
WantedBy=default.target
Note that service-files should have the .service extension. To save you the effort of typing in the service-file contents, you can download this service-file directly from the PragmaticLinux GitHub repository. To do so, open up the terminal program on your Raspberry PI and run the following command:
sudo wget -P /etc/systemd/system/ https://raw.githubusercontent.com/pragmaticlinuxblog/systemdstartupscript/master/source/logsysteminfo.service
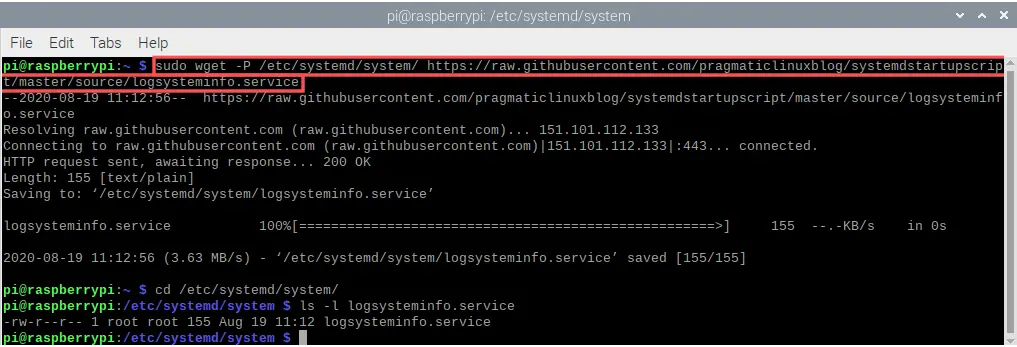
This downloads the service-file directly to the /etc/systemd/system directory. Systemd expects service-files in this directory. Note that the root user owns the /etc/systemd/system directory. Hence the necessity to run the commands with sudo.
Inspecting the service-file
Our service-file contains three sections: Unit, Service and Install. Each section contains one or more Directives. Think of a directive as a predefined variable name that you can assign a value to. For reference purposes, this web page contains an overview of all possible directives.
The Unit section
[Unit]
Description=Systemd service for logging system info at startup
The Unit section should at a minimum contain a Description directive. It can contain other directives such as other Systemd units that it depends on (Wants/Requires directives). Systemd will start the dependent units automatically in parallel. The Before/After directives could further influence the starting order if parallel activation is not desired.
Our relatively simple service-file does not depend on any other units and therefore only contains a Description directive.
The Service section
[Service]
ExecStart=/usr/local/bin/testscript.sh
Since we intend to configure a service with this Systemd unit-file, we should include a Service section. In our case we only need to inform Systemd of the script/program we want it to start, with the help of the ExecStart directive. Usually, you would also include a Type directive here. Our service type is simple, which is the default service type if the Service section contains the ExecStart directive. For this reason the Type directive was omitted.
There are many more directives available for the Service section. For example the ExecStartPre/ExecStartPost directives that allow you to specify a script/program that should be executed before or after the one specified with ExecStart. Other commonly used directives are Restart and RestartSec. These allow you the specify conditions under which the script/program should be automatically restarted.
The Install section
[Install]
WantedBy=default.target
For a Systemd service, the Install section informs Systemd at which moment during the boot process the service should be started. The recommended way is by specifying a specific Systemd target through the WantedBy directive.
During the boot process, Systemd boots your system step-by-step. Each step is a so called target that Systemd attempts to reach. By specifying a specific target in the WantedBy directive, you can latch the service on to that target. This allows you to essentially control when Systemd starts your service.
In our case we latch on to the default.target. On any Linux system with Systemd, this pretty much means the last target during the boot process. To find out which target is the default on your system, you can run the command:
systemctl get-default
If you installed the Raspberry PI operating system with a graphical desktop environment, then this outputs graphical.target. This target means full user access with graphical display and networking. If you are curious about the other available targets on your system, you can run the command:
systemctl list-units --type=target

The most commonly specified targets in the WantedBy directive are: multi-user.target, network.target and graphical.taget. Note that graphical.target is not available if you did a headless server install, since then no display manager and desktop environment were installed.
Enabling the service-file
At this point we downloaded the logsysteminfo.service example service-file to /etc/systemd/system. Although we stored the service-file in the right location, the Raspberry PI operating system will not yet run this script upon startup. For this to work we still need to enable it with Systemd. To enable the service with Systemd, run the command:
sudo systemctl enable logsysteminfo.service

Next, reboot the Raspberry PI in order for us to test that Systemd actually executed the script during system startup:
sudo reboot
Once the Raspberry PI completed booting, we can verify if Systemd executed the script during system startup by looking at the log-file that the script should have created. From the terminal you can run the command:
cat /var/log/testlog.txt
Alternatively, you can use the file manager to locate the log-file and double-click the log-file to open and inspect it in the text editor:
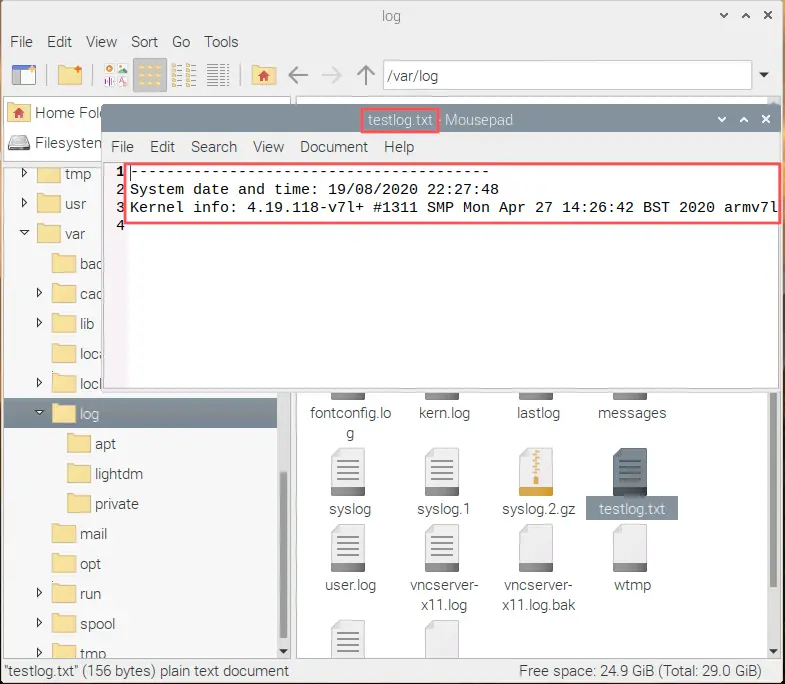
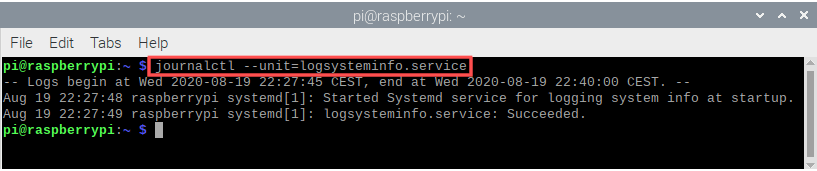
In reality, not all scripts will actually create an output file. So how do you then verify that Systemd ran your service? There are two methods. Method one involves calling the journalctl program to list the log related to the logsysteminfo.service service:
journalctl --unit=logsysteminfo.service
Method two involves calling the systemctl program and to query the status of the logsysteminfo.service service:
systemctl status logsysteminfo.service
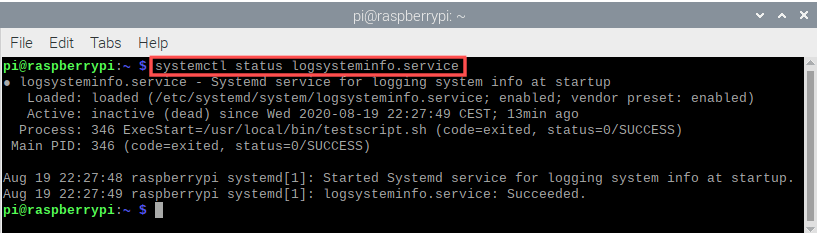
Personally, I prefer the method with systemctl simply because there is more information in the output. For example whether or not the service is actually enabled in Systemd. This helps with debugging in case you forgot to actually enable the service.
While still on the topic of of the systemctl utility program, note that you can also use it to disable the service with Systemd again, if you desire to. There is no need to do this now, but just so that you know for future purposes:
sudo systemctl disable logsysteminfo.service
Run startup script as a non-root user
In the previous section we installed and enabled the logsysteminfo.service Systemd service. It runs the testscript.sh upon system startup. An important detail is that Systemd runs this script as the root user. Very convenient, because the root user can access anything on the system. So no issue with file and directory permissions.
However, this poses a serious security threat at the same time. In general you should only execute a script or program as the root user if absolutely necessary. Our script only logs some basic system information to a log-file. Any user can execute the commands that the script calls. From a system security perspective, it would be better if Systemd runs the script as a non-root user. For example the pi user. In this case we just need to make sure to specify a different log-file location that the script writes to. As you might remember from a previous section, the pi user does not have write permission to the default log-file location (/var/log/testlog.txt).
Luckily, Systemd allows us to specify the user that should execute the script with the help of the User directive:
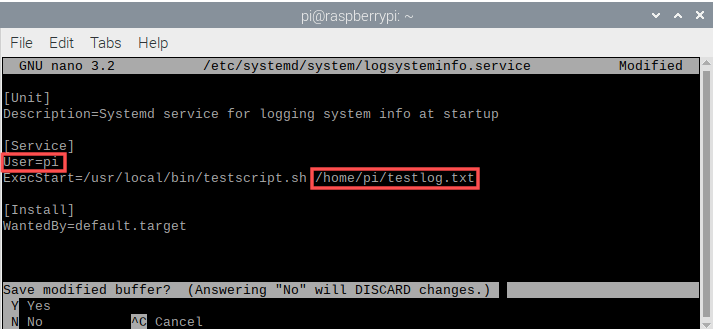
[Service]
User=pi
ExecStart=/usr/local/bin/testscript.sh /home/pi/testlog.txt
Note that in the above snippet of the logsysteminfo.service file, the User directive was added and that the /home/pi/testlog.txt log-file location is passed on as a parameter to our testscript.sh.
Open up the terminal program on your Raspberry PI and open the service-file with the Nano text editor. Refer to this blog article for a brief refresher on editing files in the Terminal with Nano.
sudo nano /etc/systemd/system/logsysteminfo.service
Make the changes, similar to what you see in the previous snippet of the Service section. Afterwards, save the changes and close the Nano editor:
Verify that the startup script ran as the pi user
Now reboot the Raspberry PI so that we can test if the changes to the service-file worked:
sudo reboot
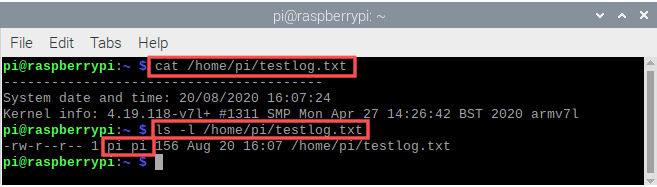
Once the Raspberry PI completed booting, we can verify if Systemd executed the script during system startup by looking at the log-file that the script should have created. From the terminal you can run the command:
cat /home/pi/testlog.txt
Furthermore, we can verify with the ls command that the pi user wrote the log-file:
ls -l /home/pi/testlog.txt
Wrap up
While working your way through this article you learned how to configure your Raspberry PI such that Systemd executes a script or program for you during system startup. This article presented two methods: one where the root user executes the script and one where a non-root user (such as pi) executes the script.
Based on the length of this article you might think that having the Raspberry PI execute a script during startup with Systemd is complex. However, this is not the case. You merely need to store your own service-file, similar to the one presented in this article, in /etc/systemd/system and then enable the service with the systemctl program. This article just turned out a bit longer, because I wanted to give you plenty of extra background information about Systemd. Meaning that I didn’t just want to show you how it works, but also explain why it works.
Note that almost all Linux distributions nowadays include Systemd. With other words, your newly gain skill-set not only applies to the Raspberry PI, but to other Linux distributions as well.

2 thoughts on “Raspberry PI startup script using Systemd”
Comments are closed.