 by
by Interested in giving the openSUSE Tumbleweed rolling release distribution a try? openSUSE Tumbleweed uses automated quality testing and features system snapshots to rollback changes. With this in mind openSUSE Tumbleweed is well suited as your daily desktop machine. Always the latest software versions, with a negligible risk of breaking during a system update. To help you get started, this article presents you with the 5 things to do right after installing openSUSE Tumbleweed.
Background
In the world of Linux, Arch and openSUSE Tumbleweed are the front-runners when it comes to rolling release distributions. Perfect for those that prefer the latest and greatest of all their desktop software and the Linux kernel. Newcomers to Linux tend to shy away from rolling release distributions, because of the higher chance of things breaking during an update. In the case of openSUSE Tumbleweed, this risk is minimal though. Before each snapshot release, a full suite of automated tests (openQA) guarantees its stability. Even if something does go wrong during a system update, the snapshots offered by the default Btrfs file system, allow you to quickly restore your system to the previously working state.
As regular readers know, I currently run Debian on all my servers and on my laptop. But I’ve always had a soft spot for openSUSE. It’s the first distribution I even installed back in the late 90s. Every now and then I get this itch to run with openSUSE again. This time I set my sights on openSUSE Tumbleweed for my laptop. The installation is straightforward: Backup your system, download the ISO image, create a bootable USB drive from the ISO and boot from it to start the installer. But what to do next? This article presents the 5 things to do after installing openSUSE Tumbleweed.
What do you need
As a starting point, this article assumes that you freshly installed openSUSE Tumbleweed. Either on your desktop or laptop PC or as a VirtualBox virtual machine. When you never installed openSUSE Tumbleweed before, I can highly recommend installing it inside a virtual machine first. To install openSUSE Tumbleweed, follow these steps:
- Download the latest openSUSE Tumbleweed ISO image. I typically opt for the smaller network install image.
- Create a bootable USB drive from the downloaded ISO image when installing on actual PC hardware. In the case of virtual machine, setup a new virtual machine and link the downloaded ISO image to its virtual optical drive.
- When installing on your actual PC, make sure to backup your current system first. At least backup the files in your home directory.
- Boot your PC (or virtual machine) from the ISO image. This starts the openSUSE Tumbleweed installer. Simply follow the installation wizard to complete the installation.
For this article, I prepared a VirtualBox virtual machine with openSUSE Tumbleweed. I decided to install openSUSE Tumbleweed with the GNOME desktop environment.
1 – Update your openSUSE Tumbleweed system
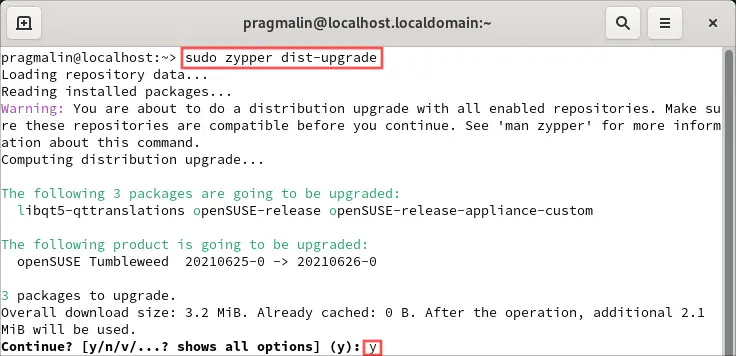
The ISO image from which you installed openSUSE Tumbleweed, might contain an older snapshot. Therefore the first thing to do, after installing openSUSE Tumbleweed, is to update your system. This is a two step process:
- Refreshing the package repositories. This downloads package metadata from the online package repositories and stores it in a local cache.
- Update all currently installed software packages to the latest version. The previously refreshed package metadata is used to determine which packages need an update.
To perform these steps, open up your terminal and run the following two commands:
sudo zypper refresh(or the short version:sudo zypper ref)

sudo zypper dist-upgrade(or the short version:sudo zypper dup)
2 – Install the multimedia codecs
The multimedia codecs comprise of a set of software packages needed for playing multimedia formats such as MP3s and DVDs. Due to restrictions caused by software patents, openSUSE cannot include these by default. However, as an end-user you have the choice to install these. So as the next thing to do after installing openSUSE Tumbleweed, you can install these multimedia codecs. The third-party Packman repository offers the multimedia codecs related software packages.
1-Click install approach
One quick way of installing the multimedia codecs on openSUSE Tumbleweed, is by opening up the Firefox web browser and visiting the site https://www.opensuse-community.org/. The front page includes a convenient 1-Click Install button that guides you through the process:
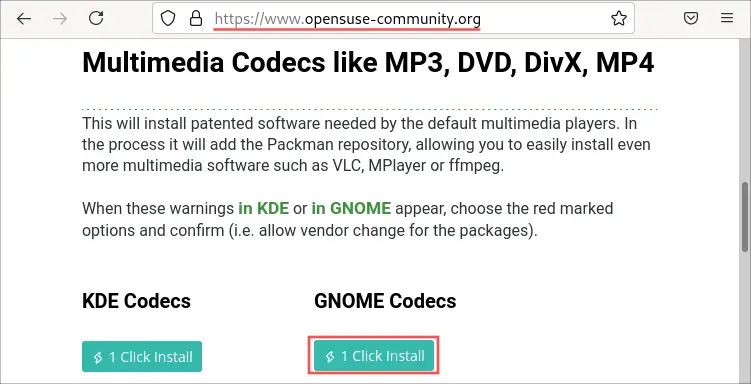
This essentially registers the third-party Packman repository on your system, allowing you to install software packages from it. As a next step it installs the multimedia codecs software packages on your system.
Manually in the terminal
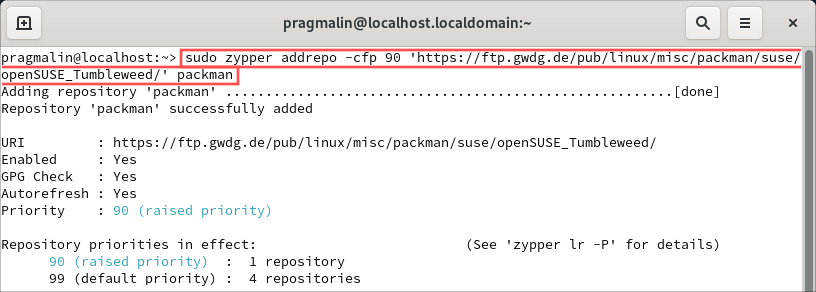
Alternatively, you can complete these steps manually in the terminal. That’s how I personally prefer to do it. Start by registering the Packman repository on your system:
sudo zypper addrepo -cfp 90 'https://ftp.gwdg.de/pub/linux/misc/packman/suse/openSUSE_Tumbleweed/' packman
After adding the new repository, we should refresh the repositories to download the latest package metadata and accept its signing key:
sudo zypper refresh
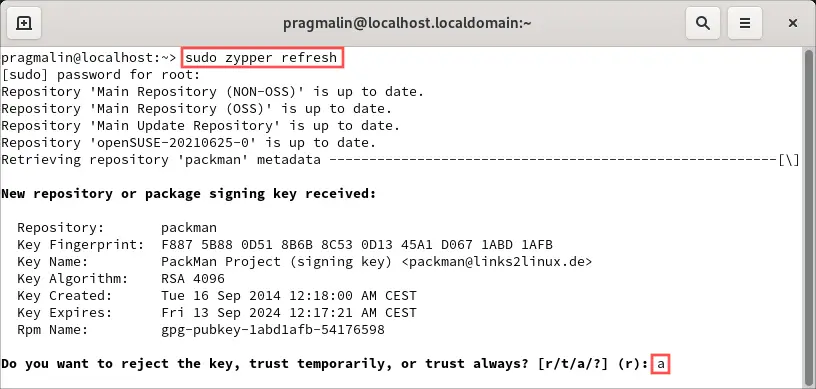
Perhaps some packages offered by the Packman repository are available and already installed from the default openSUSE Tumbleweed repositories. Let’s first update these to the latest versions from the Packman repository:
sudo zypper dist-upgrade --from packman --allow-vendor-change

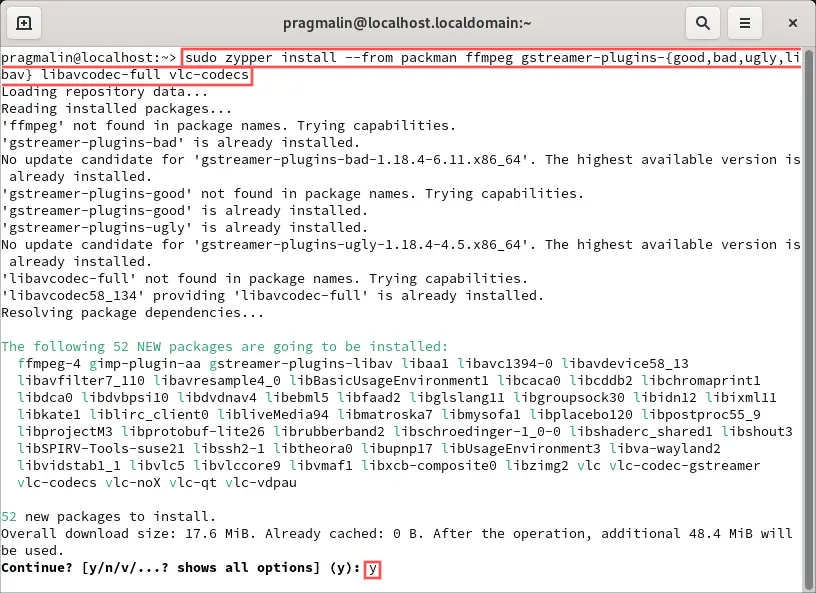
As the last step you can proceed with the installation of the actual multimedia codecs from the Packman repository:
sudo zypper install --from packman ffmpeg gstreamer-plugins-{good,bad,ugly,libav} libavcodec-full vlc-codecs
3 – Set the hostname of your machine with YaST
The hostname is basically just the name that you give your PC. It helps you recognize the system you currently work on. It enables you to address the system by its hostname on your local network, instead of its IP address. Furthermore, the hostname is the first part of the fully qualified domain name (FDQN), optionally needed for publicly accessing your system on the Internet. To find out the current hostname, simply open up the terminal and you can see your system’s hostname in the prompt:

After a fresh install, the hostname of your openSUSE Tumbleweed system is typically set to the default localhost or something else randomly generated. That’s probably not what you want. You can of course change this to whatever you prefer. Just keep in mind that the hostname can only have valid characters from a to z and digits from 0 to 9. A hyphen - is allowed, as long as the hostname doesn’t start with a hyphen.
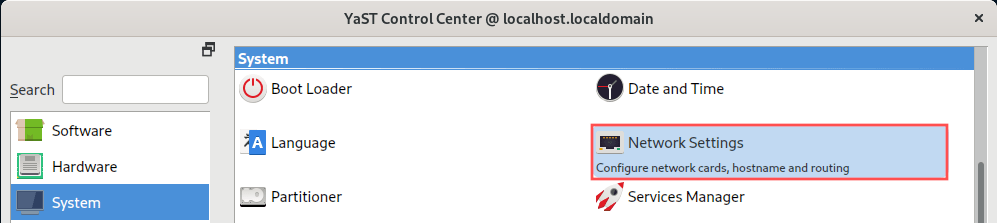
With the help of the YaST system configuration program, you can change the hostname of your system. Go ahead and start the YaST program. You can find an application launcher for it in your desktop environment’s application menu. Once opened, go to the System category and select Network Settings:
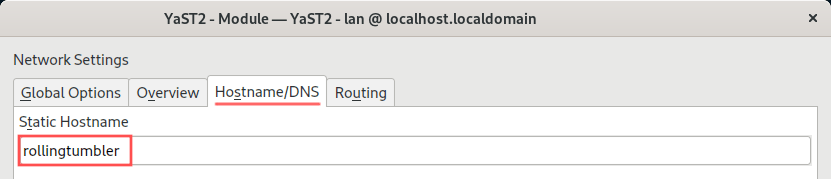
A new dialog appears. Go to the Hostname/DNS tab and enter your desired hostname in the edit box labeled Static Hostname. For example purposes, I used rollingtumbler as the hostname:
Click the OK button on the dialog to confirm the hostname change. Afterwards you should reboot your system to activate the new hostname. You can verify the changed hostname by opening up the terminal again:

4 – Color the Bash prompt
If you worked with Debian or Ubuntu before, you probably find the Bash prompt in the terminal on openSUSE Tumbleweed a bit boring. Just plain black text. No colors or bold text. Luckily we can easily customize the Bash prompt to make it more attractive.
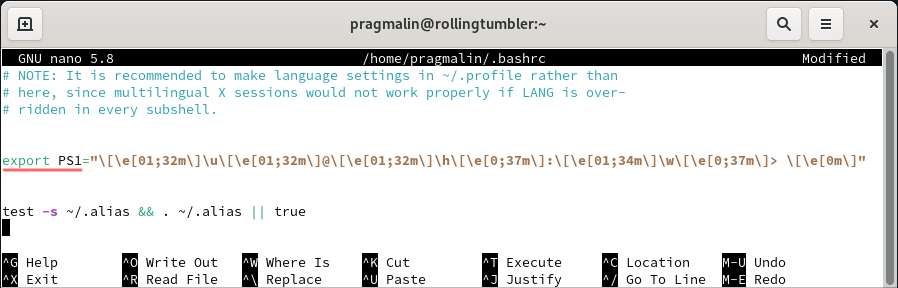
To change the looks of the Bash prompt, we can set the PS1 variable in file .bashrc. This file is located in your home directory. The PS1 variable is the so called primary prompt string. Refer to this page for a reference list of things you can add to the primary prompt string. More convenient is an online Bash prompt generator for formating your Bash prompt. An example primary prompt string I created for this article:
export PS1="\[\e[01;32m\]\u\[\e[01;32m\]@\[\e[01;32m\]\h\[\e[0;37m\]:\[\e[01;34m\]\w\[\e[0;37m\]> \[\e[0m\]"
To use this one, edit your ~/.bashrc file and add the above line to the file. You could use the Nano text editor to do this directly in the terminal:
nano ~/.bashrc
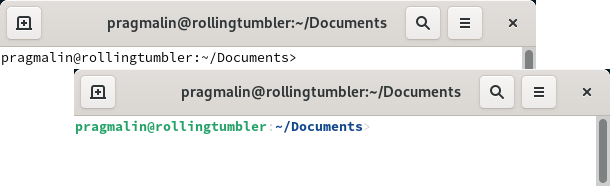
The next time you open your terminal, you’ll see colors. The following screenshot shows you the before and after:
5 – Install GNOME Shell extensions
Configuring the desktop environment is the last thing to do after installing openSUSE Tumbleweed. For this article I installed the GNOME desktop environment. Its default configuration does a great job in getting out of your way, while also enabling a productive workflow. Whenever you miss a piece of functionality or when you would like to optimize the workflow to your personal preferences, you can do so by installing GNOME extensions. You can find a list of available and installable GNOME extensions on the website https://extensions.gnome.org/.
How to install a GNOME extension
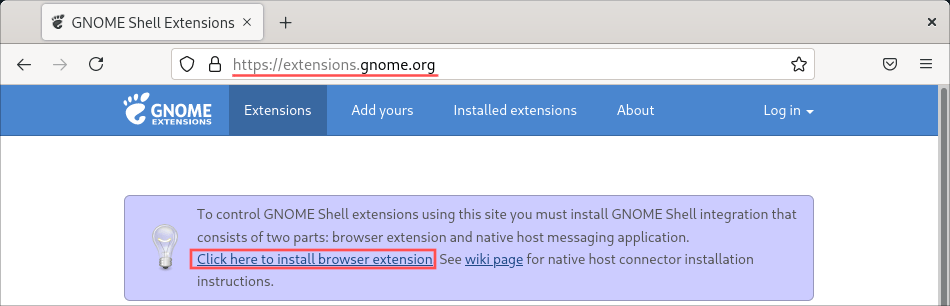
You can install GNOME extensions with the help of an add-on for your web browser. Simply point your Firefox browser to https://extensions.gnome.org/. On your first visit, it will remind you to install this add-on. Click on the link as shown below to proceed with this installation:
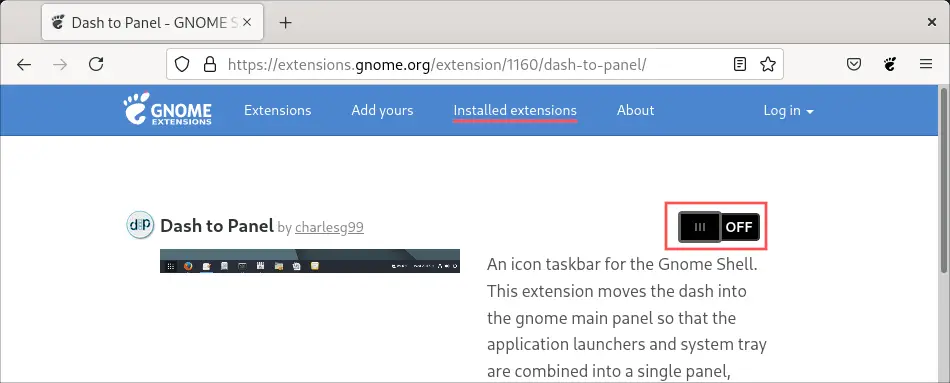
To install a new GNOME extension, find one you like on the same website. Then move the slider from the OFF to the ON position. Note that on the same website, you can find a page called Installed extensions. On this page you can list, configure and uninstall previously installed GNOME extensions:
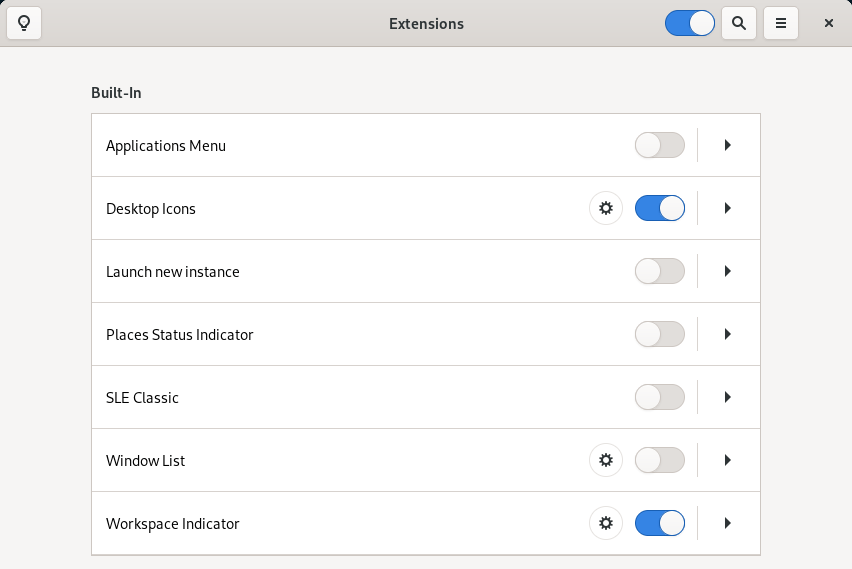
Alternatively you can use the GNOME Extensions application to configure and disable/enable installed GNOME extensions. openSUSE Tumbleweed installed the GNOME Extension application by default, so you can find it in your list with desktop applications:
In case the installation of a GNOME extension fails, you can try and download a different version of the extension. Either from the GNOME extensions website or directly from the developer. You’ll end of with a ZIP-file of the extension. Refer to the tutorial about how to manually install a GNOME extension from a ZIP-file for more information.
Essential GNOME extensions
As you can see in the previous screenshot, openSUSE Tumbleweed already preinstalled a few GNOME extensions for you. I personally like the Desktop Icons and Workspace Indicator extensions, so I enabled them right away. Other GNOME extensions that I consider essential for my workflow are:
- Dash to Panel for moving the dash with icons of your favorite applications to the top taskbar.
- Panel OSD to configure where notifications appear on the screen. I prefer the top-right corner.
- Screenshot Tool which adds an icon to the taskbar for quickly and conveniently creating desktop screenshots.
Feel free to try out different ones to further customize and optimize the GNOME desktop environment to your personal liking.
Wrap up
openSUSE Tumbleweed is a high quality rolling release Linux distribution. With openSUSE Tumbleweed, you can always access the latest versions of software packages, including the kernel. Perfect for when you have fairly new PC hardware that might not be fully supported by an older kernel. Since you continuously update your system to the latest software versions, there is no need to ever reinstall your system. The flip side of a rolling release Linux distribution is the higher risk of something going wrong during a system update. Thanks to openSUSE Tumbleweed automated openQA testing and the build in Btrfs snapshot feature, this is not something to worry about anymore.
This article assisted you with getting your system up-and-running. It presented 5 things to do after installing openSUSE Tumbleweed:
- Update your openSUSE Tumbleweed system.
- Install the multimedia codecs.
- Set the hostname of your machine with YaST.
- Color the Bash prompt.
- Install GNOME Shell extensions.