
 by
by Did you know that the freely available PyCharm community edition is perfectly suited for developing and debugging Django web applications? The goal of the article is to help you setup a new Django application framework in the PyCharm community edition, to the point that you can run and debug the Django application in PyCharm. We’ll also setup a virtual environment for the PyCharm project and install Django inside this virtual environment.
Background
PyCharm is an integrated development environment (IDE) for Python, developed by JetBrains. It features an uncluttered and intuitive user interface, combined with a pleasant to work with editor. This make PyCharm a great tool for developers working on Django web applications.
PyCharm editions
PyCharm comes in two editions: the professional edition and the community edition. The professional edition needs to be bought. In contrast, JetBrains makes the community edition free and open source. With other words, you can download the community edition for free and get started with it right away.
When inspecting the differences between the PyCharm editions, you’ll notice that the PyCharm professional edition features all sort of Django specific support as you can read here. From this information you might think that you absolutely need to purchase the PyCharm professional edition, when programming and debugging Django applications. This is incorrect. You can definitely program and debug your Django application with the free PyCharm community edition. In this article, I’ll explain step-by-step how you can setup and debug a Django application in the free PyCharm community edition.
That said, the Django support in the PyCharm professional edition does offer many features that makes your life as a Django developer easier. So by all means consider upgrading to the PyCharm professional edition if you are a full-time Django developer or if you would just like to support JetBrains and thank them for making the community edition available to everyone.
Goal
The goal of the article is to help you setup a new Django application framework in the PyCharm community edition, to the point that you can run and debug the Django application in PyCharm. We’ll also setup a virtual environment for the PyCharm project and install Django inside this virtual environment. Note that this article is not an in-depth Django tutorial. It assumes you’ve dabbled with Django before and have a basic understanding of what it does.
What you need
To complete the steps outlined in this article, I assume that you have the PyCharm community edition installed on your PC. For details on installing the PyCharm community edition, refer to the first part in the previously published article about how to create a virtual environment in PyCharm.
Create a PyCharm project with a virtual environment
While developing a Django application, you’ll install several Python packages from the Python package index (PyPI). For starters, you will need to install the Django package. This leads to the question of where do you want to install these Python packages?
The default option installs them globally on your operating system. At first, this sounds convenient. But what if you work on several Django applications and some require different versions of a specific package? This won’t work. Therefore the recommended approach is to create a project specific Python virtual environment. You can then install the Python packages that your project requires into this virtual environment, without affecting the rest of your PC system.
The PyCharm development environment can automatically create such a virtual environment for your project. Each time you open and close your project in PyCharm, it will even automatically activate and deactivate the virtual environment.
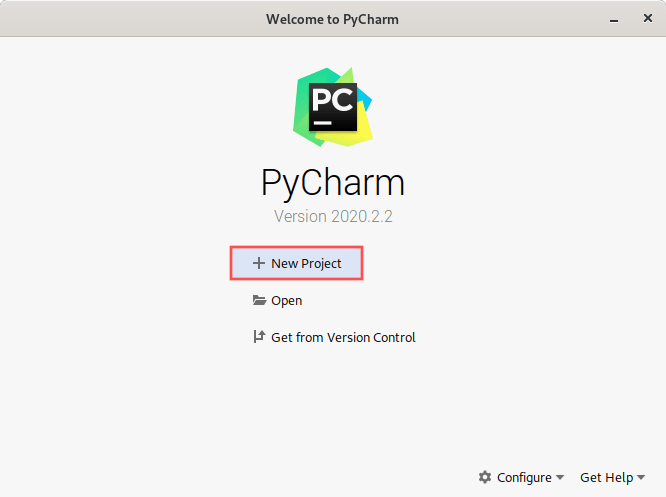
In this section we’ll start out with creating a new project in PyCharm, including the creation of the virtual environment. When you start PyCharm, a dialog opens which prompts you if you want to create a new project of open an existing one. Select New Project on this dialog:
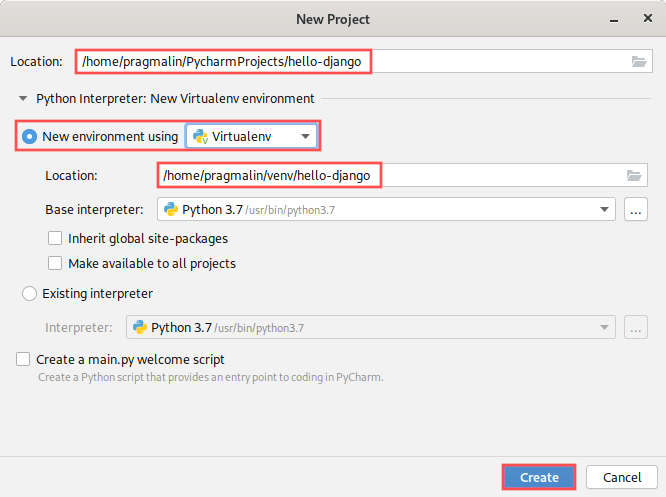
In general, I prefer to store my PyCharm projects in directory:
<home directory>/PycharmProjects/<project name>
And for the actual virtual environments, I typically select the following directory:
<home directory>/venv/<project name>
On the New Project dialog, you can specify the project name and location of the virtual environment. Since we want to create a project specific virtual environment, it makes sense to give the virtual environment the same name as the project itself. Let’s settle on hello-django as a project name in this article:
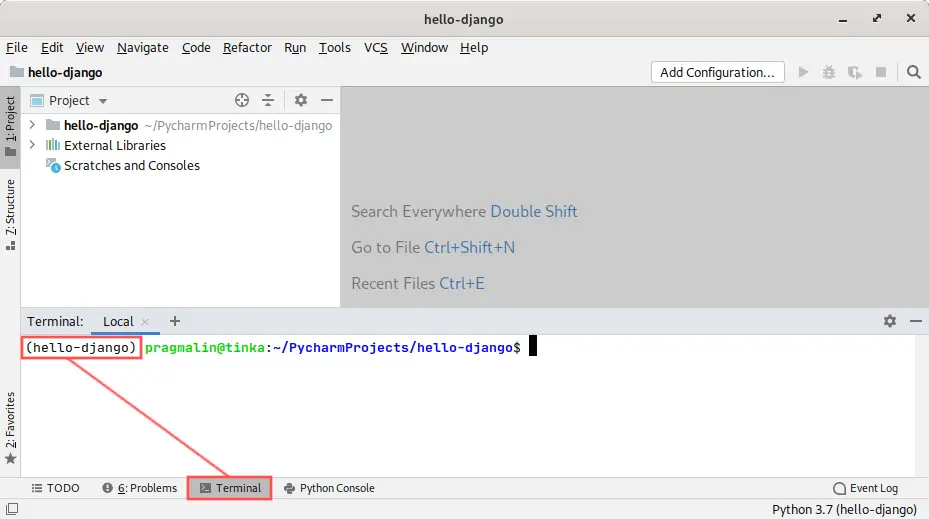
To verify that the virtual environment got created and automatically activated, open up the terminal window in PyCharm. The PyCharm terminal postfixes the name of the virtual environment to the prompt, as illustrated in the following screenshot:
Install Django from PyPi into the virtual environment
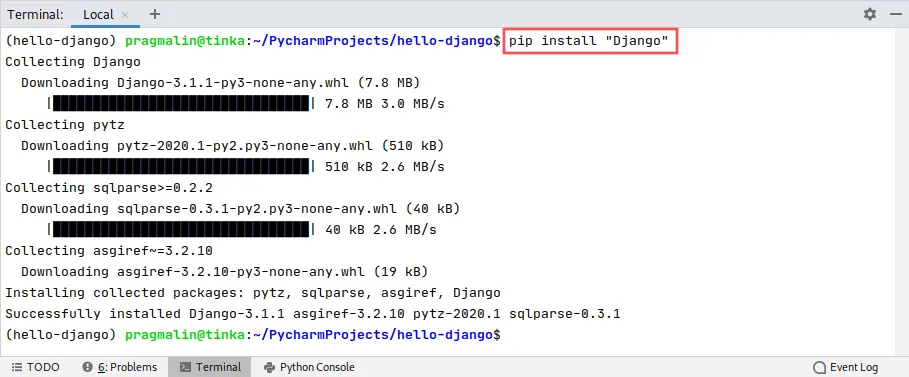
Since we plan on developing a Django application, the first task involves installing the Django package. PyPI offers this package for us, so we can conveniently install it with the help of pip. Open up the PyCharm terminal and type the command:
pip install "Django"
This installs the latest release of the Django package into our project’s virtual environment:
Note that if you want to install a specific version of Django for your application, you can specify its version number. For example:
pip install "Django"==3.1.1
Start a new Django project
Django differentiates between Projects and Applications. Typically you create one Project for an entire site. This site could potentially contain multiple Applications. This means that we should first create a new Django project, before we can create a Django application. In most online tutorials and Django related literature, the Django project is named mysite. We’ll go along with this, however you can of course change this name to whatever suits your needs best.
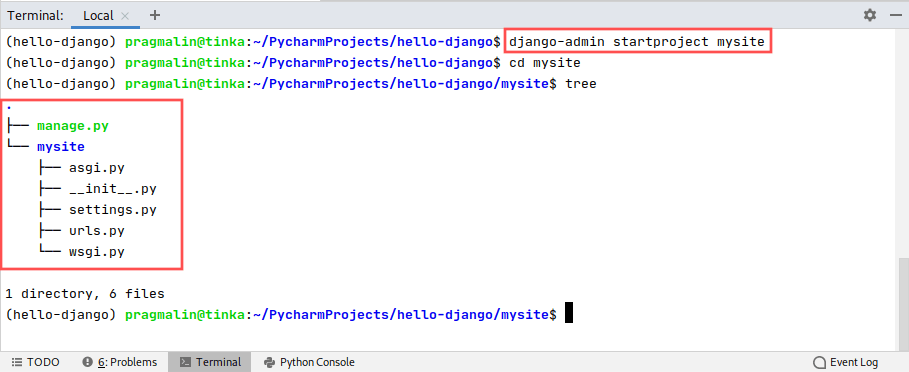
Type the following command in the terminal to create our new Django project:
django-admin startproject mysite
The new project is now created in subdirectory mysite. Feel free to look around and see what files and directories the Django administrator created for you:
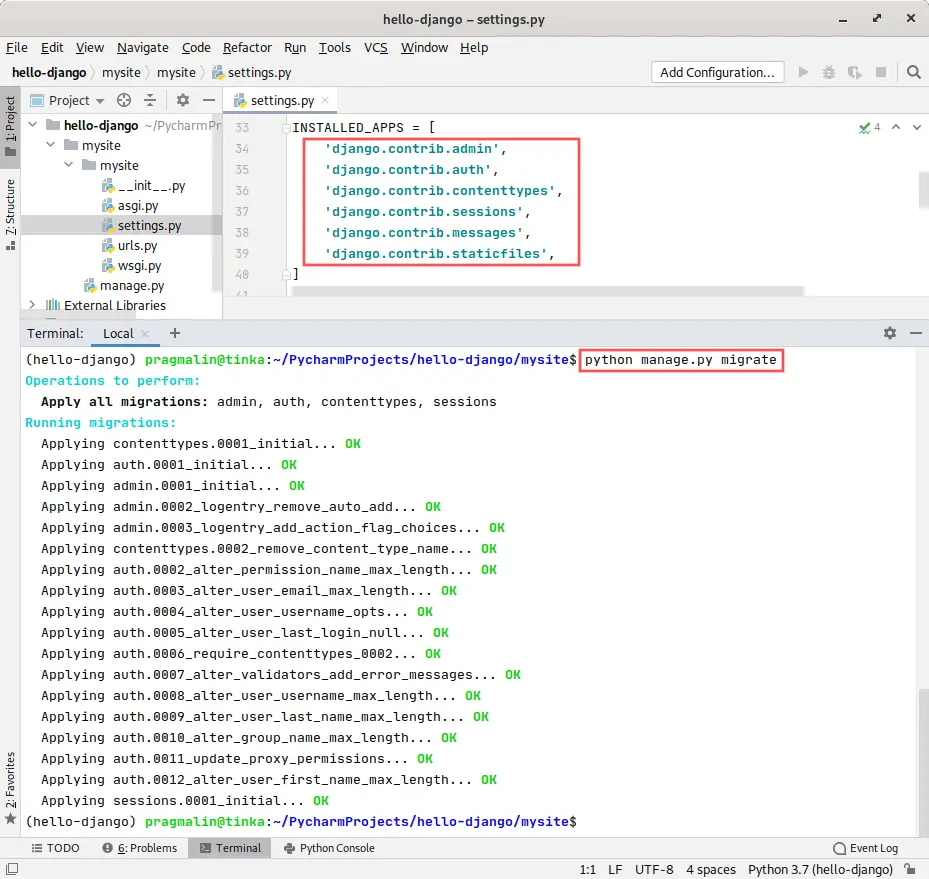
If you open up the settings.py file, you’ll see that by default Django already installed some applications for us. This is partially what they mean when they say Django is a framework with batteries included. To finalize the Django project creation, we need to create and apply the so called database migrations. This creates the database layout that is needed by these pre-installed applications. Run the following command to perform these database migrations from the mysite directory:
python manage.py migrate
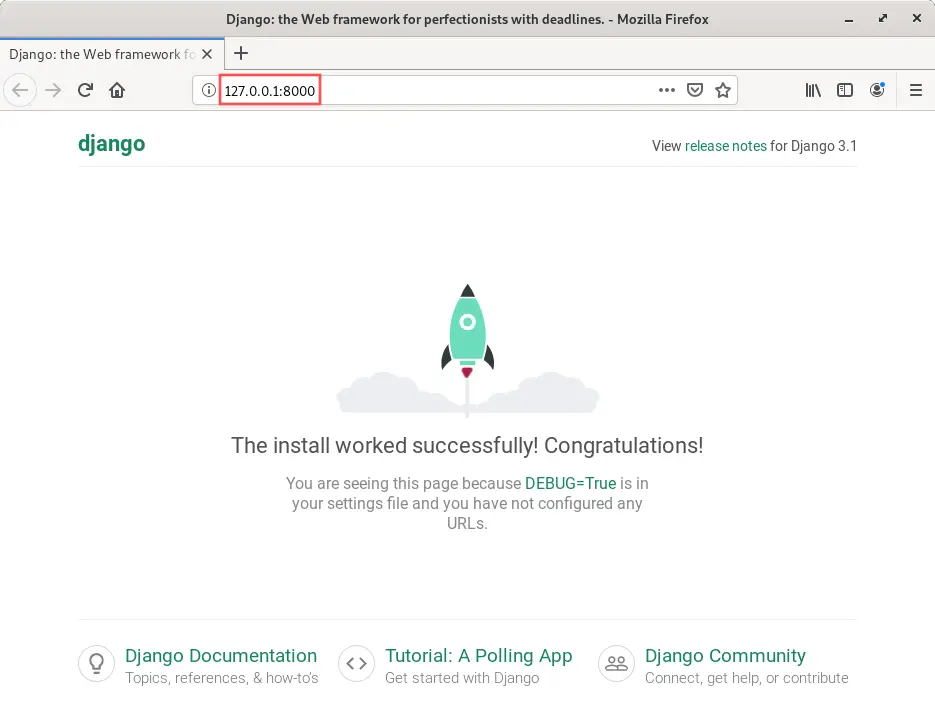
To verify the successful setup of our new Django project, we can run the included development web server. To start the development server, type the command:
python manage.py runserver
You can click on the link in the terminal screen to automatically open up the URL in your web browser. Alternatively, you can open up your web browser yourself and type the http://127.0.0.1:8000/ URL in its address bar. The expected results look something like this:
Typing the CTRL + C key combination in the PyCharm terminal screen, stops the development server.
Create a new Django application
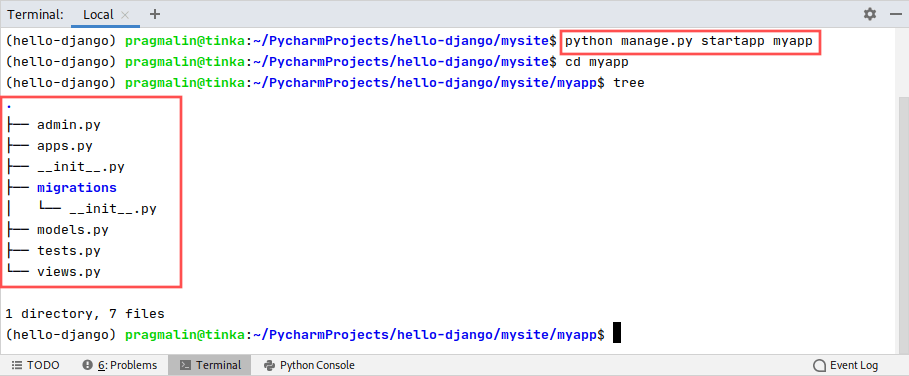
After the creation of our new mysite Django project, we can create our own Django application. Make sure your are in the mysite directory. Next, run the following command to create a new Django application inside our mysite Django project:
python manage.py startapp myapp
The new application is now created in subdirectory myapp. Feel free to look around and see what files and directories the Django project manager created for you:
You can of course change the application name myapp to a more descriptive name, if you already know what type of application you want to develop. For example blog, shoppingcart, todolist, etc.
After the creation of the myapp Django application, we just need to register it in our mysite Django project. Open the Django project’s settings.py file and locate the INSTALLED_APPS variable. Insert our new myapp Django application at the end of this variable definition and save the settings.py file:
INSTALLED_APPS = [
    'django.contrib.admin',
    'django.contrib.auth',
    'django.contrib.contenttypes',
    'django.contrib.sessions',
    'django.contrib.messages',
    'django.contrib.staticfiles',
    'myapp', # our own Django application
]
Creating a basic page
To create a basic page inside a Django application, we need to create a view. With the view created, we need to then link it to a URL, so that visitors can actually access the page from their web browser.
To create the view, open up the views.py file in the PyCharm editor. The Django project manager created this file for us inside the myapp subdirectory. Update it such that its contents look like:
# myapp/views.py
from django.http import HttpResponse


def homepage_view(request):
    return HttpResponse('Django says: Hello world!')
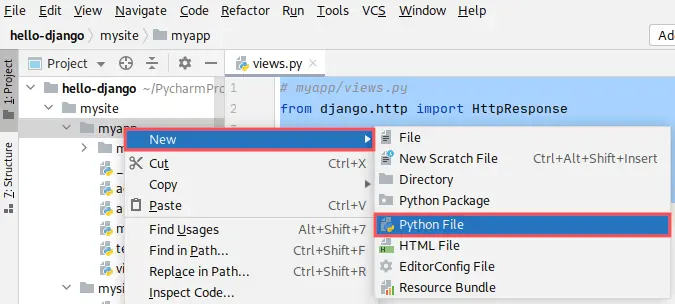
As a next step we configure, inside our myapp Django application, the URL for reaching our basic page. Create a new Python file called urls.py inside the myapp subdirectory. You can do this from within PyCharm. Right-click the myapp subdirectory in the Project manager and select New → Python File from the popup menu. You can then enter the urls.py filename for the new file:
With the newly created urls.py file open in the PyCharm editor, add the following contents:
# myapp/urls.py
from django.urls import path
from .views import homepage_view

urlpatterns = [
    path('', homepage_view, name='homepage')
]
From our myapp Django application perspective we are done. From our mysite Django project perspective, we still need to make one change to be able to access our newly created homepage. Typically, each Django application has its own URL within the Django project. This means we still need to configure the base URL for our myapp Django application inside our mysite Django project.
Open up the urls.py file inside the mysite subdirectory. So not the file we just created, but the one that was created automatically for us by the Django administrator. Locate the urlpatterns variable. Insert the URL for our new myapp at the end of this variable definition. Also import the include function from django.urls:
from django.contrib import admin
from django.urls import path, include # import include function

urlpatterns = [
    path('admin/', admin.site.urls),
    path('', include('myapp.urls')), # myapp at the root URL
]
To verify that our new Django application with one basic page works, we can run the included development web server. To start the development server, type the command:
python manage.py runserver
Make sure to run this command from the mysite subdirectory and not the myapp subdirectory. If we now go to the URL listed in the terminal (http://127.0.0.1:8000/), our browser should display our basic homepage:

Once done, type the CTRL + C key combination in the PyCharm terminal screen to stop the development server.
Run and debug your Django application with PyCharm
Always manually starting and stopping the development server from the PyCharm terminal screen gets a bit annoying over time. Luckily we can create a run configuration within PyCharm to start and stop the development server automatically.
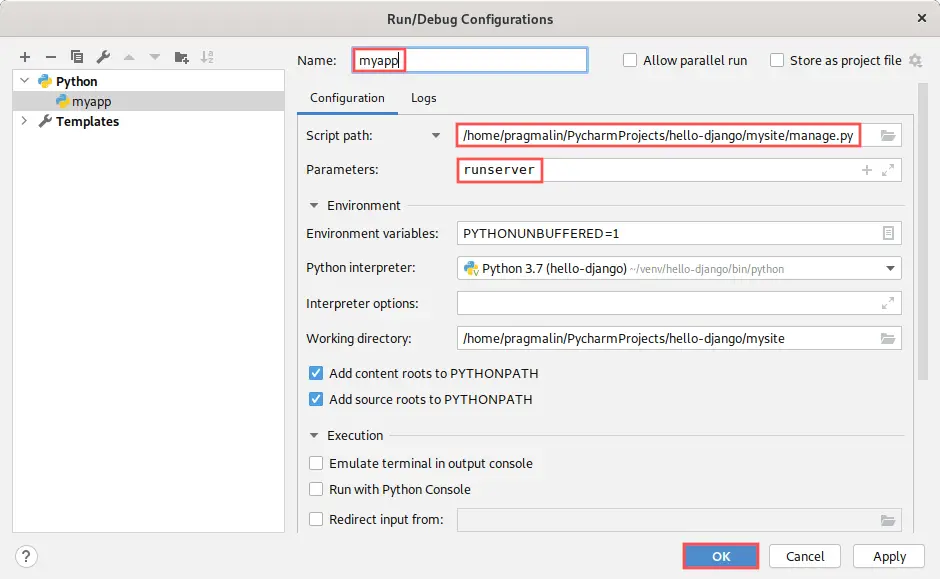
From the PyCharm program menu, select Run → Edit Configurations…Click the button with the plus-sign to create a new run configuration and select Python from the list of templates. On the newly appeared dialog, enter a name for the run configuration. This could simply be the same as the Django application name, so myapp. Next, configure the Script path. Browse and select the manage.py file inside the mysite Django project. Finally, enter runserver in the Parameters edit box and click the OK button:
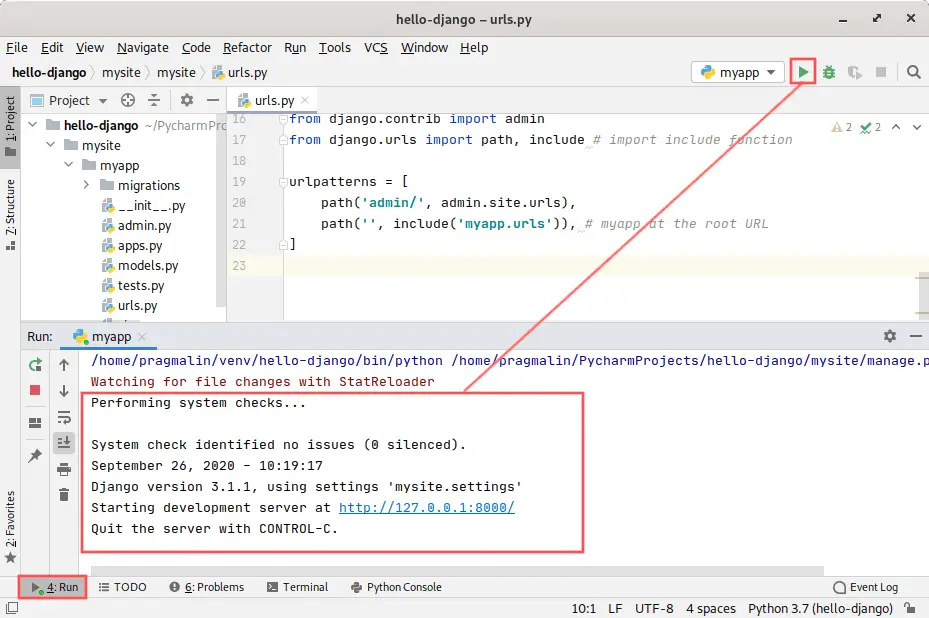
To run and test the Django application(s) inside your Django project, you can now simply click the green Play button on the PyCharm toolbar. You’ll see in the Run window that PyCharm automatically started the development server for us. Once running, you can stop it again by clicking the red Stop button on the toolbar.
Besides just running your Django application, PyCharm can also debug it. Debugging your Django application with PyCharm enables you to set breakpoints, view variable values and step through your code line-by-line. A must have feature for tracking down problems in your code. To start a debug session of your Django application, simply click the green Bug button on the PyCharm toolbar. It is located right next to the green Play button:
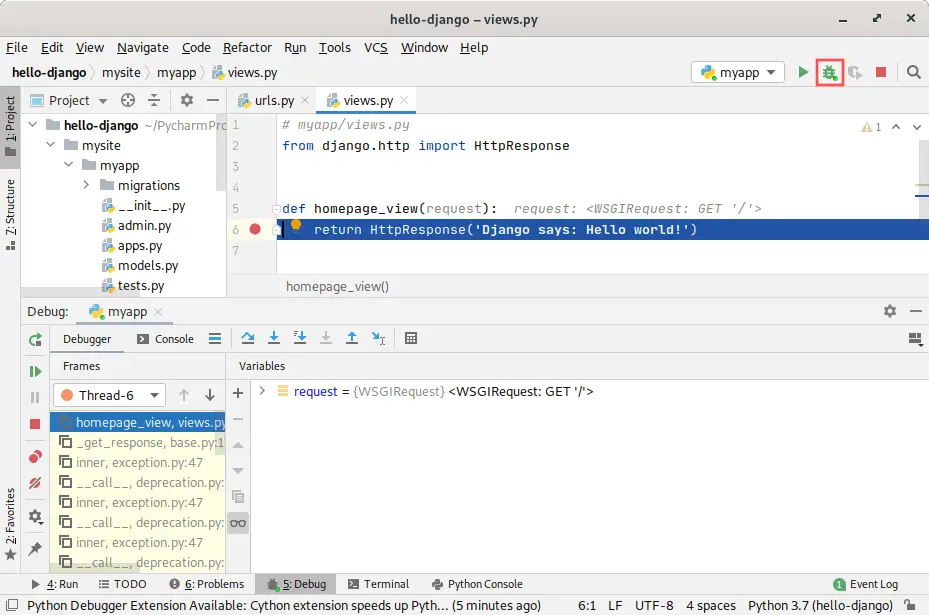
To test this out, you could set a breakpoint on the following line inside views.py:
return HttpResponse('Django says: Hello world!')
You do this by clicking in the gray gutter in the editor on the left side of the line. A red dot will appear, indicating that a breakpoint is active for that line. If you want to remove the breakpoint, simply click there again on the red dot. If you now start a debug session of your Django application, PyCharm automatically halts the application when it reaches this line of code. Once halted, you can inspect variable and parameter values and step through the code one line at a time.
Wrap up
This article walked you through all the steps for creating a new Django application in the PyCharm community edition. This included the installation of Django from PyPi into a newly cerated and project specific virtual environment, which is managed automatically for us by PyCharm. Towards the end of the article you also learned how to create a run configuration in PyCharm, such that you can run and debug your Django application. As a Django application developer you’ll likely need to perform these tasks regularly. Feel free to visit this page each time you need to setup a new Django application. It safes you the effort of having to memorize all steps involved.
One thought on “Setup and debug a Django app in PyCharm Community Edition”
Comments are closed.