
 by
by XML files are a perfect choice for storing the settings of your wxWidgets cross-platform application. Confused about how to use the wxWidgets classes to read and write XML files? No worries. In this hands-on tutorial, you’ll learn how to read and write XML files with wxWidgets, using the classes wxXmlDocument, wxXmlNode and wxXmlAttribute. We’ll expand a previously presented wxWidgets template application, such that it stores its application window dimensions in an XML file.
Background
The eXtensible Markup Language (XML) file format enables you to store data in a document, in a way that is both human-readable and machine-readable. This means that you can open up an XML file in a text editor and easily extract the data it embeds. Likewise, a computer program can open an XML file and extract its data.
As such, an XML file offers an ideal solution for storing the settings of your wxWidgets application, which you want to persists for the next time your user opens the application. The wxWidgets cross-platform GUI library includes several classes that you can use to read and write XML files. These include wxXmlDocument, wxXmlNode and wxXmlAttribute. For most library parts, wxWidgets includes well commented sample code to help you get started. Unfortunately, not for the XML classes at the time of this writing.
For this reason, this tutorial explains how you can read and write XML files with wxWidgets, using the classes wxXmlDocument, wxXmlNode and wxXmlAttribute. We’ll use the template wxWidgets C++ application from the tutorial getting started with wxWidgets on Linux, as a starting point.
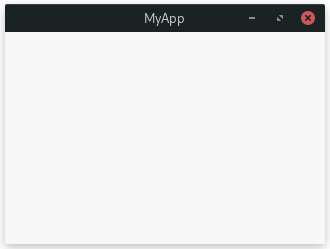
This template wxWidgets application currently implements an empty window:
In this tutorial, we’ll expand the application such that it automatically stores the window’s dimensions in an XML settings file, when the application closes. Upon application startup, we’ll then read the window’s dimension from the XML file and restore the window’s size accordingly.
What do you need
To complete the steps in this tutorial, I assume that you have a Linux system with desktop environment. It can be your daily driver, a VirtualBox virtual machine or even a Raspberry PI. The choice is yours. If you don’t yet have Linux, consider setting up Ubuntu as a virtual machine in VirtualBox:
- How to install Ubuntu Desktop 20.04 LTS in VirtualBox
- Install VirtualBox guest additions in Ubuntu 20.04
Furthermore, your Linux system needs tools for developing wxWidgets applications. The installation instructions for popular Linux distributions:
- Debian/Ubuntu:
sudo apt install git gcc g++ gdb make cmake libwxgtk3.0-gtk3-dev - Fedora:
sudo dnf install git gcc g++ gdb make cmake wxGTK3-devel - openSUSE:
sudo zypper install git gcc gcc-c++ gdb make cmake wxGTK3-devel
We’ll use the template wxWidgets C++ application from a previous tutorial as a starting point. To get the code, clone the following Git repository to a subdirectory, for example inside your home directory:
git clone https://github.com/pragmaticlinuxblog/cmake_wxwidgets.git ~/myapp
Theoretically, that is all you need. However, you could optionally install Visual Studio Code and use it as your development environment. It works great for developing wxWidgets applications in C++, in combination with CMake. It’s what I used for preparing this tutorial as well. Refer to the article about how to import a CMake project into Visual Studio Code. It includes detailed instructions on setting up Visual Studio Code for this purpose.
Layout of the XML settings file
Before we dive into the code to read and write an XML file with wxWidgets, we should first design the layout of the XML file. We plan on storing the width and height of our application’s main window. The following XML layout strikes me as a good fit for this purpose:
<settings>
  <mainwindow>
    <width>800</width>
    <height>600</height>
  </mainwindow>
</settings>
Each XML file has a root node. In our case this is the settings one. The XML file embeds the mainwindow node as a child of the root node. It contains the width and height of the window in pixels.
As an alternative layout, we could use XML attributes. In this case the XML layout would look like this:
<settings>
  <mainwindow width="800" height="600" />
</settings>
Both layouts are valid and it’s up to your personal preference, which one to pick. For this tutorial, I decided on the first option, so the one without XML attributes. If you want to go with the second option, you can use the wxXmlAttribute class to write and read the attributes to and from the node, respectively.
Location of the XML settings file
The next design question to answer is: “Where to store the XML settings file”? Luckily, wxWidgets offers the wxStandardPaths class to assist us. If you include these two header files:
#include <wx/stdpaths.h>
#include <wx/filename.h>
You can construct the filename for the XML settings file with this line of code:
wxString settingsFile = wxStandardPaths::Get().GetUserDataDir() +
                        wxFileName::GetPathSeparator() +
                        wxT("settings.xml");
For our application with name myapp, this result in the filename:
~/.myapp/settings.xml
On a side note: the wxWidgets library is cross-platform. The same code works under Microsoft Widows as well. In that case it results in the filename:
C:\Users\username\AppData\Roaming\myapp\settings.xml
Enable support for the wxWidgets XML functionality
As you can see in this overview of the wxWidgets library architecture, the XML part (wxXML) is a separate module. We need to make sure that the linker actually includes this XML library, when creating our application’s executable. We can enable support for the wxWidgets XML functionality by changing the following line in our application’s CMakeLists.txt:
find_package(wxWidgets COMPONENTS core base xrc REQUIRED)
Change it to:
find_package(wxWidgets COMPONENTS core base xrc xml REQUIRED)
We added xml after xrc.
Use wxWidgets to write the application settings to the XML file
In the previous sections, we designed the layout of the XML settings file and decided on the location to store the XML file. Now it’s time for some hands-on coding, where we implement the functionality to write the application settings to the XML file, using wxWidgets.
Implementing the saveSettings() method
Open up the file mainwindow.h header-file and add the following private method prototype to the MainWindow class:
void saveSettings(void);
Next, open up the file mainwindow.cpp and add the following include statements to include the needed header-files:
#include <wx/xml/xml.h>
#include <wx/stdpaths.h>
#include <wx/filename.h>
In the same file, implement the following method that handles the actual writing of the XML settings file:
void MainWindow::saveSettings(void)
{
  wxXmlDocument xmlDoc;
  wxString settingsFile = wxStandardPaths::Get().GetUserDataDir() +
                          wxFileName::GetPathSeparator() +
                          wxT("settings.xml");

  /* Make sure the directory for the settings file actually exists. */
  if (!wxFileName::DirExists(wxStandardPaths::Get().GetUserDataDir()))
  {
    /* Create the directory. */
    wxFileName::Mkdir(wxStandardPaths::Get().GetUserDataDir(),
                      wxS_DIR_DEFAULT, wxPATH_MKDIR_FULL);
  }

  /* Create and set the root node of the XML file. */
  xmlDoc.SetRoot(new wxXmlNode(wxXML_ELEMENT_NODE, wxT("settings")));

  /* Create the main window child node. */
  wxXmlNode * mainWindowNode = new wxXmlNode(xmlDoc.GetRoot(),
                                             wxXML_ELEMENT_NODE,
                                             wxT("mainwindow"));

  /* Get the dimensions of the main window. */
  wxSize windowSize = GetSize();

  /* Add the width child node with its value. */
  wxXmlNode * widthNode = new wxXmlNode(mainWindowNode,
                                        wxXML_ELEMENT_NODE,
                                        wxT("width"));
  new wxXmlNode(widthNode, wxXML_TEXT_NODE, wxT("width"),
                wxString::Format(wxT("%i"), windowSize.GetWidth()));

  /* Add the height child node with its value. */
  wxXmlNode * heightNode = new wxXmlNode(mainWindowNode,
                                         wxXML_ELEMENT_NODE,
                                         wxT("height"));
  new wxXmlNode(heightNode, wxXML_TEXT_NODE, wxT("height"),
                wxString::Format(wxT("%i"), windowSize.GetHeight()));

  /* Save the XML settings file. */
  xmlDoc.Save(settingsFile);
}
The first few lines in this function make sure that the directory for the XML settings file actually exists. Otherwise writing the actual XML file fails. Once done, we create the XML settings file, one node at a time:
- First we add the
settingsnode as the root node of the XML file. - Next, we add the
mainwindowchild node. - Followed by the
widthandheightchild nodes with the actual pixel values as text.
Calling the saveSettings() method
With the saveSettings() method implemented we still need to call it. When? Well, when the window is about to close sounds about right. To realize this, we can implement an onClose event handler and bind it to the wxEVT_CLOSE_WINDOW event.
Open up the file mainwindow.h header-file and add the following private method prototype to the MainWindow class:
void onClose(wxCloseEvent& event);
Next, open up the file mainwindow.cpp and add its implementation:
void MainWindow::onClose(wxCloseEvent& event)
{
  /* Save the application settings. */
  saveSettings();

  /* Close the window. */
  Destroy();
}
The last puzzle piece is binding the wxEVT_CLOSE_WINDOW event to this new onClose method. Otherwise our newly added onClose method won’t get called. Add the following lines at the end of the constructor of the MainWindow class:
/* Bind the events to their event handlers. */
Bind(wxEVT_CLOSE_WINDOW, &MainWindow::onClose, this);
Testing the saveSettings() method
Alright, time to test if the writing of the XML settings file works properly in our wxWidgets application. Go ahead and build and run the application. Instruction on how to do so, can be found in the article that introduced the wxWidgets template application.
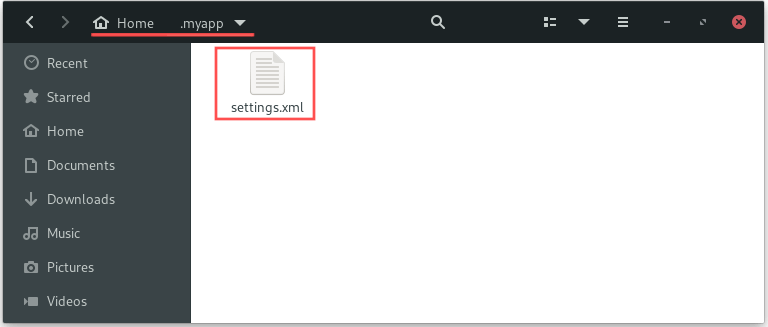
Once running, resize the window to whatever size you prefer. Afterwards exit the application by closing the application window. To check that the wxWidgets application correctly created the XML settings file, point your file manager to the .myapp directory inside your home directory. Make sure to enable the viewing of hidden files and directories. Otherwise you won’t see the directory. If all is okay, it should contain the settings.xml file:
If you open it with a text editor, you can verify that its layout represents the design as discussed earlier on:

Use wxWidgets to read the application settings from the XML file
In the previous section we realized functionality that writes the window dimensions to the XML settings file, when the wxWidgets application closes. As a logical next step, we continue with implementing functionality for restoring these settings, the next time the user starts the application.
Implementing the restoreSettings() method
Start by opening up the file mainwindow.h header-file and add the following private method prototype to the MainWindow class:
void restoreSettings(void);
Next, open up the file mainwindow.cpp and implement the method that handles the actual reading of the XML settings file:
void MainWindow::restoreSettings(void)
{
  wxXmlDocument xmlDoc;
  wxString settingsFile = wxStandardPaths::Get().GetUserDataDir() +
                          wxFileName::GetPathSeparator() +
                          wxT("settings.xml");

  /* Attempt to open the user configuration file as an XML file. */
  if (!xmlDoc.Load(settingsFile))
  {
    return;
  }

  /* Verify that the XML file contains a root node. */
  if (xmlDoc.GetRoot() == nullptr)
  {
     return;
  }

  /* Verify that the root node is the expected settings node. */
  if (!xmlDoc.GetRoot()->GetName().IsSameAs(wxT("settings")))
  {
    return;
  }

  /* Attempt to locate the main window child node. */
  wxXmlNode * mainWindowNode = nullptr;
  wxXmlNode * node = xmlDoc.GetRoot()->GetChildren();
  while (node != nullptr)
  {
    if (node->GetName().IsSameAs(wxT("mainwindow")))
    {
      /* Found our node. Store it and stop the loop. */
      mainWindowNode = node;
      break;
    }
    /* Continue with the next node. */
    node = node->GetNext();
  }

  /* Only continue if we found the main window child node. */
  if (mainWindowNode != nullptr)
  {
    /* Start with the current dimensions of the main window. */
    wxSize windowSize = GetSize();

    /* Loop over all its child nodes. */
    wxXmlNode * node = mainWindowNode->GetChildren();
    while (node != nullptr)
    {
      /* Is this the width node? */
      if (node->GetName().IsSameAs(wxT("width")))
      {
        /* Extract the value. */
        wxString widthStr = node->GetNodeContent();
        if (widthStr.IsNumber())
        {
          windowSize.SetWidth(wxAtoi(widthStr));
        }
      }

      /* Is this the height node? */
      if (node->GetName().IsSameAs(wxT("height")))
      {
        /* Extract the value. */
        wxString heightStr = node->GetNodeContent();
        if (heightStr.IsNumber())
        {
          windowSize.SetHeight(wxAtoi(heightStr));
        }
      }

      /* Continue with the next node. */
      node = node->GetNext();
    }

    /* Restore the dimension of the main window. */
    SetSize(windowSize);
  }
}
In the first three if-statements, we make sure that wxWidgets can actually read the XML settings file and that it actually contains the expected settings root node. After we verified the validity of the root node, we loop through all its child nodes, with the purpose of finding the mainwindow child node. Once we located the mainwindow child node, we loop over its children to look for the width and height nodes. We extract these settings and store them in variable windowSize. The final line of code handles the actual resizing of the application’s main window, by calling its SetSize method.
Calling the restoreSettings() method
When should we call the restoreSettings() method? Ideally at the end of constructor of class MainWindow. We can add the method call right under the Bind() call, which we added earlier on. The function body of the constructor now looks like this:
/* Center the window on the screen. */
Centre();

/* Bind the events to their event handlers. */
Bind(wxEVT_CLOSE_WINDOW, &MainWindow::onClose, this);

/* Load and restore the settings from the XML file. */
restoreSettings();
Testing the restoreSettings() method
At this point our wxWidgets application contains all the functionality to write and read the settings to and from the XML file. Time to do the final testing. Here are the steps:
- Build and run the application.
- Resize the main window.
- Close the application.
- Start the application again.
- Check that the window size is the same as when you last closed the application.
I uploaded the resulting code as a TAR GZ archive. In case your wxWidgets application doesn’t work as expected, you can cross-reference your wxWidgets application with the contents of this TAR GZ archive. To find out more about how to work with TAR GZ archives, refer to the previously published tutorial about how to create and extract a TAR GZ archive in Linux.
Wrap up
In this tutorial you learned how to read and write XML files in your wxWidgets application. We used a hands-on approach, where we implemented persistence of an application’s window dimensions. As a starting point we used the wxWidgets template application introduced in a previous tutorial. To learn more about developing GUI applications with the wxWidgets cross-platform library, refer to all other wxWidgets related tutorials on the PragmaticLinux website.