 by
by By default, openSUSE proposes the Btrfs filesystem for the root partition. One of the great Btrfs features is the build-in snapshots. openSUSE automatically creates snapshots for you when you install or change something on your system. As such, the only thing you really need to know is how to rollback to a snapshot, to restore your openSUSE system to a previously working state. This article explains exactly that: How to rollback your openSUSE system to a previous snapshot.
Background
The openSUSE Linux distribution is a front-runner when it comes to supporting the Btrfs filesystem. For several years already, the openSUSE installer’s default partitioning scheme proposes the Btrfs filesystem for the root / partition. Some benefits of Btrfs compared to the more common Ext4 file system:
- Better error detection and correction.
- Support for data compression.
- Build-in snapshots.
Especially the last item, the build-in snapshots, can be a life-saver. These Btrfs snapshots enable you to undo changes to your system. Gone are the days where you keep your fingers crossed during a system update. If something goes wrong during a system update on openSUSE, you simply rollback to a previous snapshot. A great feature for both production servers running openSUSE Leap and desktop PCs running openSUSE Tumbleweed.
Other Linux distributions such as Fedora and Ubuntu started to support Btrfs as well. But one thing that sets Btrfs on openSUSE apart from the other Linux distributions, is how well the developers integrated Btrfs related tooling into their operating system. This results in an easy-to-use snapshot management for the end-user. In fact, you do not even need to worry about Btrfs and snapshots. It all happens auto-magically in the background.
Whenever you change something on your system, through their YaST configuration tool or by installing/removing software with the Zypper package manager, openSUSE automatically creates before and after snapshots for you. As whip-cream on top, openSUSE even creates entries for the latest snapshots in the Grub boot menu.
So the only thing you really need to know as an openSUSE user, is how to rollback to a previous snapshot. To restore your system in case something went wrong. That is exactly the topic of this article: How to rollback a snapshot on openSUSE.
What do you need
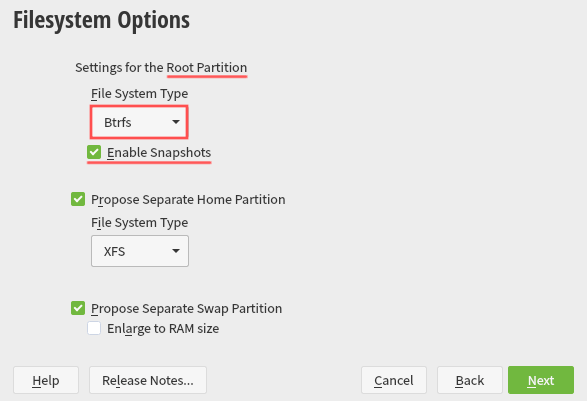
To complete the steps in this tutorial, you need either an openSUSE Leap or an openSUSE Tumbleweed based Linux system. The type of system doesn’t really matter. It can be a laptop or desktop PC, a Raspberry PI or a virtual machine. It is important though that you selected the Btrfs filesystem type for the root / partition in the installer:
I prepared an openSUSE Leap 15.3 virtual machine in Gnome Boxes, which I’ll use throughout this tutorial.
Viewing available snapshots on your openSUSE system
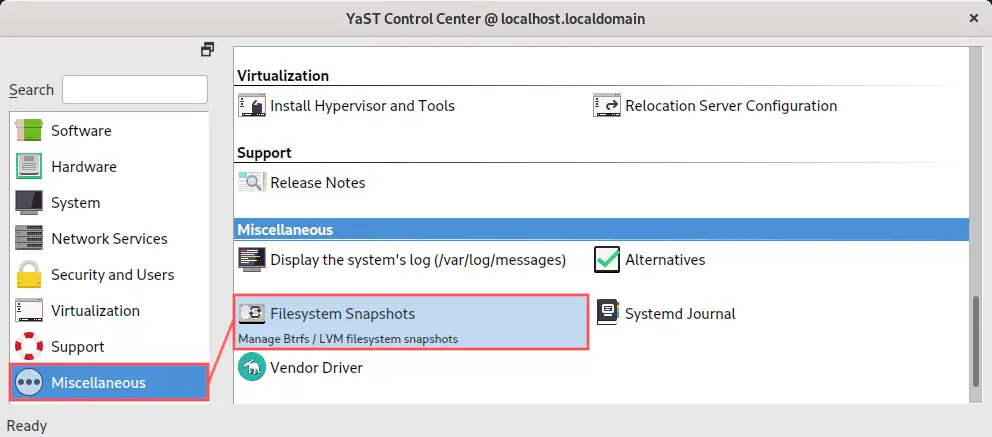
Before diving into how to rollback a snapshot, let’s first figure out how to view the available snapshots on your openSUSE system. Open up the YaST configuration tool. You can find a desktop launcher for YaST in your desktop environments application menu. Select Filesystem Snapshots from the Miscellaneous category:
This opens up a dialog that shows all the currently available snapshots that Snapper created. Snapper is the command-line program that openSUSE uses under the hood, for creating and managing snapshots. Thanks to the openSUSE Btrfs tooling, you’ll probably never need to use Snapper directly, except for when you rollback a snapshot.
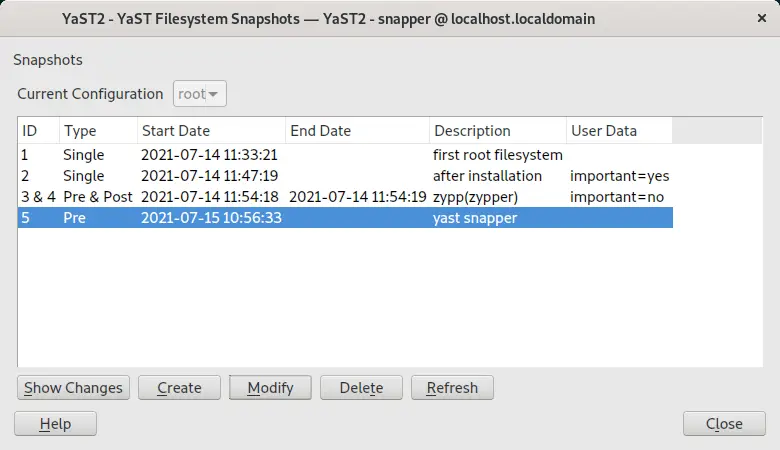
Since I just installed openSUSE Leap 15.3, just five snapshots are available. Note that openSUSE created all these snapshots automatically. Every time you use YaST or Zypper, openSUSE creates Pre and Post pair of snapshots for you. So one before the changes were made and one after the changes were made. If you manually install software on your system, then you can manually create these Pre and Post snapshots by clicking the Create-button on the dialog.
Installing HTOP on your openSUSE system for testing purposes
Now that we know how to list Btrfs snapshots, let’s install some software. We’ll use it for testing purposes to later on rollback our openSUSE system to before we installed this software. I selected the HTOP software program for this tutorial, but you can of course change this to whatever your prefer. I’ll install HTOP directly in the terminal with Zypper:
sudo zypper install htop
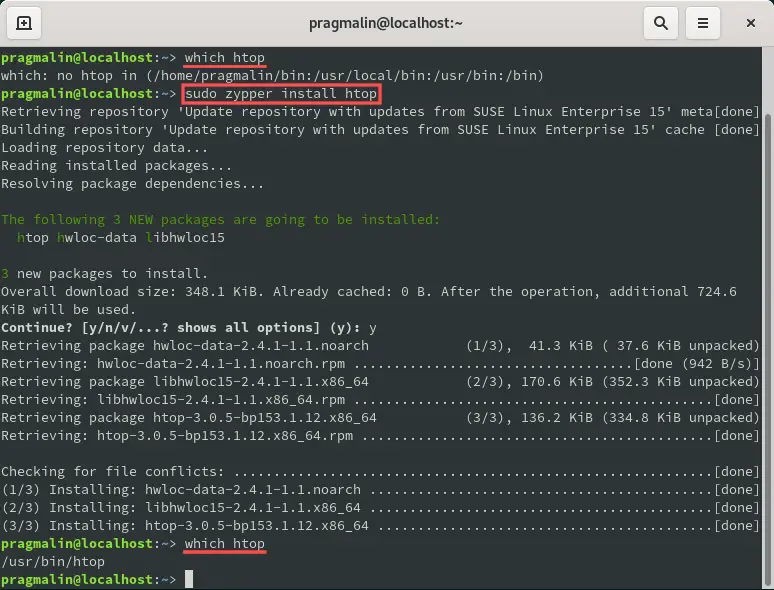
As you can see in the screenshot, I used the which command to verify if HTOP is installed on the openSUSE system. Let’s use YaST again to display the available snapshots:
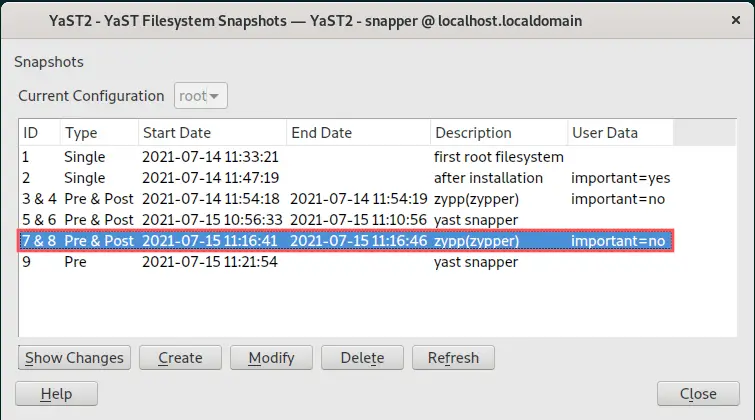
Snapshots 7 and 8 are the Pre and Post snapshots from installing HTOP. How do I know this? Because it’s the last thing I did with Zypper. Sure, there is one more snapshot with number 9. But that is just the one that got created because I just opened up this dialog in YaST. When unsure which snapshot belongs to what, you can select the snapshot and click the Show Changes-button on the dialog:
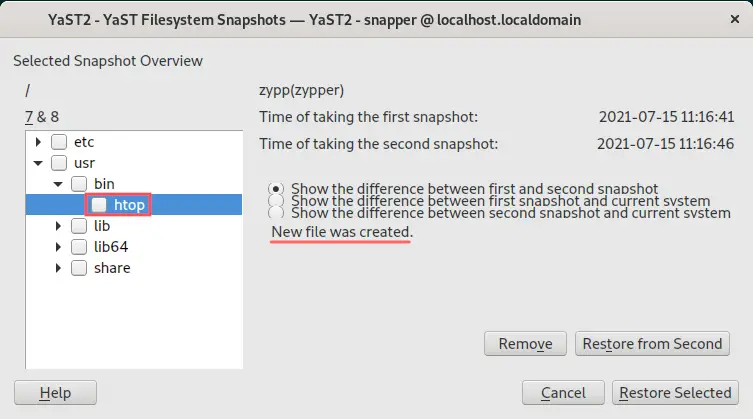
In the screenshot you can clearly see that the \usr\bin\htop file was created. A true indicator that this snapshot pair belongs to the HTOP installation we just performed.
Booting your openSUSE system from a read-only snapshot
In the previous section we installed the HTOP program on your openSUSE system. While performing this operation, openSUSE automatically created snapshots for us. By inspecting the available snapshots, we determined that:
- Snapshot number 7 represent the system before we installed the HTOP program.
- Snapshot number 8 represents the system after we installed the HTOP program.
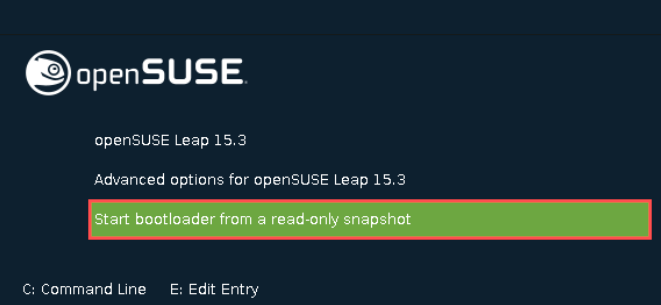
For testing purposes, we now want to restore our system to the point before we installed the HTOP program. This means we need to rollback our openSUSE system to snapshot number 7. This is a two step process. For the first step, we boot our openSUSE system from read-only snapshot. So go ahead and reboot your system and on the boot screen select Start bootloader from a read-only snapshot.
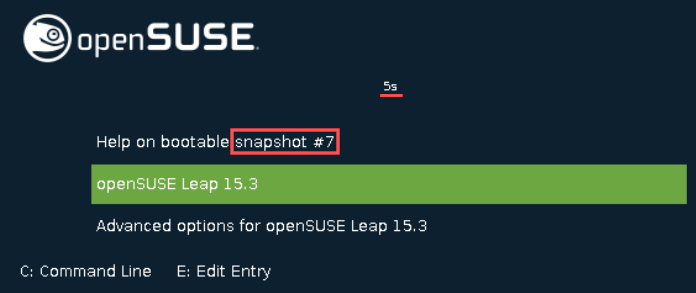
The next screen lists the available snapshots that you can boot from. Unfortunately, it does not show the actual snapshot number. But when you select the snapshot by pressing Enter, it opens up the next screen, which does show you the snapshot number. If you selected the wrong snapshot, simply press Esc to go back to the previous screen, which lists the snapshots.
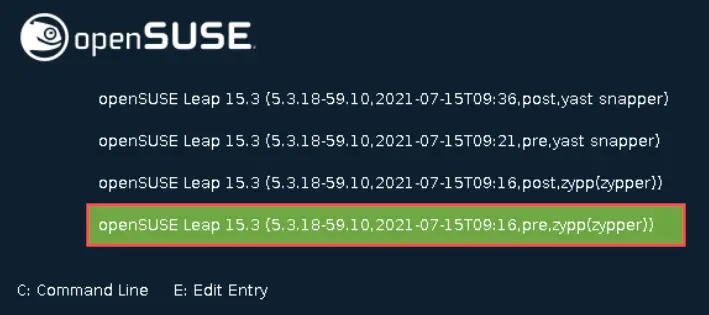
After doing through this process, I found out that snapshot number 7 belongs to the entry that is called openSUSE Leap 15.3 (5.3.18-59.10.2021-07-15T09:16,pre,zypp(zypper)). After selecting this one from the boot menu, it will boot from that snapshot after a few seconds:
Rolling your openSUSE system back to the booted snapshot
Now that we booted our openSUSE system from the correct read-only snapshot (snapshot 7 in my case), we can continue with the second step of the system rollback. Note that you are now running from a read-only snapshot, so you cannot write the any directory that is part of the snapshot. Reading works fine, so you could double-check that everything is working fine and that this is actually the correct snapshot.
To complete the rollback to this openSUSE snapshot, simply open the terminal and execute this command:
sudo snapper rollback
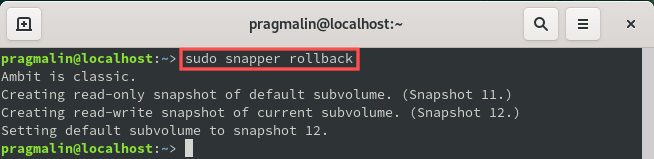
That’s it! All you need to do now is reboot your openSUSE system to complete the snapshot restore process. In our example, the HTOP program should now no longer we available. We can verify this by running command:
which htop

As expected, the HTOP program is no longer installed on our system. This proves that the rollback of our openSUSE system, to the snapshot before we installed HTOP, completed successfully.
Wrap up
Thanks to the default Btrfs filesystem and the well integrated Btrfs snapshot tooling, openSUSE makes system snapshot management a breeze. This takes away the worries you might have when updating your openSUSE system. If something goes wrong, just rollback your openSUSE system to the previous (still working) snapshot. Then simply try again or file a bug report in openSUSE’s Bugzilla and wait for a fix. openSUSE automatically creates snapshots for you each time:
- You change a system setting through the YaST configuration tool.
- Install or remove software with the Zypper package manager.
At any time, you can also manually create a snapshot. For example when you manually install a piece of software, without using Zypper.
As an end-user, the only thing you really need to know is how to rollback your openSUSE system. For example to a previously working snapshot, if something went wrong with your system. This tutorial explained step-by-step how to perform such a snapshot rollback on openSUSE. It consists of the following steps:
- Determine the snapshot time and number from when the system was still okay. It’s most likely one of the last Pre snapshots.
- Boot your system from this read-only snapshot.
- Perform the snapshot rollback by running command
sudo snapper rollbackfrom the terminal. - Reboot your system to complete the snapshot rollback operation.