 by
by Did the installation of a Gnome Shell Extension, through your web browser’s Gnome Shell integration add-on, result in an error? This happens sometimes due to a potential bug or compatibility issue. To resolve the problem, you can download an older or newer version of the Gnome extension. You’ll end up with a ZIP file of the Gnome extension, which you’ll have to install manually. This tutorial explains how to manually install a Gnome extension from a ZIP file.
Background
When I first tried out the Gnome 3 desktop environment, I strongly disliked it. I felt that it didn’t fit my workflow. Consequently, I decided on moving to a different desktop environment. I settled on XFCE because it’s simple, lightweight and responsive. This was a few years ago. About a year ago I started working with my Thinkpad T450s. Most of the time it’s connected to an external monitor. On occasion, I work directly on the laptop with its relatively small 14″ screen. On the 14″ laptop screen, the fonts were just too small for my eyes. At that point the XFCE desktop environment did not yet support font scaling. As a result, I started desktop hopping to find one that allows me to quickly adjust the font scaling. That’s how I ended back on the Gnome 3 desktop environment.
After committing myself to this desktop environment, I have to admit that I now really love it. Once you understand and use the workflow the Gnome 3 designers had it mind, it’s a joyful experience and it makes me feel productive. Here’s what I particularly like about Gnome 3:
- It seamlessly supports both a keyboard centric and a mouse centric workflow.
- With the help of Gnome Shell extensions, you can customize the desktop and further optimize it for your preferred workflow.
Gnome Shell Extensions
The recommended way of installing Gnome Shell extensions is through your web browser, by visiting the https://extensions.gnome.org/ website. Upon your first visit, the site recommends that you install the Gnome Shell integration browser add-on. Afterwards you can conveniently search and directly install Gnome Shell extensions through your browser. You probably already know about this. Now here’s a questions for you: Did you ever encounter an error like the one you see in the following screenshot, while installing a Gnome Shell extension this way?
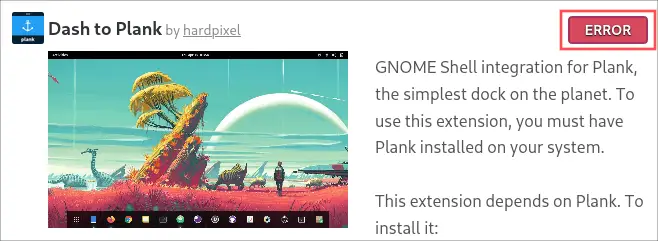
This happens sometimes. In the above example of the Dash to Plank extension, I caused the error myself. The notes clearly stated that this extension does not yet work under Wayland, and I tried it anyways. The point is that sometimes a Gnome extension installs with an error. Typically caused by one of the following reasons:
- A compatibility issue between the Gnome 3 desktop environment on your Linux system and the Gnome extension offered on the website.
- A bug in the version of the Gnome extension itself.
Why would you manually install a Gnome Extension?
In case the installation of the Gnome shell extension resulting in an error, you have two options:
- Select and download a different version of the Gnome extension.
- Visit the developer’s website and download a different (development) version of the Gnome extension.
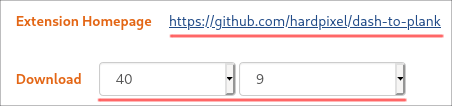
The web page of the Gnome Shell extension gives you both options, as you can see in this screenshot:
Either way, you’ll end up with a ZIP file of the Gnome extension, which you’ll have to install manually. This leads to the next question: How do you manually install a Gnome extension from a ZIP file? That’s exactly what I’ll explain in this tutorial. I’ll show you how to manually install the Gnome extension through GUI applications and by using the terminal. I’ll even present a Bash script for automating the manual installation of a Gnome extension.
What do you need?
Since we plan on manually installing a Gnome extension, you need a Linux system with the Gnome desktop environment. Gnome is the default desktop environment for popular Linux distributions such as Ubuntu, Debian, Fedora and openSUSE. For this article, I’ll use Fedora 34, which is the first regular release distribution to feature the Gnome 40 desktop environment.
Additionally, we need the ZIP file of a Gnome extension. For demonstration purposes, I decided on using the Lock Keys extension. This extension adds two icons to the Gnome panel, which indicate the Numlock and Capslock status. To download the ZIP file of the Lock Keys extension, point your browser to its page on the Gnome extensions website:
Next, select your version of the Gnome desktop in the drop down box. Afterwards a second drop down box appears, where you can select a specific version that is supposed to be compatible with your version of the Gnome desktop environment. Note that if you don’t know the exact version of your Gnome desktop environment, open the Activities view, type About and hit Enter. This opens up an info dialog, which includes the Gnome version. In my case I selected Gnome version 40 and extension version 42:

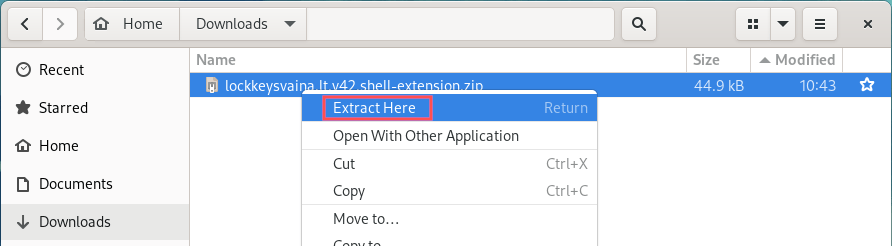
Once downloaded, the file shows up in my Downloads directory with filename lockkeysvaina.lt.v42.shell-extension.zip.
Note that the extension’s page on the Gnome extensions website also lists the homepage of the extension. By going there directly, you can often download a newer development version of the Gnome extension. One that is not yet available on the Gnome extensions website.
Manually install the Gnome Extension using GUI applications
With the ZIP file of the Gnome extension downloaded, we can continue with the manual installation of it. This section shows you how to do this, without having to touch the terminal.
Extract the ZIP file
Open up the file manager (Nautilus) and go the directory where you stored the ZIP file of the Gnome extension. Extract the ZIP file, by right-clicking it and selecting Extract Here from the pop-up menu:
Rename the directory of the Gnome extension
With the ZIP file extracted, we need to make sure its directory name is correct. This part is very important. Look inside the directory that we just extracted the ZIP file to. You’ll find a file with the name metadata.json. Open this file in a text editor and locate the variable uuid there:
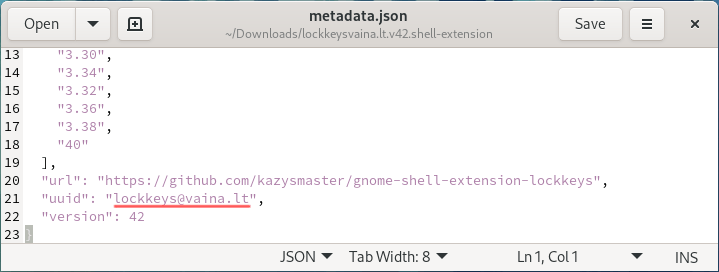
In my case the uuid variable is set to lockkeys@vaina.lt. Now that we know the uuid of the Gnome extension, rename the directory that the ZIP files were extracted to, to the uuid value. So in my case I had to rename directory lockkeysvaina.lt.v42.shell-extension to lockkeys@vaina.lt. To rename a directory, right-click the directory in the file manager and select Rename… from the pop-up menu. Alternatively, you can select the directory and press the F2 key on your keyboard.
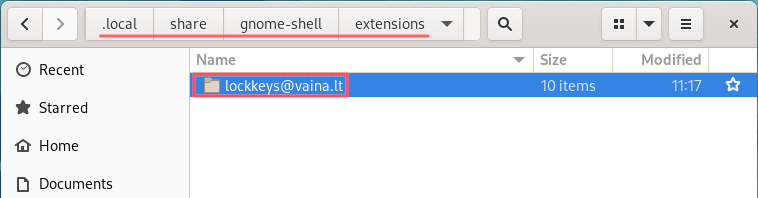
Move the directory to your user’s Gnome extension directory
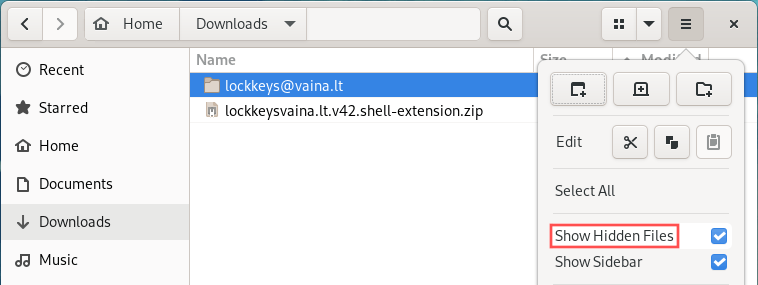
Halfway there. We now need to move the renamed directory to your user’s Gnome extension directory. We’ll use a basic cut-and-paste operation for this. Before we proceed, make sure you enabled the Show Hidden Files option in the file manager (keyboard shortcut: Ctrl+h):
Here goes:
- Right-click the recently renamed directory, which contains the Gnome extension files, and select Cut from the pop-up menu (keyboard shortcut Ctrl+x).
- Go to directory
Home→.local→share→gnome-shell. - If not yet available, create a new directory called
extensions. - Go inside the
extensionsdirectory. - Paste the directory with the Gnome extension into this directory. Right-click on the empty space inside the
extensionsdirectory, and select Paste from the pop-up menu (keyboard shortcut Ctrl+v).
In my case the result looks like this:
Restart the Gnome Shell and enable the extension
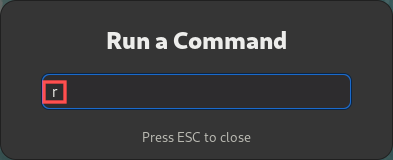
At this point the Lock Keys Gnome extension is correctly installed. We just need to restart the Gnome shell such that it actually detects it. One way is to log out your user and then log back in. A quicker way is to restart the Gnome shell like this:
- Open the Run a Command dialog by pressing Alt+F2 on the keyboard.
- Enter just r in the box and press Enter.
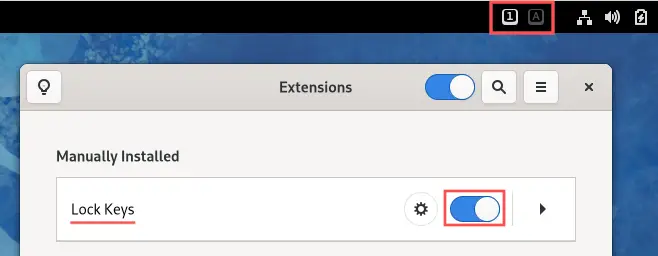
You can now enable the newly installed Gnome extension the usual way, so with the Gnome Tweaks or Gnome Extensions (Gnome >= 40) application. Afterwards, the icons appear on the Gnome panel, to indicate the Numlock and Capslock status:
Manually install the Gnome Extension using the terminal
Anything that can be achieved through a GUI, can also be done through the terminal on Linux. Especially for those who prefer working in the terminal, I’ll now show you how to manually install the Gnome extension directly in the terminal.
Install dependencies
To automatically extract the value of the uuid variable from the metadata.json file, we’ll need a tool. Specifically one that can extract JSON formated parameters from a file. The jq tool is perfect for this. Luckily most Linux distributions packaged the jq tool. Run one of the following commands to install it, based on your Linux distribution:
- Ubuntu or Debian:
sudo apt install jq - Fedora:
sudo dnf install jq - openSUSE:
sudo zypper install jq
Extract the UUID from metadata.json
With the jq tool installed, we can use it to extract the uuid parameter value from the metadata.json file, which is located inside the ZIP file. Note that we can do this in combination with the unzip command, without even having to extract the entire ZIP file first. Open up the terminal and run the following command:
MY_EXT_UUID=$(unzip -p ~/Downloads/lockkeysvaina.lt.v42.shell-extension.zip metadata.json | jq -r '.uuid')
This stores the extracted uuid parameter value in a Shell variable that we called MY_EXT_UUID. You could use echo $MY_EXT_UUID to verify the result:

Extract the ZIP file to your user’s Gnome extension directory
Now that we know the uuid of the extension, we also know the name of the directory to extract the ZIP file to. Before extracting the ZIP file, we first make sure that the directory for storing your user’s Gnome extensions exists:
mkdir -p ~/.local/share/gnome-shell/extensions/
Next, we extract the ZIP file to a subdirectory here, with the name we stored in the MY_EXT_UUID Shell variable:
unzip -q -o ~/Downloads/lockkeysvaina.lt.v42.shell-extension.zip -d ~/.local/share/gnome-shell/extensions/$MY_EXT_UUID

Restart the Gnome Shell and enable the extension
The Lock Keys Gnome extension is now installed. We just need to restart the Gnome shell to make sure it actually detects the new Gnome extension. Instead of logging out and back in, you can run this command directly in the terminal:
busctl --user call org.gnome.Shell /org/gnome/Shell org.gnome.Shell Eval s 'Meta.restart("Restarting…")'
That’s it. You can now enable the newly installed Gnome extension the usual way, so with the Gnome Tweaks or Gnome Extensions (Gnome >= 40) application.
How to remove a manually installed Gnome Extension
Removing a manually installed Gnome extension is as simple as deleting its directory and restarting the Gnome Shell. So in the case of our Lock Key extension:
- Open the Nautilus file manager in directory
~/.local/share/gnome-shell/extensions/ - Delete the
lockkeys@vaina.ltdirectory. - Restart Gnome Shell by opening the Run a Command dialog (keyboard shortcut Alt+F2), enter r and press Enter.
Bash script for manually installing a Gnome Extension from a ZIP file
As a bonus, I created a Bash script that you can use to manually install a Gnome extension from a ZIP file. Handy if you perform this procedure a lot. For example to automate the installation of several Gnome extension after installing your Linux system. The Bash script also comes in handy for Gnome extension developers. Here’s how to install the Bash script on your Linux system:
Create and edit the file /usr/local/bin/gnome-ext-install. For example with the Nano text editor, directly in the terminal:
sudo nano /usr/local/bin/gnome-ext-install
Next, copy-and-past the following contents into this file:
#!/bin/bash

# Function to display usage information
display_usage() {
  echo "Install a Gnome Shell Extension from a ZIP-file."
  echo "Usage: gnome-ext-install <zip-file>"
}

# Verify that the first parameter is an existing file with the ".zip" extension
if [ ! -f $1 ] || [ "${1: -4}" != ".zip" ]; then
  display_usage
  echo "[ERROR] No existing ZIP-file specified as a parameter."
  exit 1
fi

# Make sure the "jq" tool is installed on the system.
if [ ! -x "$(command -v jq)" ]; then
  echo "[ERROR] jq is not installed on your system. Install with:"
  echo "  * sudo apt install jq (Ubuntu/Debian)"
  echo "  * sudo dnf install jq (Fedora)"
  echo "  * sudo zypper install jq (openSUSE)"
  exit 1
fi

# Make sure the directory for storing the user's shell extension exists.
mkdir -p ~/.local/share/gnome-shell/extensions/

# Extract JSON "uuid" variable value from "metadata.json" in the ZIP-file.
MY_EXT_UUID=$(unzip -p $1 metadata.json | jq -r '.uuid')
# Check that variable is set to a non-empty string
if [ -z "${MY_EXT_UUID}" ]; then
  echo "[ERROR] Could not extract the UUID from metadata.json in the ZIP-file."
  exit 1
fi

# Extract the ZIP-file to a subdirectory with the same name as the "uuid".
unzip -q -o $1 -d ~/.local/share/gnome-shell/extensions/$MY_EXT_UUID

# Restart Gnome Shell to activate the Gnome Shell extension.
busctl --user call org.gnome.Shell /org/gnome/Shell org.gnome.Shell Eval s 'Meta.restart("Restarting…")' > /dev/null 2>&1

# All is good.
echo "Gnome Shell Extension installed in ~/.local/share/gnome-shell/extensions/$MY_EXT_UUID/"
exit 0
Save the file and make it executable:
sudo chmod +x /usr/local/bin/gnome-ext-install
From now on, you can quickly and conveniently install Gnome extensions from the terminal using the following command syntax:
gnome-ext-install [PATH TO GNOME EXTENSION ZIP FILE]
Example for the Lock Keys Gnome extension from this tutorial:
gnome-ext-install ~/Downloads/lockkeysvaina.lt.v42.shell-extension.zip

Wrap up
Sometimes the need exists to manually install a Gnome extension from a ZIP file, instead of using your web browser’s Gnome Shell integration add-on. For example when the web browser approach resulted in an error. Or if you want to install the latest development version of the Gnome extension.
This article presented you with two approaches for installing a Gnome extension directly from a ZIP file. One where you just use graphical user interface applications. Another one where you perform all steps directly in the terminal. Both approaches work fine and which one to select, depends on your personal preference.
In case you often install Gnome extensions this way, I included a Bash script that enables you to quickly and conveniently install a Gnome extension manually, using the terminal.
Note that extensions change the functionality and work flow of your GNOME desktop. If you want to customize the look-and-feel of your GNOME desktop, this article about how to manually install a GNOME icon, cursor, GTK and Shell theme might be of interest to you.