
 by
by Looking for a C/C++ IDE on Linux? I can highly recommend giving Eclipse CDT a try. Eclipse combined with the full-featured CDT plugin, transforms Eclipse into an IDE perfectly geared towards C and C++ software development. In this article I’ll show you how to install the Eclipse IDE with CDT plugin on your Linux system. Furthermore, I’ll teach you how to setup a workspace for C and C++ development, including the creation of a basic Hello World project in C.
Background
The open source Eclipse IDE offers a powerful and extensible integrated development environment for software developers. Most developers associate the Eclipse IDE with Java development. However, Eclipse combined with the full-featured CDT plugin, transforms Eclipse into an IDE perfectly suited for C and C++ software development. Personally, I use Eclipse CDT for all my C and C++ software development projects on Linux.
So if you are looking for a C/C++ IDE on Linux (or Windows for that matter), I can highly recommend giving Eclipse CDT a try. It comes with a bit of a learning curve, but it’s well worth the effort in my opinion. Especially if you plan on developing software for embedded microcontroller based systems as well. Most microcontroller manufacturers, such as ST, NXP and Infineon, offer a free Eclipse CDT based C/C++ IDE.
In this article you’ll learn how to install the Eclipse IDE with CDT plugin on your Linux system. Furthermore, I’ll show you how to setup a workspace for C and C++ development, including the creation of a basic Hello World project in C. For completion purposes, I’ll include instructions on how to remove Eclipse CDT from your Linux system as well, just in case you don’t like it.
What do you need
To install Eclipse CDT on your Linux system, you need a Linux system with a desktop environment. It doesn’t really matter which type of Linux distribution or desktop environment you run. It can be Debian, Ubuntu, Fedora, openSUSE or Arch if you want. Any type of PC will do. A desktop/laptop PC or a virtual machine all work just fine. For this article I decided to use a VirtualBox virtual machine that runs Fedora 33 with the LXQt desktop environment.
Java JRE or JDK
The Eclipse IDE runs on top of Java, so you do need a Java runtime environment (JRE) or Java development kit (JDK). Some Linux desktop distributions install this by default, some do not. Run the following command to check if Java is currently available on your Linux system:
java -version
If Java is already installed, this command outputs the Java version number. For example:

Otherwise, the output mentions something about java command not found. In this case you need to first install a JRE or JDK. The following commands show you how to can install the Java JDK on several different Linux distributions:
- Debian/Ubuntu:
sudo apt install default-jdk - Fedora:
sudo dnf install java-latest-openjdk - openSUSE:
sudo zypper install java-11-openjdk
C/C++ development tools
Since you’ll want to develop C/C++ programs, your Linux system should have C/C++ development tools installed. Here’s how you install C/C++ development tools on different Linux distributions:
- Debian/Ubuntu:
sudo apt install build-essential gdb - Fedora:
sudo dnf install @development-tools - openSUSE:
sudo zypper install -t pattern devel_C_C++
Download Eclipse CDT for Linux
For installing Eclipse CDT on Linux, I decided to download the Eclipse IDE for C/C++ Developers directly from the Eclipse website. Why? Well, there are other options:
- Some distributions include the Eclipse IDE in their online package repositories. However, the Eclipse IDE tends to be an older version and does not yet come bundled with the CDT plugin.
- Snapcraft and Flathub offer a fairly up-to-date Eclipse IDE, so you could install it as a snap or flatpak. I do like this approach. The only issue is that they do not offer a version that includes the CDT plugin.
The Eclipse organization offers a version of the Eclipse IDE for Linux, which comes bundled with the CDT plugin. And as you’ll see shortly, it is quite easy to install this version on your Linux PC. This version is called: Eclipse IDE for C/C++ Developers.
Let’s get started by downloading the Eclipse IDE for C/C++ Developers TAR GZ archive, directly from the Eclipse website:
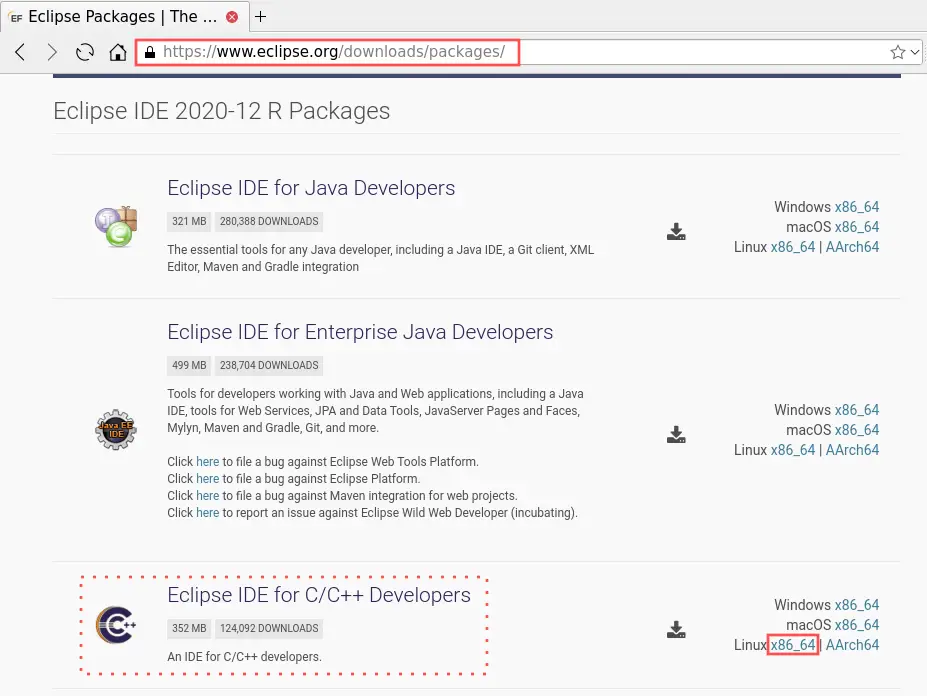
- Open your browser and visit the packages download page on the Eclipse website: https://www.eclipse.org/downloads/packages/.
- Scroll down until you see the Eclipse IDE for C/C++ Developers section. To download the TAR GZ archive, click on the x86_64 link for Linux as you can see in the following screenshot.
Manually install Eclipse CDT on your Linux system
After downloading the Eclipse IDE for C/C++ Developers TAR GZ archive from the Eclipse website, we can continue with the actual installation.
Extract the Eclipse CDT TAR GZ archive
Open up your terminal and go to the directory, where you just downloaded the Eclipse IDE for C/C++ Developers TAR GZ archive to. On my system, the file is called eclipse-cpp-2020-12-R-linux-gtk-x86_64.tar.gz and it is located in the ~/Downloads directory.
As a next step we extract the TAR GZ archive directly to the /opt directory. Refer to the previously published tutorial about creating and extracting TAR GZ archives for more information. Because the root user owns the /opt directory, we use sudo:
sudo tar -xzf eclipse-cpp-2020-12-R-linux-gtk-x86_64.tar.gz -C /opt
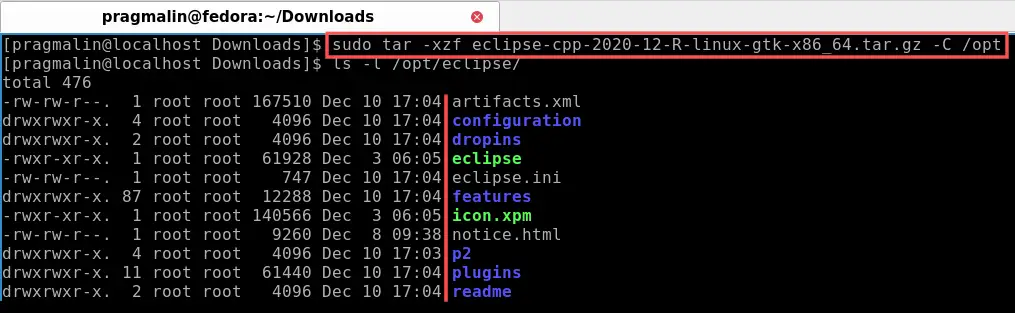
After extracting the Eclipse IDE for C/C++ Developers TAR GZ on your Linux system, Eclipse is available in the /opt/eclipse directory. Theoretically, you can start it directly by running the /opt/eclipse/eclipse program. Personally, I prefer selecting it from my desktop environment’s application menu. We’ll create the entry for this in the next section.
Create the Eclipse CDT application launcher
Let’s continue by creating an application launcher for Eclipse CDT. This adds Eclipse CDT to your desktop environment’s application menu. Afterwards you can start Eclipse CDT comfortably, by selecting it from the application menu.
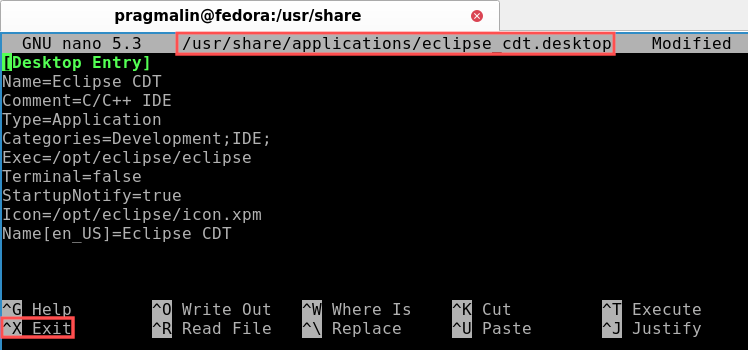
We’ll create the Eclipse CDT application launcher with the Nano terminal text editor. Refer to the tutorial covering the first steps with the Nano text editor, for more info on Nano. Open your terminal program and run command:
sudo nano /usr/share/applications/eclipse_cdt.desktop
This opens this to-be-created file in the Nano editor. Next, copy-paste the following contents:
[Desktop Entry]
Name=Eclipse CDT
Comment=C/C++ IDE
Type=Application
Categories=Development;IDE;
Exec=/opt/eclipse/eclipse
Terminal=false
StartupNotify=true
Icon=/opt/eclipse/icon.xpm
Name[en_US]=Eclipse CDT
Note that you can paste clipboard contents into the terminal with ALT + CTRL + v. Once done, exit the Nano text editor and select Yes to save the changes. You achieve this by pressing CTRL + x and then pressing y:
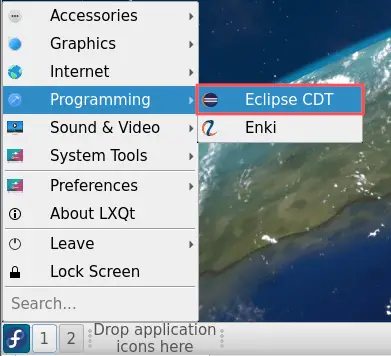
You can now find Eclipse CDT in your application menu:
Create Hello World project in Eclipse CDT
With Eclipse CDT installed, it’s time to take it for a spin. In this section I’ll show you how to create a basic Hello World project.
Eclipse workspace creation
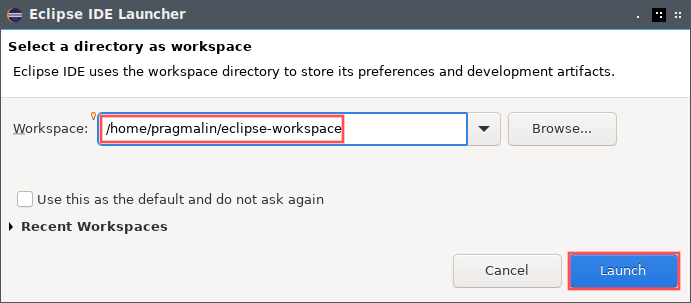
Go ahead and start Eclipse CDT, by selecting it from the application menu. A dialog pops up, asking you to select an Eclipse workspace. With an Eclipse workspace you manage your C/C++ projects. Furthermore, you can store your Eclipse preferences in the workspace. This makes them available to all projects.
Theoretically, you could create a workspace for each individual C/C++ project you work on. Personally, I would recommend to create just one workspace for all your projects. By default Eclipse offers to create a workspace for you in directory eclipse-workspace inside your home directory. You can of course change this to whatever you want. For sake of simplicity, I’ll proceed with the default here by clicking the Launch button.
Because the workspace did not yet exist, Eclipse creates the workspace for you. Afterwards, the main program window opens. For a new workspace, it usually opens a Welcome screen for new users. Feel free to explore its contents. Once done, you can simply close the Welcome screen.
New project creation in Eclipse
To create a new project, select File → New → C/C++ Project from the main menu. A project creation wizard pops up in a new dialog. Start by selecting the C Managed Build as a template for the new project and click the Next button.

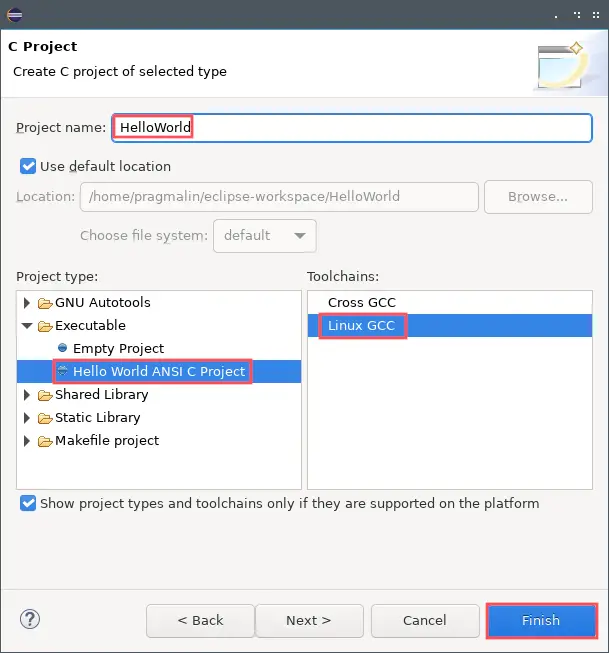
On the following screen, you can enter more project details. Go for the following:
- For the Project name, I decided on HelloWorld.
- Select Hello World ANSI C Project as the Project type.
- The Toolchain should be set to Linux GCC.
Click the Finish button to complete the new project creation.
Build, run and debug the Hello World program
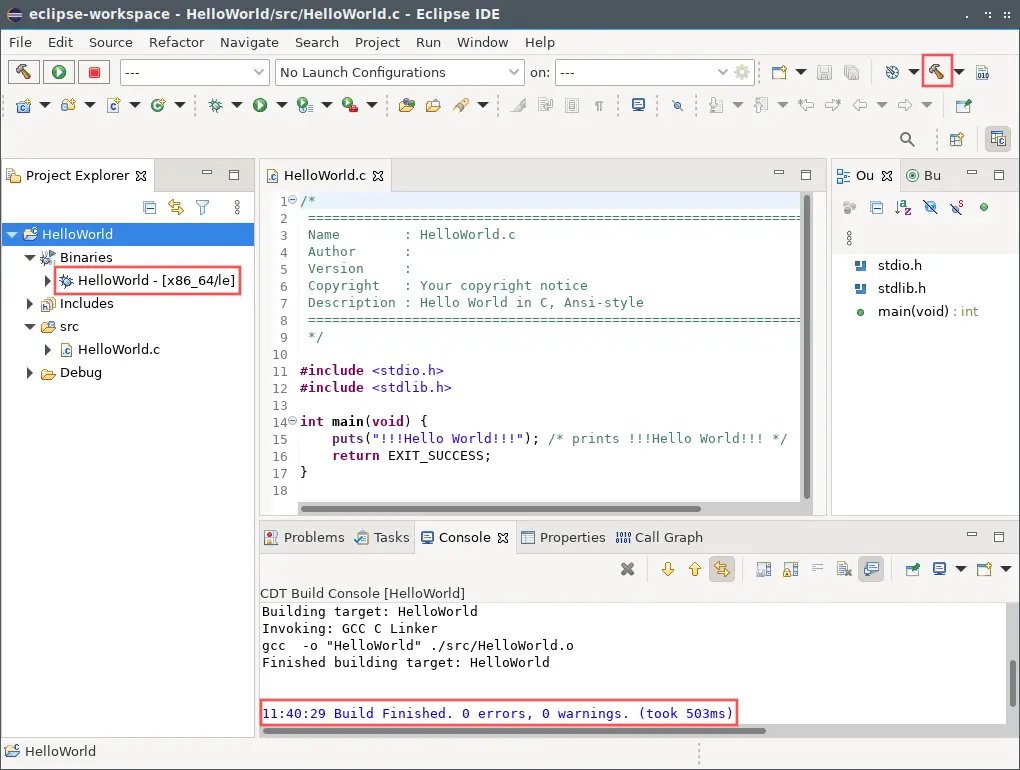
With the new Hello World project created and opened in the workspace, it’s time to build the C program. Select Project → Build project from the main menu. This compiles the C sources and links them into the final executable called HelloWorld. Alternatively, you can click the little hammer icon in the toolbar to build the project.
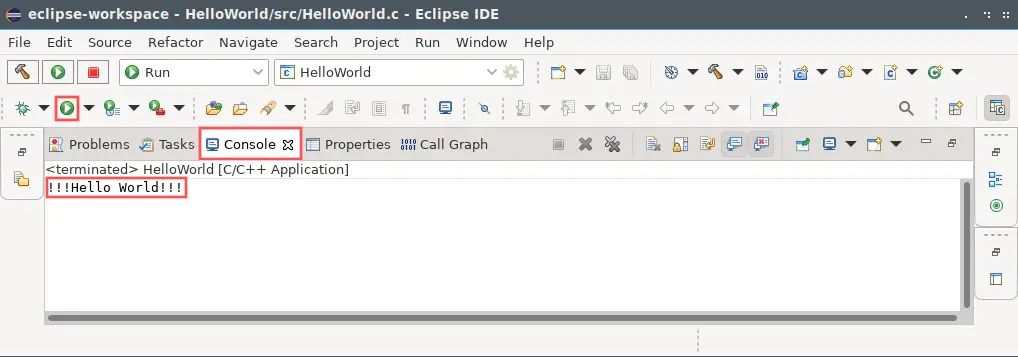
Now that you created the executable of the HelloWorld project, you can run it. Select Run → Run from the main menu. You can also run the program by simply clicking the green play button in the toolbar. The first time you run the program, Eclipse pops up a Run as dialog. Select Local C/C++ Application on this dialog. Eclipse displays program output in the Console window.
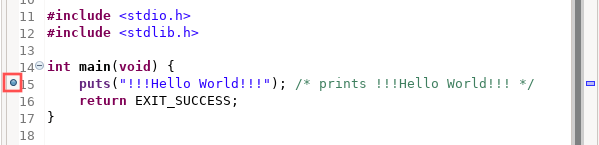
To start a debug session instead, you can click on the little bug icon in the toolbar. You can find it on the left side of the play button in the toolbar. Alternatively, you can select Run → Debug from the main menu. While debugging a program, you typically set breakpoints on specific lines of code. The debugger then automatically halts the program, once it reaches this line during execution. When halted, you can watch and inspect variable values and manually step through the code one line at a time. To set a breakpoint, double-click in the gutter, on the left side of the line number. A blue dot appears, indicating that you set a breakpoint on that line:
How to remove Eclipse CDT from your Linux system
If for some reason you do not enjoy working in Eclipse CDT, you can of course remove it from your Linux system again. You just need to run two commands from the terminal to remove Eclipse CDT.
As a first step, you remove the Eclipse CDT application launcher:
sudo rm /usr/share/applications/eclipse_cdt.desktop
With the application launcher removed, you can proceed by deleting the entire Eclipse directory:
sudo rm -rf /opt/eclipse
Wrap up
This article showed you step-by-step how to install Eclipse CDT on Linux. In a nutshell it only requires three steps:
- Download the Eclipse IDE for C/C++ Developers package from the Eclipse website.
- Extract the contents of the downloaded Eclipse TAR GZ archive to the
/optdirectory. - Create an application launcher to make Eclipse CDT available in your desktop environment’s application menu.
Besides the installation of Eclipse CDT on Linux, this article also showed you how to create, run and debug a basic Hello World C project.
For completion purposes, I included instructions for removing Eclipse CDT from your Linux system. Don’t remove it too quickly though. Eclipse CDT comes with a bit of a learning curve, but it is well worth it in my opinion.
One thought on “Install Eclipse IDE with CDT plugin for C/C++ coding on Linux”
Comments are closed.