 by
by Curious about creating your own shared library using CMake and the C programming language? This tutorial shows you how to develop a basic shared library in the C programming language and how to generate its build environment with CMake. We’ll also cover the installation of the resulting shared library on the end-user’s Linux system. This includes the pkg-config file, which makes it easy for developers to compile and link the shared library to their application.
Background
In essence a shared library enables you to share functionality with other developers, in an easy-to-use and efficient format. On Linux a shared library is a file with the .so extension, which stands for Shared Object. It packs compiled code of functionality that other developers might want to use in their own application(s).
Upon execution, an application dynamically loads the shared library’s .so file. Consequently, the application can access and call the functions embedded inside the shared library. It’s called a shared library, because different applications can load and access the same shared library at the same time.
Why would you want to develop a shared library? Isn’t it enough to just share the source code for other developers to use? Shared libraries offer several benefits over directly integrating its source code. To name a few:
- With a shared library, you just need to install a new version of a shared library’s
.sofile one-time on a Linux system, to fix a critical bug. All applications accessing the shared library, now automatically get the bugfix. - Integrating the source code directly, statically links the functionality to the application. If multiple applications do this, each individual application embeds the same object code. Not efficient from a disk space perspective.
- With the help of programming language bindings, you can use a shared library even if you develop your application in a different programming language. For example, a Python, Java, C# or Object Pascal application can use a shared library developed in C.
In this article, I’ll show you how you can create your own shared library. We’ll develop the shared library in the C programming language and generate the build environment with the help of CMake.
What do you need
To complete the steps outlined in this tutorial, you need a Linux system with C development related packages installed. If you currently do not have access to a Linux PC, consider quickly setting up Ubuntu in a virtual machine:
The instructions for installing the packages needed for C development, for popular Linux distributions:
- Debian / Ubuntu / Raspberry PI:
sudo apt install gcc g++ gdb make cmake - Fedora:
sudo dnf install gcc g++ gdb make cmake - openSUSE Tumbleweed / Leap:
sudo zypper install gcc gcc-c++ gdb make cmake
Optionally, you could install a C programmer’s editor. For C / C++ development in combination with CMake, I personally prefer Visual Studio Code. Refer to this article for more details on creating this development environment setup:
I’ll be using my trusty openSUSE Tumbleweed PC throughout this article. If you’re ever curious about giving this rolling release distribution a try, this article should get you started:
Source code of the shared library
Those of us that traveled internationally likely recognize this scenario: Roadsigns present distances in a different unit. Kilometers instead of miles or the other way around. While listening to the car radio, the weather forecast blurts out temperatures in an unfamiliar unit. Celsius instead of Fahrenheit or vise versa. Let’s build a shared library with functionality for converting these units.
A shared library developed in the C programming language always consists of at least two files:
- A header-file with the function prototypes, macros and type definitions of the API.
- The source-file, which implements the library’s functions.
As the shared library’s designer, you get to pick these filenames yourself. For our unit conversion library, I settled on convert.h for the header file and convert.c for the source file. Here’s how I implemented these files for this tutorial:
convert.h:
float convert_celsius_to_fahrenheit(float celsius);
float convert_fahrenheit_to_celsius(float fahrenheit);
float convert_kilometers_to_miles(float kilometers);
float convert_miles_to_kilometers(float miles);
convert.c:
#include "convert.h"

float convert_celsius_to_fahrenheit(float celsius)
{
  return ((celsius * 9) / 5.0) + 32;
}

float convert_fahrenheit_to_celsius(float fahrenheit)
{
  return ((fahrenheit - 32) * 5) / 9.0;
}

float convert_kilometers_to_miles(float kilometers)
{
  return kilometers / 1.619344;
}

float convert_miles_to_kilometers(float miles)
{
  return miles * 1.619344;
}
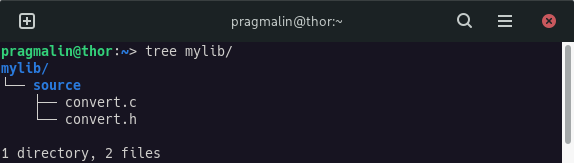
Go ahead and create a directory inside your home directory, called mylib. Next, create a subdirectory inside it called source and store these convert.h and convert.c files of our library in it. The directory layout now resembles this:
Build the shared library with CMake
With the source code in place, we need something with instructions on how to compile the library’s sources and link them into the shared library file with the .so extension. Traditionally, you would use a Makefile. We’ll use a slightly more modern approach with CMake.
CMake introduction
With CMake, you write a configuration file called CMakeLists.txt. Taken this file as an input, the CMake utility can generate the build environment for you. Including the automatic detection of the compiler toolchain. On Linux, this essentially results in the automatic creation of a Makefile, which calls gcc for building the library. As you’ll see in this tutorial, the syntax of the CMakeLists.txt file is easier and less picky (think tabs versus spaces…) than the Makefile syntax.
CMakeLists.txt for our shared library
Here’s the minimal CMakeLists.txt file to build our shared library with CMake:
CMakeLists.txt:
# Specify the minimum version.
cmake_minimum_required(VERSION 3.9)

# Specify the project info.
project(convert VERSION 1.0.0 DESCRIPTION "Unit conversion library")

# Declare the library target.
add_library(${PROJECT_NAME} SHARED
    source/convert.c
    source/convert.h
)

# Configure the directories to search for header files.
target_include_directories(${PROJECT_NAME} PRIVATE source)

# Set the version property.
set_target_properties(${PROJECT_NAME} PROPERTIES VERSION ${PROJECT_VERSION})

# Set the shared object version property to the project's major version.
set_target_properties(${PROJECT_NAME} PROPERTIES SOVERSION ${PROJECT_VERSION_MAJOR})

# Set the public header property to the one with the actual API.
set_target_properties(${PROJECT_NAME} PROPERTIES PUBLIC_HEADER source/convert.h)
If you worked with CMake in the past to build your own application, you’ll notice that the CMake configuration file for a shared library, strongly resembles that of an application. The differences:
- Instead of
add_executabe(), you useadd_library()to instruct CMake that you want to build a shared library, and not an application. - Compared to an application, you need to explicitly set the
VERSION,SOVERSIONandPUBLIC_HEADERproperties. The latter one should always specify the header-file with the function API; The one that your end-user should include in their application, to access your shared library.
Go ahead and store this CMakeLists.txt file inside directory ~/mylib.
Perform a test build of the shared library
With the shared library’s sources and CMake configuration file in place, let’s give it a try. Create a build subdirectory and run the commands cmake .. and make all from there:
mkdir ~/mylib/buildcd ~/mylib/buildcmake ..make all
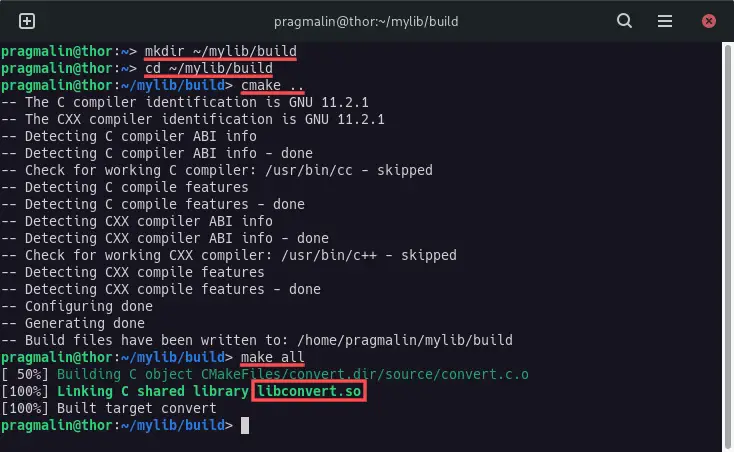
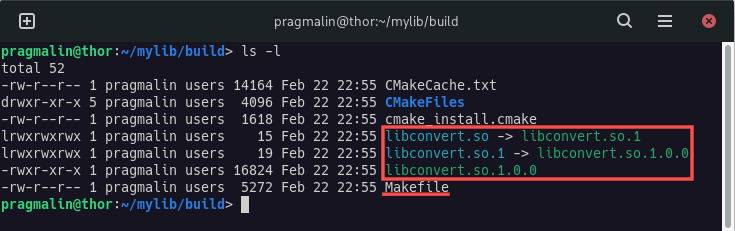
No warnings or errors, so things look good! To see what magic transpired here, inspect the contents of the build subdirectory:
As you can see, CMake automatically generated the Makefile for us, allowing us to build the shared library with the usual make all command. The build procedure called the gcc tool to compile the library’s sources and link them into the libconvert.so file. Why this filename? Well, the standard file name of a shared library under Linux is always:
lib<NAME>.so
We specified convert as the project name in CMakeLists.txt, resulting in the shared library name:
libconvert.so
There’s more though. If you look closely, you see that the linker really created the libconvert.so.1.0.0 shared library, created a symbolic link libconvert.so.1 to it and created a symbolic link libconvert.so to this latter one. As you can read here, that’s the standard naming conversion for shared libraries on Linux systems. CMake just handled all of that for us.
Install the shared library with CMake
The idea behind a shared library is the you want to share it. With other words, the shared library should be installed globally on the Linux system, such that all users and applications can access it. CMake offers build-in functionality to install a shared library on a Linux system. You only need to add a few more lines to the end of the CMakeLists.txt file:
# For access to standard installation directory variables (CMAKE_INSTALL_xDIR).
include(GNUInstallDirs)

# Set library shared object and API header file to install.
install(TARGETS ${PROJECT_NAME}
    LIBRARY DESTINATION ${CMAKE_INSTALL_LIBDIR}
    PUBLIC_HEADER DESTINATION ${CMAKE_INSTALL_INCLUDEDIR}
)
First, we include GNUInstallDirs. This gives us access to standard directory variables that start with CMAKE_INSTALL_xyz. Where xyz is an installation directory as defined by the GNU Coding Standards.
The installation instructions we added to the CMakeLists.txt file, copies the actual shared library files (libconvert.so, libconvert.so.1 and libconvert.so.1.0.0) to:
CMAKE_INSTALL_LIBDIR: The directory for object files and libraries of object code. Typically/usr/local/libor/usr/local/lib64.
Furthermore, the installation instructions copy the API header file (convert.h) to:
CMAKE_INSTALL_INCLUDEDIR: The directory for installing header files to be included by user programs. Typically/usr/local/include.
After saving the changes to CMakeLists.txt, request CMake to update the build environment for our shared library:
cd ~/mylib/buildcmake ..
Next, run the following two commands to install the shared library system-wide:
sudo make installsudo ldconfig
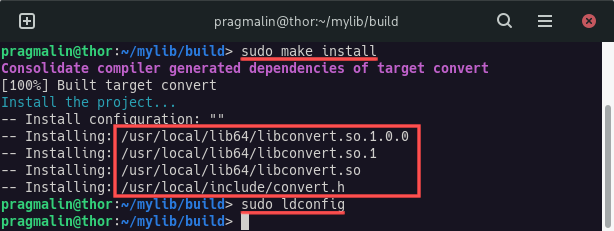
Note that you need the run ldconfig to update the shared library cache. Your Linux system uses this cache to map a shared library name to the actual location of the corresponding shared library file.
Override the installation directory
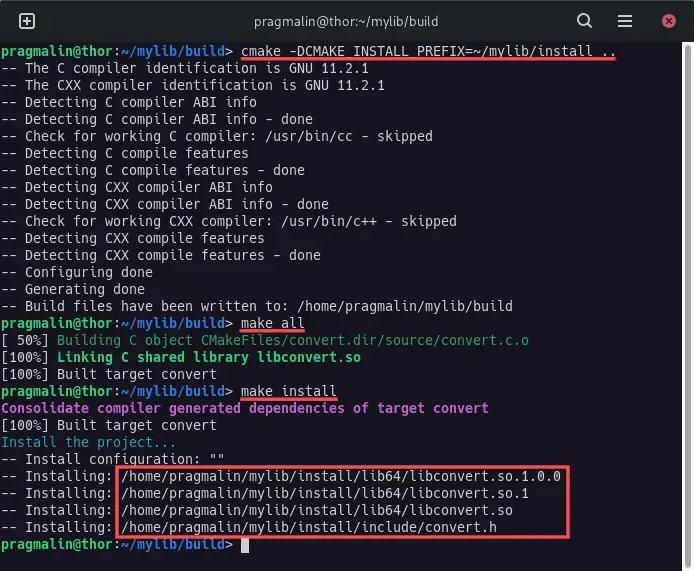
While developing a library, you might not want to always have to install it system-wide with sudo. You can override the base installation directory, by overriding variable CMAKE_INSTALL_PREFIX when calling CMake. For example:
cmake -DCMAKE_INSTALL_PREFIX=~/mylib/install ..
In this example the files would be installed in the ~/mylib/install directory:
Create and install the shared library’s pkg-config file with CMake
At this point we built the shared library and installed it system-wide, with the help of CMake. Every user and application can now potentially use the library. As a final step, it’s recommended to create and install a so called pkg-config file. This pkg-config file contains metadata with information about how application developers can integrate a shared library. Think of compiler and linker flags. Simply put, installing a pkg-config file for your library, makes the life of application developers easier.
The idea is that we create a template for the pkg-config file, with a bunch of variables. During the build and installation procedure, CMake automatically replaces these variable with the correct values and installs it in the correct location. In the ~/mylib/source directory, create a file with the name convert.pc.in and add the following contents:
prefix=@CMAKE_INSTALL_PREFIX@
exec_prefix=@CMAKE_INSTALL_PREFIX@
libdir=${exec_prefix}/@CMAKE_INSTALL_LIBDIR@
includedir=${prefix}/@CMAKE_INSTALL_INCLUDEDIR@

Name: @PROJECT_NAME@
Description: @PROJECT_DESCRIPTION@
Version: @PROJECT_VERSION@

Requires:
Libs: -L${libdir} -l@PROJECT_NAME@
Cflags: -I${includedir}
Next, add the following lines at end of the CMakeLists.txt file:
# Create the pkg-config file from the template.
configure_file(source/${PROJECT_NAME}.pc.in ${PROJECT_NAME}.pc @ONLY)

# Set pkg-config file to install.
install(FILES ${CMAKE_BINARY_DIR}/${PROJECT_NAME}.pc
    DESTINATION ${CMAKE_INSTALL_LIBDIR}/pkgconfig
)
Rebuild and reinstall the shared library to test it out:
cmake ..make allsudo make installsudo ldconfig
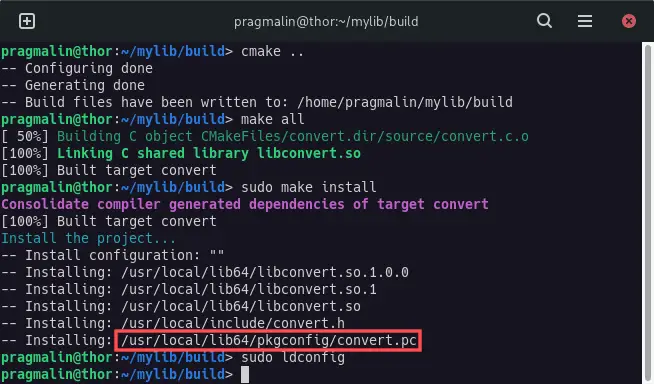
As you can see, the convert.pc file was created during the build and installed in:
/usr/local/lib64/pkgconfig
Using the pkg-config file
In case you are not familiar with pkg-config files, this section presents a brief demonstration on how to use them. Let’s assume you develop an application where you want to make use of our freshly installed convert shared library. You implemented the application in a source-file myapp.c:
#include <stdio.h>
#include <convert.h>

int main(void)
{
  float degC = 23;
  float degF;

  degF = convert_celsius_to_fahrenheit(degC);
  printf("%.0f degrees Celsius equals %.0f degrees Fahrenheit\n", degC, degF);

  return 0;
}
With gcc you could build this application using command:
gcc -o myapp myapp.c
However, this results in a linker error, because the linker doesn’t know where to look for the shared library:
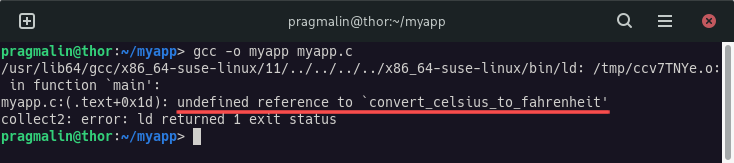
This is where the installed convert.pc pkg-file comes to the rescue. We just need to add $(pkg-config --libs --cflags convert) to the gcc parameters:
gcc -o myapp myapp.c $(pkg-config --libs --cflags convert)

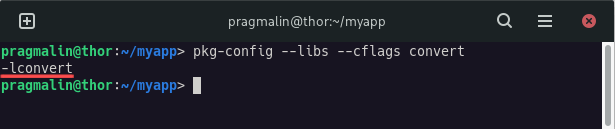
The gcc program now gets all the information it needs from the pkg-config tool, including library specific compiler and linker flags. You can run it directly in the terminal, in case you’re curious:
pkg-config --libs --cflags convert
Using the shared library in your own application
The previous section briefly demonstrated how to use the pkg-config file in combination with CMake, for linking the shared library to your own application. This assumed you use CMake and not a Makefile and that you wanted to use the pkg-config file. Refer to the following tutorial for more in-depth details on how to link a shared library to your application:
It covers three different use cases:
- Calling GCC directly to build the application and link the shared library.
- Build the application and link the shared library with a Makefile.
- Generating the build environment with CMake and then building the application using the generated Makefile.
Manually uninstall a shared library
This tutorial demonstrates how CMake aids us with building and installing a shared library on Linux. The only downside I encountered, is that CMake does not offer functionality to uninstall the shared library. Not too much of a problem. If your shared library becomes popular, you or someone else might package it properly for inclusion in Linux distributions. This entails the creation of DEB and RPM packages. When the user installs your shared library using the DEB / RPM package and their distribution’s package manager, all files automatically get uninstalled, when the user removes the package from their system.
In the mean-time, you need to manually remove all the installed files to uninstall the shared library. So keep track of where the files were installed. By looking at the screenshots in this article, I know that on my openSUSE Tumbleweed system, I can uninstall the shared library using commands:
sudo rm /usr/local/lib64/libconvert.sosudo rm /usr/local/lib64/libconvert.so.1sudo rm /usr/local/lib64/libconvert.so.1.0.0sudo rm /usr/local/include/convert.hsudo rm /usr/local/lib64/pkgconfig/convert.pcsudo ldconfig
Wrap up
In this article you learned everything you need to know to get started with developing a shared library in C with CMake. We developed our own example shared library step-by-step:
- Implementing the shared library’s functionality in its source and header file.
- Setting up
CMakeLists.txtfor building the shared library with CMake. - Adding instructions for installing the shared library system-wide with the help of CMake.
- Creating and installing the shared library’s pkg-config file.
For your convenience, I added all the files of the shared library we created, to a GitHub repository. That way you can use it as a reference and template for developing your own C (or C++) shared library: