
 by
by Interested in using a shared library in your C or C++ application? Not sure how to build your application with the GCC compiler, such that it properly links the shared library? This article explains how to link a shared library to your application, built with the GCC toolchain. It covers three scenarios: (1) Calling GCC directly from the terminal, building with a Makefile and auto-generating the build environment with CMake.
Background
A shared library packs compiled code of functionality that the developer wants to share with other developers. On Linux a shared library is a file with the .so extension, which stands for Shared Object. As a C (or C++) application developer, you can speed up your application development, by integrating shared libraries into your application. Why reinvent the wheel if someone already developed a similar piece of functionality?
Let’s say you want to store your application’s settings in an SQLite database file. Grab libsqlite and you’re all set. Need to download a file from the Internet? Check out libcurl. Interested in communicating with a USB device? Libusb to the rescue. The list goes on and on. To find a suitable shared library, you can search through your Linux distribution’s package manager. When your search did not yield any results, you can expand your search to online code repositories hosted on platforms such as GitHub and GitLab.
Once you found and installed the shared library on your Linux system, the next hurdle shows up: How do you actual build your application, such that the GCC compiler finds and properly links the shared library to your application? That’s exactly the question this article sets out to answer. I’ll explain how you can link a shared library to your application, built with the GCC toolchain. I’ll cover three different scenarios:
- Calling GCC directly in the terminal, to build your application and link the shared library.
- Building your application with the help of a Makefile.
- Automatically generating your application’s build environment with CMake.
What do you need
To follow along with the hands-on part of this article, you essentially need two things:
- Linux system with C development related packages installed.
- A shared library installed on your Linux system.
If you currently do not have access to a Linux PC, consider quickly setting up Ubuntu in a virtual machine:
The instructions for installing the packages needed for C development, for popular Linux distributions:
- Debian / Ubuntu / Raspberry PI:
sudo apt install gcc g++ gdb make cmake - Fedora:
sudo dnf install gcc g++ gdb make cmake - openSUSE Tumbleweed / Leap:
sudo zypper install gcc gcc-c++ gdb make cmake
The remaining puzzle piece is the shared library itself. We’ll use the example unit conversion shared library, featured in the tutorial:
The next section includes installation instructions for this unit conversion shared library.
Installing a shared library
How do you actually get your hands on a shared library? Your Linux distribution offers packages for popular and commonly used shared libraries in its online package repository. Alternatively, you can download the shared library’s source code. In this latter case, you do need to manually build and install the shared library.
From your Linux distribution’s package manager
Ideally, you install the shared library using your Linux distribution’s package manager. Either directly from the terminal or with its graphical user interface counterpart:
- Debian / Ubuntu / Raspberry PI:
aptorsynaptic(GUI). - Fedora:
dnfordnfdragora(GUI). - openSUSE:
zypperorYaST(GUI).
Keep in mind though that each shared library comes in two different packages:
- Just the actual shared library, so the
.sofile. - The shared library combined wit the the development related files.
Take the previously mentioned libsqlite shared library as an example. This is how Ubuntu named the two different packages:
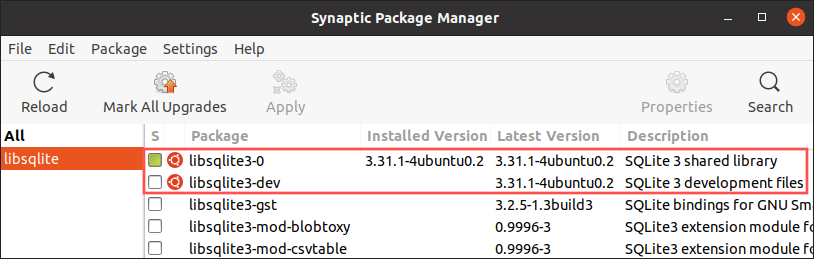
The first package libsqlite3-0 contains just the shared library (the .so file). The second package libsqlite3-dev contains the development related files. On Debian / Ubuntu, the package name of the shared library’s development version typically ends with -dev. On Fedora / openSUSE it tends to be -devel instead.
When your users run your application, the .so file of the library it depends on, gets loaded automatically. This assumes the presence of the .so file on the users Linux system. For this, they just need to install the first package.
You as the developer need to install the second package. The one with the development related files. This additionally installs the header-file of the shared library’s API. Your application’s source code includes this header-file using an #include-statement. The GCC compiler throws a compile error, if it can’t find the header-file.
Build and install manually from the library’s source code
If your distribution’s package manager does not offer the library of your interest, or not the version you want, you can manually build and install the shared library. How to build the library depends a bit on how the developer set up its build environment. Most developers add build and installation instructions in the readme file.
For hands-on demonstration purposes, we’ll go ahead and build and install the libconvert shared library. This example shared library embeds functionality for unit conversion between both Celsius and Fahrenheit, and kilometers and miles. The libconvert shared library was developed for and feature in this tutorial:
Download the shared library
Run these command to download the latest development version of libconvert from the GitHub repository:
mkdir ~/libconvert && cd ~/libconvert
wget -O - https://github.com/pragmaticlinuxblog/cmake_c_lib/tarball/master | tar xz --strip-components=1
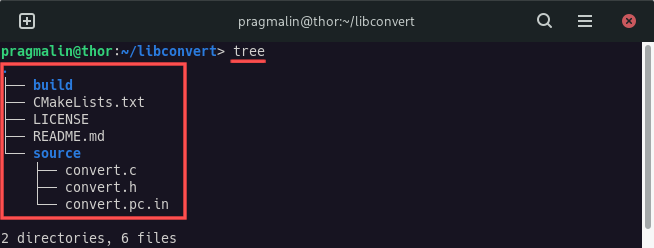
The first line creates the libconvert directory in your home directory and changes into it. The second line downloads and extracts the shared library’s code, found in the master branch of its GitHub repository. Afterwards, the directory contents look like this:
Build the shared library
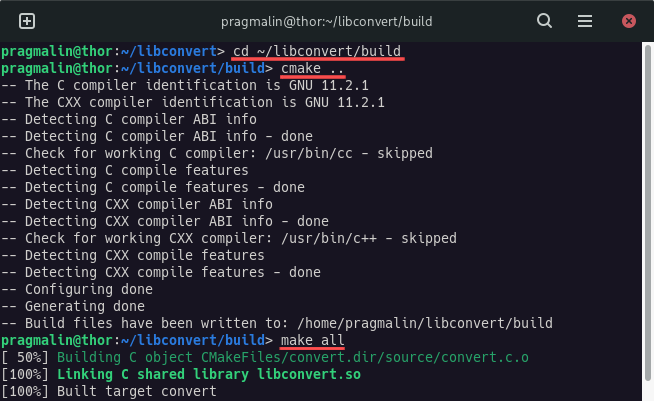
For detailed information on how to build the libconvert library, you can refer to the included README.md file. It boils down to running these commands from the terminal:
cd ~/libconvert/build
cmake ..
make all
This creates the libconvert.so shared library file:
Install the shared library
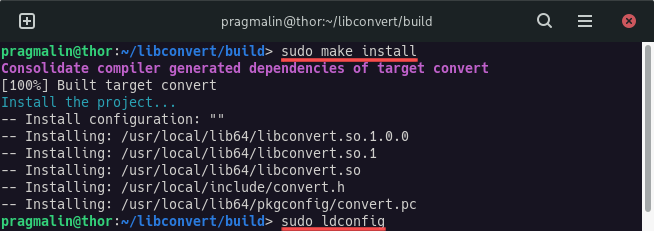
The final step for installing and registering the shared library on your Linux system, involves running these commands from the terminal:
sudo make install
sudo ldconfig
One downside of manually building and installing a shared library, is that you yourself are responsible for keeping it up-to-date and for removing it from your system, once you no longer need it. Refer to section manually uninstall a shared library of the article featuring the libconvert shared library, for instructions on how to remove it.
Our example application
After installing thelibconvert shared library on our Linux system, we can continue with developing our own application that makes use of its functionality. In the code snippet below, you can find the example application we’ll use throughout this article:
#include <stdio.h>
#include <convert.h>

int main(void)
{
  float degC = 23;
  float degF;

  degF = convert_celsius_to_fahrenheit(degC);
  printf("%.0f degrees Celsius equals %.0f degrees Fahrenheit\n", degC, degF);

  return 0;
}
Create a directory called myapp in your home directory and store this code in a file called myapp.c, inside the newly created myapp directory. Note that the application includes the shared library’s header file convert.h and calls the function convert_celsius_to_fahrenheit() to convert a temperature of 23 degrees Celsius to Fahrenheit.
Calling GCC directly to build the application and link the shared library
With the example application in place, it’s time to build our application. You can call the GCC compiler directly from the terminal to compile its source file and link it into an executable application with name myapp:
gcc -o myapp myapp.c
However, this results into an error:

The output already tells us a lot. The ld program (linker) reports the error. With other words, the GCC compiler was successful, because the compiler runs before the linker. From this you can deduce that GCC had no problems finding the shared library’s API header file convert.h. That’s good news.
The not so good news is that the linker could not find anything that provides function convert_celsius_to_fahrenheit(). Because ld outputs the message about undefined reference to convert_celsius_to_fahrenheit. But why not? We properly installed the shared library on our Linux system. The solution is simple: When linking a shared library to your C application, you need to inform the GCC toolchain about the library you want to link. You do this with linker flag:
-l<library name>
Where the library name is the name of the shared library, minus the first lib part and minus the .so file extension. For our libconvert.so shared library, this results in:
-lconvert
With what we just learned, let’s try building our application again with GCC and properly linking the libconvert shared library:
gcc -o myapp myapp.c -lconvert

This time around, GCC did not report any errors. It successfully built our myapp executable and we could run it.
Build the application and link the shared library with a Makefile
Directly calling GCC from the terminal, to build an application and link a shared library, works fine. However, it gets a bit cumbersome when your application grows to the point where it consists of multiple source files. In this case you need to run multiple commands to compile each source file individually and then link all created object files into the final executable.
With the help of the GNU Make utility and a Makefile for your project, you can automate this task of building your application. It works if your application consists of just one source file or many source files. You can build your application with just one command on the terminal. The GNU Make utility even figures out which files need to be recompiled, based on which source files changed.
Presenting the Makefile for the application
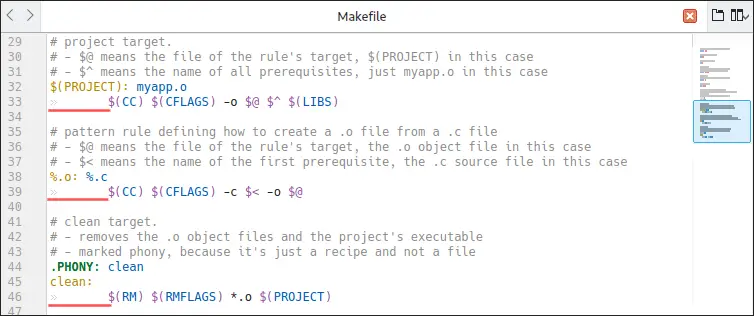
It’s outside the scope of this article to explain in full detail how a Makefile works. Instead, I’ll present a fairly generic Makefile for our application. I added comments for everything, so you can get a feel for how it works:
# project name and also the name of the executable to build
PROJECT = myapp

# the program to compile and link
CC = gcc

# the program to remove files
RM = rm

# compiler flags:
#  -g    adds debugging information to the executable file
#  -Wall turns on most, but not all, compiler warnings
CFLAGS  = -g -Wall

# remove flags:
# -f     ignore nonexistent files and don't prompt for them
RMFLAGS = -f

# libraries to link
LIBS=-lconvert

# all target. for building the entire application.
# - optional, because the first target in a Makefile is assumed to be the
#   'all' target.
# - marked phony, because it's just a recipe and not a file
.PHONY: all
all: $(PROJECT)

# project target.
# - $@ means the file of the rule's target, $(PROJECT) in this case
# - $^ means the name of all prerequisites, just myapp.o in this case
$(PROJECT): myapp.o
	$(CC) $(CFLAGS) -o $@ $^ $(LIBS)

# pattern rule defining how to create a .o file from a .c file
# - $@ means the file of the rule's target, the .o object file in this case
# - $< means the name of the first prerequisite, the .c source file in this case
%.o: %.c
	$(CC) $(CFLAGS) -c $< -o $@

# clean target.
# - removes the .o object files and the project's executable
# - marked phony, because it's just a recipe and not a file
.PHONY: clean
clean:
	$(RM) $(RMFLAGS) *.o $(PROJECT)
Store this code in a file called Makefile inside the myapp directory, so in the same directory where myapp.c resides.
Important: The Makefile syntax is extremely picky when it comes to TAB characters. The rule inside a target, so every indented line, must start with a TAB character.
Specifying shared libraries in a Makefile
When building your application with the GNU Make utility and a Makefile, you need to specify the shared library to link, just like we did when calling GCC directly. This time around we can use a variable inside the Makefile. It’s common to call this variable LIBS:
LIBS=-lconvert
Whenever you want to link more shared libraries, you just need to update this variable. Assuming you want to use the math library libm.so as well, the LIBS variable would look like this:
LIBS=-lconvert -lm
During the build operation, the Makefile first calls GCC to compile all source files into object files. In our case this creates myapp.o. As a final step, the Makefile links the created object files together with the shared libraries specified in variable LIBS.
Building the application with a Makefile
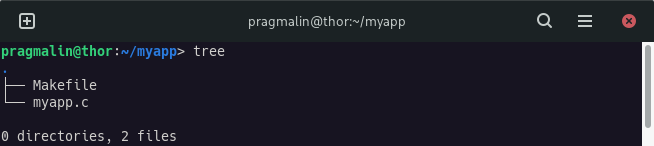
Now that we have our Makefile in place, let’s build our application using our Makefile. At the start our ~/myapp directory just holds the application’s single source file and the Makefile:
To build the application with the GNU Make utility and our Makefile, run this command from the terminal:
make all

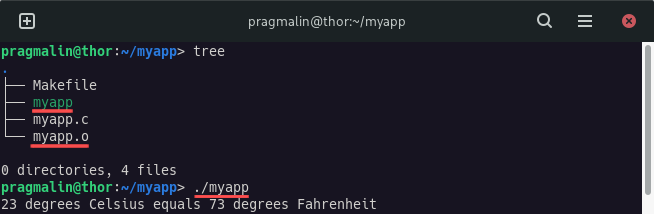
Afterwards, you can see that the build operation created the myapp.o object file and the actual executable of our application, which we can run:
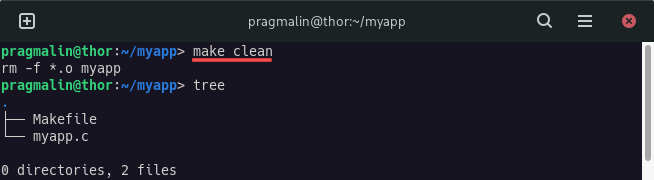
The Makefile includes a clean target, for removing all the files created during the build. Whenever you want to do a complete rebuild, you can first run:
make clean
This removes the object files and the application’s executable:
Build the application and link the shared library with CMake
Instead of manually writing a Makefile, the way we did in the previous section, you can also use CMake. CMake works on a higher level than a Makefile. CMake can automatically generate the build environment for you. With other words, CMake can generate the Makefile. Why would you want to use CMake, if you can also just write the Makefile yourself? Two important reasons:
- The CMake syntax is a lot easier and less picky than that of a Makefile.
- CMake works cross-platform. So under Windows it would automatically generate a Visual Studio solution for you, as opposed to a Makefile.
I personally use CMake for all my C and C++ development projects. I can highly recommend it.
Presenting the CMakeLists.txt for the application
Similar to how GNU Make requires a Makefile, CMake requires a CMakeLists.txt file. It’s outside the scope of this article to explain in full detail how a CMakeLists.txt works. Instead, I’ll present the CMakeLists.txt file for our application. I added comments for everything, so you can get a feel for how it works:
# Specify the minimum version
cmake_minimum_required(VERSION 3.9)

# Specify the project name
project(myapp)

# Declare the project target
add_executable(${PROJECT_NAME}
    myapp.c
)

# Libraries to link
target_link_libraries(${PROJECT_NAME} convert)
As you’ll see later on, this file pretty much does the same as the Makefile, presented in the previous section. This backs up the claim I made earlier, about the CMake syntax being a lot easier than that of a Makefile. Also, no need to worry about TAB characters.
Store this code in a file called CMakeLists.txt inside the myapp directory, so the same directory where myapp.c resides.
Specifying shared libraries in CMakeLists.txt
When building your application with the CMake utility and a CMakeLists.txt file, you need to specify the shared library to link, just like we did when calling GCC directly. This time around you specify the library using the function call target_link_libraries():
target_link_libraries(${PROJECT_NAME} convert)
Whenever you want to link more shared libraries, you just need to add another parameter. Assuming you want to use the math library libm.so as well, the function call would look like this:
target_link_libraries(${PROJECT_NAME} convert m)
Generating the build environment and building the application
With CMake, you first generate the build environment, before building the application. Go ahead and create the subdirectory build and change into it. Next, run the cmake .. command from this directory:
mkdir -p ~/myapp/build && cd ~/myapp/build
cmake ..
You’ll notice that this generated the build environment for us. CMake automatically detected GCC and GNU Make on our Linux system, and deduced that we want to build our application with the help of a Makefile:
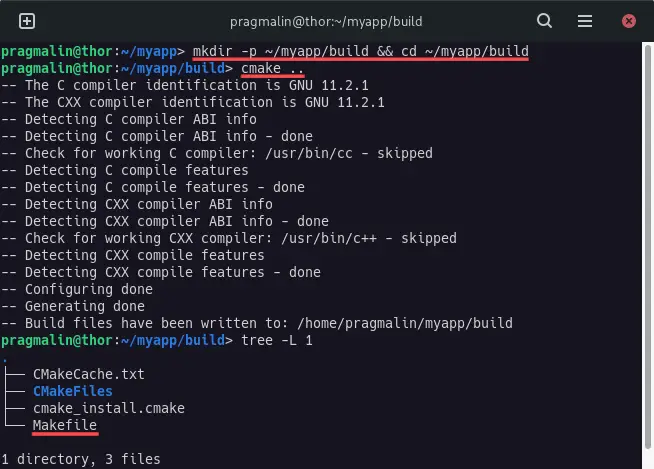
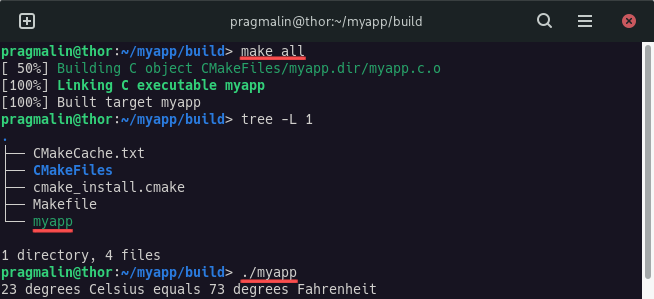
Given the fact that the build directory contains a Makefile, we already know how to build the application. The usual make all command does the trick:
make all
The Makefile also includes a clean target. Whenever you want to do a complete rebuild, you can first remove the object files and the application’s executable using command:
make clean
A note about pkg-config
Sometimes, shared library developers provide a pkg-config file for their library. These are files with the .pc extension. For installed shared libraries, you can find these in directories:
/usr/share/pkgconfig//usr/local/share/pkgconfig//usr/lib64/pkgconfig//usr/local/lib64/pkgconfig/
pkg-config is a tool to help you, as the application developer, to insert the correct compiler and linker options. Specifically when building your application with the GCC toolchain and linking one or more shared libraries.
In the previous sections we hard-coded the linker flag for our shared library. For example when we added -lconvert to the Makefile. That works for basic shared libraries. However, sometimes a shared library requires special compiler or linker flags or depends on yet another shared library. The library’s developer can include these specifics in the .pc file. To give you an idea of what such a file looks like, you can open the one from libconvert. It’s located at:
/usr/local/lib64/pkgconfig/convert.pc
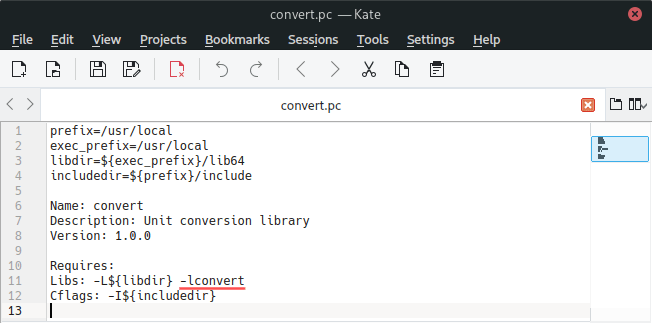
If a shared library bundled such a .pc file, you should use it instead of manually adding information to the Makefile or CMakeLists.txt file. Since I highly recommend building your application with CMake, I’ll just present how you would link a shared library using it’s .pc file in a CMakeLists.txt file:
# Specify the minimum version
cmake_minimum_required(VERSION 3.9)

# Specify the project name
project(myapp)

# Declare the project target
add_executable(${PROJECT_NAME}
    myapp.c
)

# Finds the pkg-config executable, adds the pkg_check_modules() function, among others.
find_package(PkgConfig REQUIRED)

# Create imported target with name PkgConfig::CONVERT
pkg_check_modules(CONVERT REQUIRED IMPORTED_TARGET convert)

# Specify the libraries to use when linking the target.
target_link_libraries(${PROJECT_NAME} PUBLIC PkgConfig::CONVERT)
Compared to the previously presented CMakeLists.txt, you’ll notice that the find_package() and pkg_check_modules() function calls were added to locate and load the convert.pc pkg-config file. An updated call to target_link_libraries() then properly links the shared library, when building with the GCC toolchain.
Wrap up
This article presented everything you ever need to know when it comes to linking a shared library to your C or C++ application, built with the GCC toolchain. It presented three different use cases:
- Calling GCC directly to build the application and link the shared library.
- Build the application and link the shared library with a Makefile.
- Generating the build environment with CMake and then building the application using the generated Makefile.
All three options work fine. My personal and recommended method is using the CMake utility in combination with a CMakeLists.txt file. Its syntax is much easier and more concise, compared to a Makefile. On top of that, you get build-in cross-platform functionality. This keeps the door open to eventually port your application to Windows and macOS.