 by
by Interested in developing a graphical user interface application for Linux, but not sure where to start? As a first step you select a fitting graphical user interface (GUI) library, followed by a programming language to develop your application in. wxWidgets is such a GUI library for C++. It’s also cross-platform and even offers bindings for other programming languages. This article helps you getting started with developing a GUI application using wxWidgets on Linux.
Background
Where do you start, when you want to develop a graphical user interface (GUI) application on Linux? You first pick a GUI library. Ideally you pick a popular GUI library because then it’s more likely that you can find examples and tutorials on-line. You can then also be fairly certain that it will still be around in the future. Besides selecting a popular GUI library, I can recommend one that is cross-platform. That way you keep the option open to support Windows and macOS systems down the road. Two popular and cross-platform GUI libraries currently exist:
- wxWidgets
- QT
For this article, I selected the wxWidgets GUI library to explain how to get started with developing a graphical user interface application on Linux. QT works just as well, though. In the next section, I’ll compare both GUI libraries in a bit more detail.
Once you selected the GUI library, your next step is to select the programming language for developing your GUI application. wxWidgets is a C++ library, so C++ is an obvious choice. However, bindings exist for other programming languages, making it possible to use those as well. For example Python, Ruby and Perl.
The goal of this article is getting you started with wxWidgets on Linux. The focus lies on getting the development environment setup on your Linux system. Then together, we’ll create a Hello World! type GUI application in C++. You can use the resulting application as a starting point for developing your own GUI application. As whip-cream on top, I’ll also show you how you can build your wxWidgets based GUI application with the help of CMake.
wxWidgets versus QT
As mentioned in the previous section, the most popular and cross-platform GUI libraries are wxWidgets and QT. The one to select depends mostly on your personal preference. Here is a bit more background to help you make that decision.
Licensing
This is probably the biggest factor in the decision making. wxWidgets comes with very liberal licensing terms. It is basically a LGPL type license with an extra exception. The extra exception allows you to distribute your wxWidgets based binary at your own terms. With other words, you can use wxWidgets in both open source and commercial closed source applications. When you distribute your application binary, you don’t even have to mention that it uses wxWidgets.
In contrast, QT is offered under a dual licensing module. This essentially means that you can use QT for free when you develop an open source (GPL/LGPL compatible) application. However, if you develop a commercial closed source application, you need to purchase a commercial license.
Support
The benefit of the QT commercial license is that it includes support. So no worries when you are stuck on something, because there is always someone around to answer your question.
In the case of wxWidgets, you cannot purchase a support contract. The core members of the wxWidgets team are available for hire though, in case you get really stuck. Thanks to the popularity of wxWidgets there are plenty of on-line resources available to help you answer you questions, including a fairly active community forum.
Owner
A group of volunteers handles the development and maintenance of wxWidgets. It is completely community driven, without a corporate entity behind it. QT is the opposite. It is owned by the Qt Group with several hundred employees around the world. This essentially means that more funds a available for QT development and maintenance, compared to wxWidgets. However, it also means that the Qt Group can decide at any point to change the licensing terms and pricing model.
In summary, both wxWidgets and QT offer a great cross-platform GUI library and you can’t go wrong with either one. When operating on a tight development budget and/or when you want to support the open source community, wxWidgets is the way to go. Otherwise consider QT.
What do you need
As the title of this article implies, you need a Linux system with graphical desktop environment. You can decide yourself which Linux distribution you want to use and with which desktop environment. I’ll be using my openSUSE Tumbleweed machine, in combination with the GNOME desktop environment.
In the introduction I already mentioned that we are going to create a basic Hello World! type GUI application with wxWidgets in C++ and we’ll build it with the help of CMake. From a development environment perspective, any text editor suffices for editing the source code, in combination with the terminal for building. However, a much nicer solution exists: Visual Studio Code in combination with a few extensions for C++ and CMake. In a previous article I covered in detail how to setup a C/C++/CMake development environment based on Visual Studio Code. I can highly recommend this setup and it’s what I’ll use throughout this article myself.
Setting up your Linux system for development with wxWidgets
Assuming that you installed Visual Studio Code together with the C++ and CMake extensions, you still need to install basic C++ development software, including of course the wxWidgets library. You can perform this step in the terminal, using your Linux distribution’s package manager. Here are the installation instructions for popular Linux distributions:
- Debian/Ubuntu:
sudo apt install git gcc g++ gdb make cmake libwxgtk3.0-gtk3-dev - Fedora:
sudo dnf install git gcc g++ gdb make cmake wxGTK3-devel - openSUSE:
sudo zypper install git gcc gcc-c++ gdb make cmake wxGTK3-devel
Download the wxWidgets template project
To help you getting started with wxWidgets on Linux, I created a template project at PragmaticLinux’s GitHub account. It even includes the CMakeLists.txt file for building the GUI application with CMake. Whenever you want to start the development of your own wxWidgets GUI application, feel free to use this wxWidgets template project as your starting point.
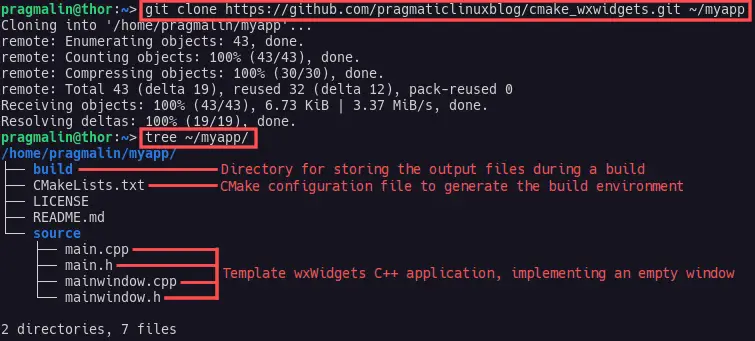
To download the template, open up your terminal and run the following GIT clone command:
git clone https://github.com/pragmaticlinuxblog/cmake_wxwidgets.git ~/myapp
You can now find the wxWidgets template project in subdirectory myapp inside your home directory:
Import the wxWidgets template project into Visual Studio Code
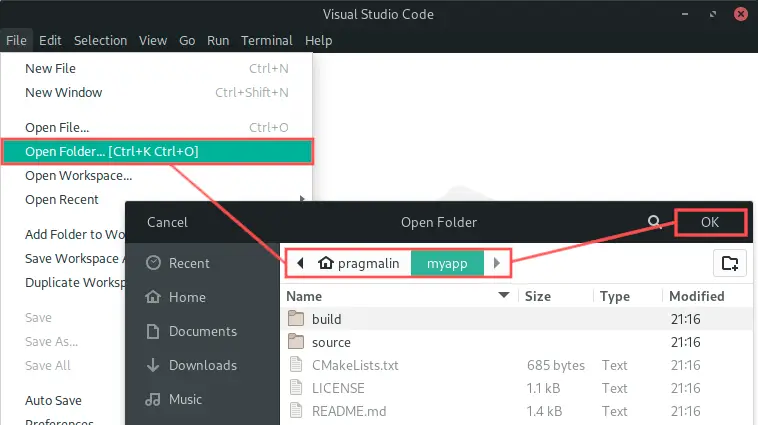
After downloading the wxWidgets template project, we continue with importing it into Visual Studio Code. Open up Visual Studio Code and select File → Open Folder… from the program menu. Then browse to where we just cloned the wxWidgets template project. This is the directory that contains the CMakeListst.txt file, so ~/myapp:
You might see a dialog where Visual Studio Code asks you if you trust the author of the files in the folder. You can click the Yes, I trust the authors button on the dialog to get rid of it.
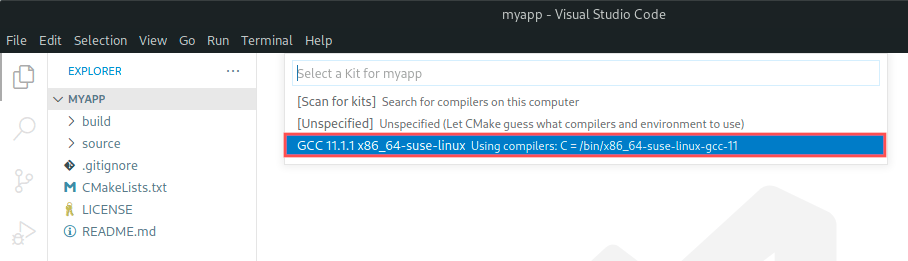
At this point, the only step left for us is to let Visual Studio Code know, which kit we prefer to use in combination with CMake. To select the kit, click on the No Kit Selected text in the status bar. A selection box pops up at the top, where you can select C/C++ development tools that Visual Studio Code detected on your system. We installed GCC earlier on, so select that option:
Build and run the wxWidgets application
At this point we completed setting up the wxWidgets template project in Visual Studio Code. To try it out we simple need to build the project and then run it. You can perform both the building and running by clicking the associate text and icons in the status bar. Alternatively you can use keyboard shortcuts. Here’s a brief overview:
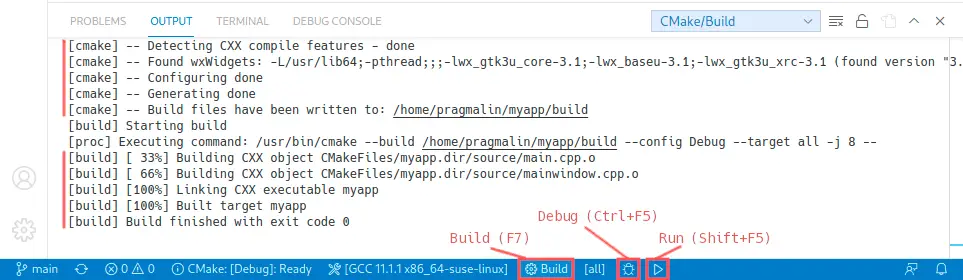
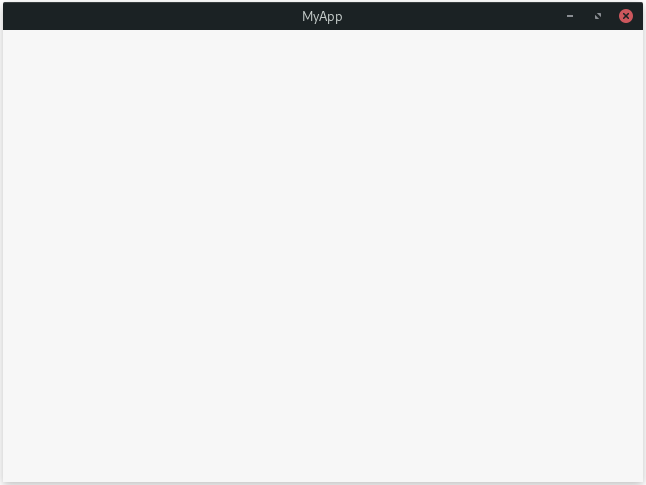
Go ahead and build the wxWidgets template project, by clicking the Build text in the status bar or by pressing F7. You can follow the progress in the Output window. If you look closely, you see that it also automatically used CMake to setup the build environment. Upon completion of the build task, run the resulting application by clicking the little play icon in the status bar or by pressing Shift+F5. The empty window of the wxWidgets template project shows up:
Creating the Hello World! application
Thanks to the wxWidgets template project, getting started with wxWidgets on Linux is fairly quick and easy. We already completed the entire setup of the development environment and imported the template project. Let’s go a step further and do some actual wxWidgets coding. Our goal is to create a simple Hello World! application, consisting of an edit box and a button. Whenever we press the button, the text Hello World! should show up in the edit box.
Resize the window and add a panel
The empty window of the template project is bigger than it needs to be for our Hello World! application. Furthermore, we plan on adding two visual components (also known as widgets) to the window. It’s common practice to place these in a separate container. A panel is such a container.
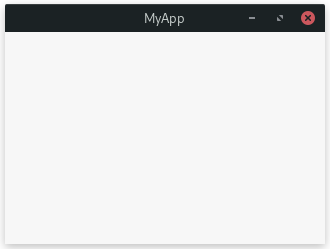
Let’s start by resizing the window. Open up main.cpp and locate the line where we construct mainWindow. The default size of the window is 640 by 480 pixels. Half of that sounds more than sufficient for our Hello World! application:
MainWindow *mainWindow = new MainWindow(wxT("MyApp"), 320, 240);
As a next step we add the panel to the main window. You can’t really see the panel (unless you change its background color), but think of it as a layer we place on top that covers the entire window contents, just excluding the actual title bar. We’ll use it later on to place the edit box and the button on. Open up the file mainwindow.h and add a private member m_Panel to the MainWindow class. It’s a pointer to the wxPanel class:
class MainWindow : public wxFrame
{
public:
  MainWindow(const wxString& title, int width, int height);
private:
  wxPanel * m_Panel;
};
Wit the m_Panel member added to the class, we continue by creating and adding the panel at the start of the constructor of class MainWindow, in file mainwindow.cpp:
MainWindow::MainWindow(const wxString& title, int width, int height)
  : wxFrame(NULL, wxID_ANY, title, wxDefaultPosition, wxSize(width, height))
{
  /* Create and add the panel to the frame. */
  m_Panel = new wxPanel(this, wxID_ANY);

  /* Center the window on the screen. */
  Centre();
}
If you now build and run the application, you see a similar window as before, just smaller in size:
Add the edit box
Now that we added the panel to class MainWindow, we can continue with adding the edit box. The class name for this component is wxTextCtrl. Adding the edit box is similar to how we added the panel: First we add a new private member to the class and then we create the edit box and add it to the panel.
In mainwindow.h add the following line right underneath the line where we added the private member m_Panel:
wxTextCtrl * m_EditBox;
Now go back to class constructor in mainwindow.cpp and add the following lines right underneath where we just created the panel:
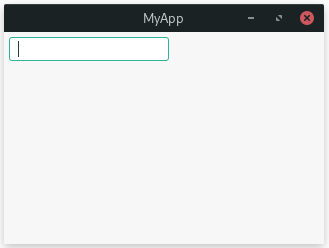
  /* Create and add the edit box to the panel. */
  m_EditBox = new wxTextCtrl(m_Panel, wxID_ANY, wxT(""),
                             wxPoint(5,5), wxSize(160, 24));
After building and running the application, it looks like this:
Add the button
Adding the button resembles the procedure for adding the edit box. The class name for the button component is wxButton. Add the following private member to mainwindow.h:
wxButton * m_Button;
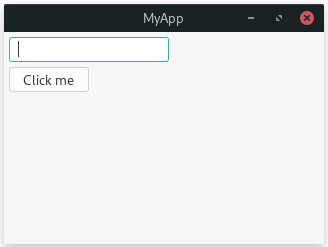
Then in mainwindow.cpp create the button and add it to the panel:
  /* Create and add the button to the panel. */
  m_Button = new wxButton(m_Panel, wxID_ANY, wxT("Click me"),
                          wxPoint(5,35), wxSize(80, 25));
If you now run the application, you can see the button underneath the edit box:
Add the button’s OnClick event handler
With the design of the user interface for our Hello World! application completed, we continue by implementing its functionality. We want to show the text Hello World! in the edit box, when the user clicks the button. To realize this functionality we need to:
- Implement an OnClick event handler.
- Bind the button’s click event to this OnClick event handler.
Let’s start with implementing the OnClick event handler. Open up the class definition in mainwindow.h and add the following private member function prototype. You can place it right underneath where you added the m_Button member variable:
void OnButtonClick(wxCommandEvent & event);
With the function prototype added, open up mainwindow.cpp and add the member function:
void MainWindow::OnButtonClick(wxCommandEvent & event)
{
  m_EditBox->SetValue(wxT("Hello World!"));
}
Note that upon calling this member function, the text in the edit box will change to Hello World!.
Connect the button’s OnClick event handler
We currently still miss one last puzzle piece to complete the application: Making sure our OnButtonClick event handler function actually gets called, when the user clicks the button. Add the following line to the MainWindow constructor. You can place it right underneath the line where we created the button:
  /* Bind the button's event to this instance's OnButtonClick(). */
  m_Button->Bind(wxEVT_BUTTON, &MainWindow::OnButtonClick, this);
Whenever the user clicks the button, the application’s main event loop detects this event. Next, it dispatches the event (wxEVT_BUTTON) to the widget that the event occurred on. In our case m_Button, because that’s where the mouse pointer was at. If our button doesn’t actually handle the event, the event dispatch propagates to its parent widget(s).
By calling the button’s Bind function, we connect the OnButtonClick method of class MainWindow to the button’s wxEVT_BUTTON event. With other words, when the application’s main event loop dispatches the wxEVT_BUTTON event to our button, the OnButtonClick event handler of class MainWindow automatically gets called. Note that the third parameter to the Bind function, should always be the instance pointer of a class that implements the actual event handler. In our case, this points to an instance of MainWindow, which implements the OnButtonClick event handler.
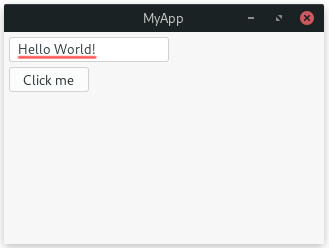
All set now, so go ahead and build the application one more time and then run it. If you now click the button, you can see the text in the edit box change to Hello World!:
Wrap up
This tutorial covered everything you need to know about getting started with wxWidgets on Linux. We covered the following topics:
- Installing the software packages needed for developing a wxWidgets based GUI application in C++ on Linux.
- Downloading the wxWidgets template project from PragmaticLinux’s GitHub account.
- Importing the wxWidgets template project into Visual Studio Code.
- Building the wxWidgets template project with CMake.
- Creating a basic Hello World! type GUI application.
Where to go from here? If you are already familiar with wxWidgets itself, you now have everything you need to develop your own GUI application. For those new to wxWidgets, continue learning by trying out the following:
- Add a menu to the application. For example one for File → Quit.
- Try adding different widgets to the application to learn more about them. For example a check box, a radio button and a progress bar.
- Teach yourself about sizers to better control the placement of widgets.
- Add an About dialog to your application.
While learning about wxWidgets, the following on-line resource might prove helpful: