
 by
by When working with Linux, sooner or later you encounter TAR GZ archives. This is a file with the tar.gz extension. A TAR GZ archive packs multiple files, including those in subdirectories, into one large archive file and compresses its contents. Think of TAR GZ archives as the Linux version of ZIP archives, with the latter one being more common on MS Windows. This article teaches you how to create and extract a TAR GZ archive in the Linux terminal. We’ll use the tar program for this.
Background
The more you work with Linux, to more often you get confronted with filenames that end with .tar.gz. These files are TAR GZ archives, also called tarballs. Think of such tarballs as the Linux version of ZIP archives.
What are TAR GZ archives
The tar program makes it possible to quickly create and extract TAR GZ archives from the command line in Linux. When creating a TAR GZ archive, you basically pack a collection of files together (the TAR part) and then compress the archive (the GZ part). Hence the tar.gz file extension for the resulting archive. When extracting a TAR GZ archive, tar repeats these step in reverse order. Meaning that it first uncompresses the archive file. Followed by unpacking all the files contained within the TAR GZ archive.
Why would you need TAR GZ archives? Historically, the main reason was to archive files. So to store files away that you no longer need to work with on a regular basis, but also do not want to delete. Packing these files in one compressed archive made them easy to move around and required less disk space. Think of a backup for example. Nowadays, with the Internet fully integrated in our daily lives, TAR GZ archives offer a great solution for sharing files with others. Think of e-mail attachment as one prominent example.
TAR GZ versus ZIP
Why not use ZIP archives instead? Well, you can. There is nothing wrong with ZIP archives. They practically do the same thing. You pack a bunch of files together in a compressed way. One difference to note: When creating a ZIP archive, the files are individually compressed before they are packed into the archive. When creating a TAR GZ archive, the files are first packed into the archive and then the resulting archive is compressed. At the end of the day, personal preference decides which solution works best for you.
Regardless of your personal preference, when working in Linux you will encounter TAR GZ archives sooner or later. Not a big deal when a full blown graphical desktop environment runs on your PC. These ship with GUI programs to create and extract TAR GZ archive. Think of File Roller for the Gnome desktop environment and Ark for the KDE desktop environment. Personally, I use Double Commander as my file manager, which has build-in functionality to create and extract TAR GZ archives.
However, when working in the terminal, you need the tar command line program in Linux to create and extract TAR GZ archives. This gets a bit trickier. For this reason, this article explains in detail how you create and extract a TAR GZ archive with the tar program.
What you need
Just any type of Linux system really. A Raspberry PI, a server that you SSH into or a Linux install complete with desktop environment. It just needs to have the tar program installed, which most Linux distributions install by default. To verify the presence of the tar program on your system, run the command:
which tar

If the command outputs something, then the tar program is installed. If not, you can quickly install it with your distribution’s package manager. For Debian/Ubuntu based systems you would run:
sudo apt install tar
I’ll be using my Debian 10 based Thinkpad T450s, with Gnome desktop environment.
Setting up a test environment
Since we’ll be creating and extracting TAR GZ archives, we’ll need at least some files in a few directories for testing purposes. Instead of creating a bunch of dummy files and directories, we might as well download the latest WordPress archive.
WordPress is a hugely popular website content management system and runs on millions of websites, including the PragmaticLinux blog. We are not actually going to install WordPress, but simply use the WordPress files and directories as a foundation for this article.
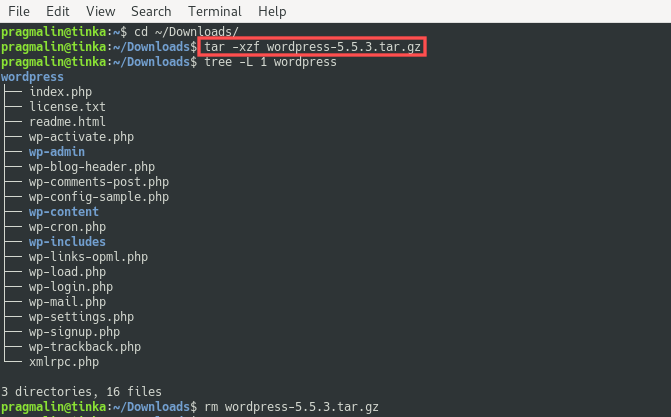
Go ahead and download the WordPress 5.5.3 archive from https://wordpress.org/wordpress-5.5.3.tar.gz. On my PC the file wordpress-5.5.3.tar.gz is now present in directory /home/pragmalin/Downloads/
As a first step we’ll extract the files and directories packed inside this TAR GZ archive. Open your terminal and set the directory to where the downloaded WordPress archive resides. Next, run the following command to extract the WordPress TAR GZ archive:
tar -xzf wordpress-5.5.3.tar.gz
You just extracted your first TAR GZ archive from the command line in Linux. A perfect introduction for this article. The resulting files are located in the wordpress directory. In the next sections, I’ll explain in more detail how this worked. For now, delete the original WordPress TAR GZ archive to complete setting up the test environment:
rm wordpress-5.5.3.tar.gz
Create a TAR GZ archive
To create a TAR GZ archive in Linux that packs all the files and subdirectories, the tar command syntax is:
tar -czf [ARCHIVE NAME] [DIRECTORY TO PACK]
For example:
tar -czf wordpress_archive.tar.gz wordpress

This packs all the files and subdirectories present in the wordpress directory, performs the compression operation and stores the results in the TAR GZ archive wordpress_archive.tar.gz. You can of course change the archive name to whatever you prefer when running the tar command.
What do the command line parameters -czf mean?
cstands for create new archive.zstands for use compression.fyou need to specify the archive file name.
With the archive created, we can remove the original directory:
rm -rf wordpress
Extract a TAR GZ archive
The syntax to extract a TAR GZ archive in Linux is quite similar to the one for creating the archive. You basically just replace the c with an x and leave out the last part of the command line, which specified the directory to pack. The result:
tar -xzf [ARCHIVE NAME]
For example, to extract the wordpress_archive.tar.gz TAR GZ archive that we just created, run the command:
tar -xzf wordpress_archive.tar.gz
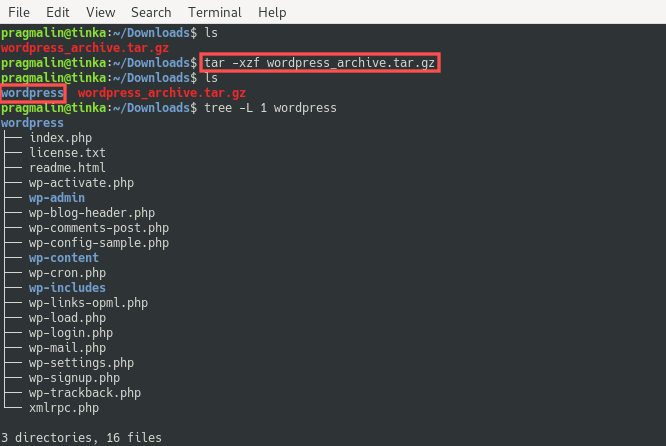
Note that the when extracting the TAR GZ archive in Linux, tar automatically recreated the wordpress directory and unpacked the archive there. So the same directory name as the one we initially packed.
What do the command line parameters -xzf mean?
xstands for extract from archive.zstands for use decompression.fyou need to specify the archive file name.
Extract a TAR GZ archive to a specific directory
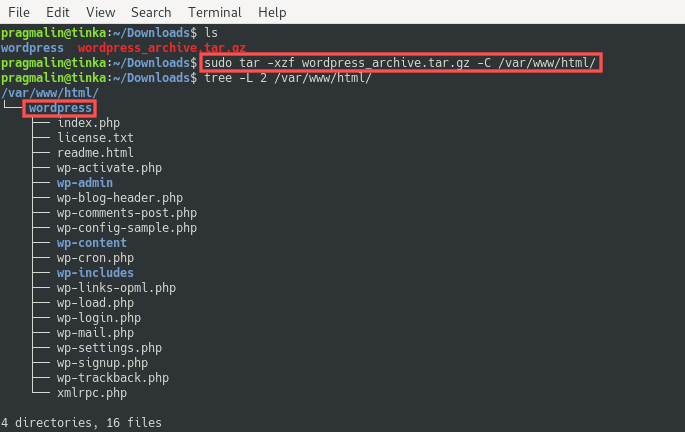
In certain cases you want to extract the TAR GZ archive to a specific directory. The WordPress archive makes a perfect example. Since this TAR GZ archive holds files for a website, you probably want extract the TAR GZ archive directly to the /var/www/html directory. By default the Apache HTTP server serves web pages from this directory on Debian/Ubuntu based systems.
To extract the archive to a specific directory, the command syntax is:
tar -xzf [ARCHIVE NAME] -C [DESTINATION DIRECTORY]
So taking the example to extract to the /var/www/html directory, you would use command:
sudo tar -xzf wordpress_archive.tar.gz -C /var/www/html/
Note the sudo was added just because my pragmalin user does not have write access to the /var/www/html directory.
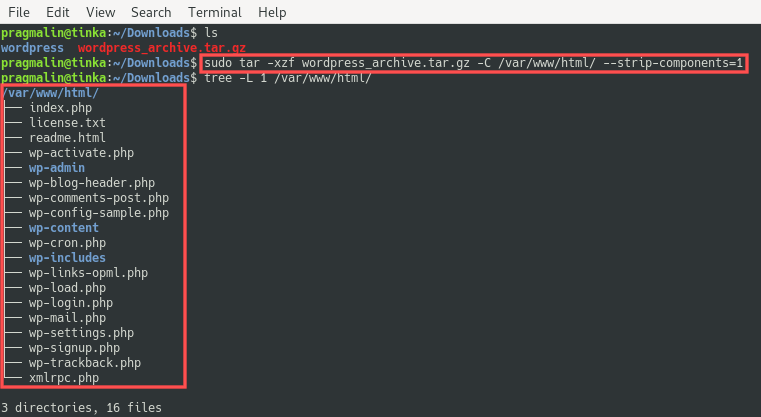
Okay, so that worked. However, the tar program still created the wordpress directory and extracted the TAR GZ archive contents there. Perhaps this is what you wanted. But how could you skip this part? With other words, how can you extract the TAR GZ archive directory to the /var/www/html directory, without the tar program creating the extra directory? To achieve this, you just need to add --strip-components=1 at the end of the command:
tar -xzf [ARCHIVE NAME] -C [DESTINATION DIRECTORY] --strip-components=1
For example, to extract the wordpress_archive.tar.gz TAR GZ archive directly to the /var/www/html directory, while stripping the first directory name present within the archive (wordpress):
sudo tar -xzf wordpress_archive.tar.gz -C /var/www/html/ --strip-components=1
Additional help on the TAR program
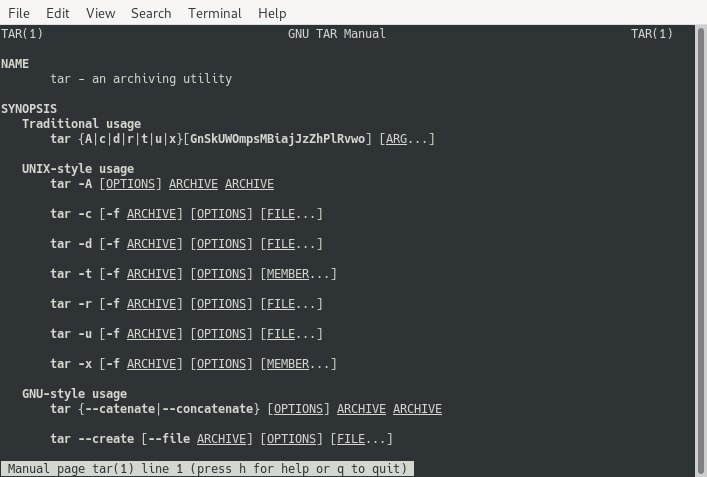
Over all the years that I worked with Linux, this pretty much sums up all I even needed to know about how to create and extract TAR GZ archives. The tar program still offers many other command line parameters that you might be interested in, in special cases. For example the p option that keeps file permissions while creating and extracting TAR GZ archives. For more information, you can always check the MAN page of the tar program by running the man tar command from the terminal:
The explain shell website offers another option for additional help. You can simply enter the tar command there, before actually running it in your terminal. The website then explains what the command would do. Very handy and often a bit quicker then scrolling through the entire MAN page. Example:

Wrap up
While working in Linux, you will encounter TAR GZ archives sooner or later. This article explained how to create and extract TAR GZ archives using the command line in Linux. It did so with the help of hands-on examples, based on the WordPress TAR GZ archive.
In summary, to create a TAR GZ archive in Linux, you use the command syntax:
tar -czf [ARCHIVE NAME] [DIRECTORY TO PACK]
To extract a TAR GZ archive in Linux, you use the command syntax:
tar -xzf [ARCHIVE NAME]
Sometimes you want to extract to a specific directory. You can specify this directory with the -C [DESTINATION DIRECTORY] parameter. In case you want to suppress the creation of the root directory present in the packed archive, you can specify the additional --strip-components=1 parameter.
I hope you enjoyed reading this article. If you don’t often work with TAR GZ archives, you might have a hard time remembering the -czf and -xzf parameters. Why not bookmark this page and always have it as a handy reference?


3 thoughts on “Create and extract a TAR GZ archive in Linux”
Comments are closed.