
 by
by Do you want to use a USB drive on your Linux server, but you are not sure how to manage the USB drive from the terminal? This article explains how to format and mount a USB drive in the Linux terminal. It covers topics ranging from file system selection, all the way to creating a mount point on your system.
Background
For those that administer a physically present Linux server, a USB drive serves as an essential tool. Need to install the operating system for the first time? Need to quickly transfer files between systems? Looking for a place to backup your data? These are all potential use cases for a USB drive. Personally, I have a backup USB drive connected to my Debian based Samba file server. Once a day an automated script runs to mount the USB drive, run an incremental backup with BorgBackup and then unmount it again.
As a server administrator you typically do not have the convenience of a desktop environment and you do all your work through the terminal. For this reason, this article explains how you can format and mount a USB drive directly in the Linux terminal.
File systems
When you buy a USB drive, it is typically formatted to the FAT32 or NTFS file system. This makes the USB drive somewhat usable under all popular operating systems such as Windows, macOS and Linux. In the case you solely run Linux on your system, the EXT4 file system serves you far better. With the EXT4 file system, you preserve file permissions when storing data on it. Additionally, you do not have to worry about data fragmentation. The only real downside is that both Windows and macOS do not know how to access a EXT4 file system by default. Since this website is dedicated to Linux tutorials, I assume that you primarily run Linux on your systems. Therefore, the EXT4 file system is the file system of choice for this article.
Finding the disk name
After inserting the USB drive to your PC, Linux automatically assigns a disk name to the device. Typically the disk name looks like /dev/sdX. For performing formatting and mounting operations, you need to know the disk name to operate on. With other words, the disk name serves as an disk identifier under Linux. The following command lists all disk names on your system:
lsblk -p | grep "disk"

As a result you can see that my system has two disks. The first one is the SSD where Linux is installed and the second one (/dev/sdb) is my USB drive. This might be different on your system. When unsure which disk name belongs to your USB drive, simply run the command with the USB drive disconnected. Afterwards, connect your USB drive and run the command one more time. By comparing the output of both commands, you can deduce the disk name of your USB drive.
Once known, make a note of your USB drive disk name. You will need it later on. In the remainder of this article, I will use /dev/sdb as the disk name in the examples. Just keep in mind to replace this with the disk name of your USB drive.
Unmounting the disk
Depending on the Linux distribution you run, the operating system might automatically mount your USB drive upon insertion. Currently I run Debian on most of my systems On my servers I installed a minimal version of Debian and the operating system does not automatically mount my USB drive. However, on this laptop I have a Debian version with a full Gnome desktop environment installed. On this system, Debian does automatically mount the USB drive upon insertion.
Formatting a USB drive only works with an unmounted disk. Consequently, we need to determine the mount status of the USB drive. You can find out the mount status of your disk by running the same command again that we ran for finding the disk name:
lsblk -p | grep "disk"

Inspect the line that lists your USB drive disk name. For a mounted disk, the line ends with a directory name. The listed directory is the so called mount point. In the event that your USB drive is currently mounted, proceed with unmounting the disk. Just make sure to replace the /dev/sdb disk name with the disk name of your USB drive:
sudo umount /dev/sdb
To verify that the unmount operation succeeded, you can run the lsblk -p | grep "disk" on more time. It should no longer list the mount point:

Formatting the disk to EXT4
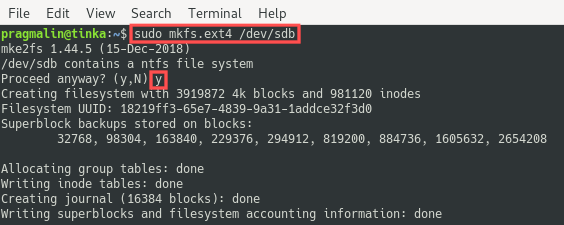
Now that you know the disk name of your USB drive and that the disk is unmounted, you can proceed with formatting the USB drive to the EXT4 file system. Note that the formatting operation removes all data currently stored on the disk. So make sure to first backup the data, if you still need it. Additionally, make sure that you specify the correct disk name to prevent data loss. To proceed with the disk format operation, run the following command. Just make sure to replace the /dev/sdb disk name with the disk name of your USB drive:
sudo mkfs.ext4 /dev/sdb
Creating the mount point
A mount point refers to the location on your PC’s file system that a disk is connected to. Under Linux manually mounted disk are typically located in a subdirectory under /mnt. In contrast, automatically mounted disks are typically located under /media.
Since we plan on manually mounting the USB drive, the creation of the mount point comes next. With other words, we need to choose a directory name where the files on the USB drive will appear after mounting the disk. For this article, I chose usbdrive. Run the following command to create the mount point:
sudo mkdir -p /mnt/usbdrive
Mounting the disk
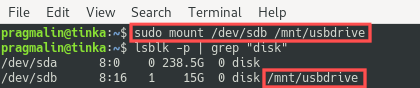
With the USB drive formatted and the mount point created, it is time to actually mount the disk. Run the following command to mount the disk. Just make sure to replace the /dev/sdb disk name with the disk name of your USB drive:
sudo mount /dev/sdb /mnt/usbdrive
To verify that the mount operation succeeded, you can run the lsblk -p | grep "disk" on more time. It should list the mount point at the end:
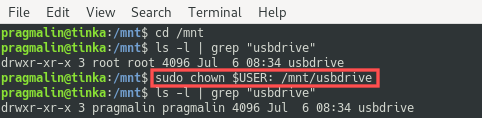
At this point, the root user owns this directory. This means that only the root user has read/write access to the disk. In case you want your own user to have read/write access to the USB drive, you can change the owner of this directory with the chown command. My user name is pragmalin so I will use this in the example. You should change this to your own user name or write $USER, which gets automatically replaced with your user name:
sudo chown $USER: /mnt/usbdrive
You can run the ls command to verify that the owner change was successful:
To verify that your user has read/write access to the disk, you can create a text-file with some dummy content on the disk:
echo "Can you read this?" > /mnt/usbdrive/testfile
With the cat command you can read and show the file contents in the terminal:
cat /mnt/usbdrive/testfile
After verifying your read/write access to the disk, delete the text-file again by running the command:
rm /mnt/usbdrive/testfile

Linux automatically unmounts the disk when you shutdown or reboot the system. If at any time you want to manually unmount the disk, the command presented earlier does the trick: sudo umount /dev/sdb.
Automatically mount the disk when booting
Now that you know how to format and mount a USB drive, you might be interested in automatically mounting the USB drive with each system boot. For example if your system has a permanently connected USB drive. The file /etc/fstab on Linux holds a list of all the mount operations to perform upon system boot.
Before making changes to this important configuration file, consider creating a backup copy first:
sudo cp /etc/fstab /etc/fstab.backup
Using the Nano editor, open the file for editing:
sudo nano /etc/fstab
Next, add the following line at the end of /etc/fstab:
/dev/sdb /mnt/usbdrive ext4 auto,nofail,sync,users,rw 0 0
After saving the changes to /etc/fstab and rebooting your system, the USB drive gets mounted automatically.
Wrap up
After reading through this article, you learned how to format and mount a USB drive with the EXT4 file system, directly in the Linux terminal. This knowledge comes in handy every time you deal with an USB drive and only have access to your Linux system through the terminal. This is typically the case with servers or for example a headless Raspberry Pi. I hope you enjoyed reading this article as much as I enjoyed writing it. Feel free to leave a comment if you have additional questions.
4 thoughts on “How to format and mount a USB drive in the Linux terminal”
Comments are closed.