
 by
by C and C++ compiler toolchains make it possible for us software geeks to build amazing things. Did you know that both GCC and Clang offer build-in functionality that aids us in becoming better developers and creating higher quality software? I’m talking about compiler warnings. This article explains how you can enable compiler warnings, when using CMake to generate the build environment.
Background
CMake is quickly gaining popularity for generating the build environment for C and C++ applications and libraries. Any rightfully so. It offers an easier to understand syntax, compared to Makefiles. On top of that, it offers an abstraction layer from the compiler toolchain. This opens the path to cross-platform support for building your software. Running CMake for your project on your Linux machine, automatically detects GCC (or Clang) and generates a Makefile accordingly. When repeating these steps on a Windows PC, CMake automatically detects Visual Studio and generates a project solution for it.
Just keep in mind that CMake by default does not enable compiler warnings, when generating the build environment. These lenient default settings let us get away with a lot of things: Unused parameters, unused or uninitialized variables, to name just a few. In my opinion always building your software applications and libraries with compiler warnings enabled, leads to higher quality software. Perhaps even turns us into better developers. This article shows you how you can enable compiler warnings in your CMake CMakeLists.txt file.
What do you need
To complete the steps in this article, you essentially need just two things:
- C/C++ development and Git related packages installed on your Linux system.
- A template C application configured for building with CMake.
For installing the C/C++ development and Git related packages, you can follow these distribution specific installation instructions:
- Debian/Ubuntu:
sudo apt install git gcc g++ gdb make cmake - Fedora:
sudo dnf install git gcc g++ gdb make cmake - openSUSE:
sudo zypper install git gcc gcc-c++ gdb make cmake
Once installed, you can clone the following template C application, configured for building with CMake, to your home directory:
git clone https://github.com/pragmaticlinuxblog/cmake_c_app.git ~/myapp
The article about how to import a CMake project into Visual Studio Code initially featured this template application.
Enable compiler warnings for GCC in CMakeLists.txt
With the template C application cloned to your home directory, let’s make a small change to the file main.c. Add the following line at the start of function main():
int i;
Afterwards, function main() looks like this:
int main(void)
{
  int i;
  printf("Hello World!\n");
  return 0;
}
Now go ahead and generate the build environment with CMake, followed by building the application:
cd ~/myapp/buildcmake ..make all
The output looks like this:
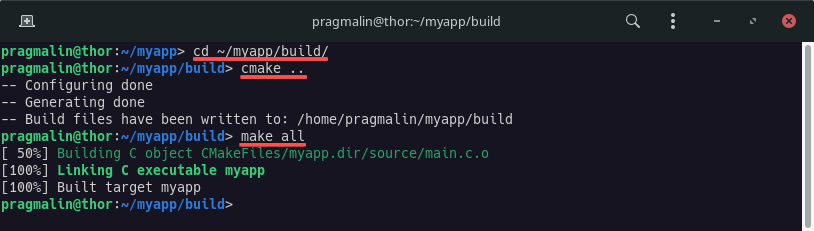
Notice how it did not complain at all about the completely unused and unnecessary variable i that we added? It could just be sloppy coding, but it could also indicate that we forgot something in our code. Possibly leading to a bug down the road.
Let’s fix that. Open up the CMakeLists.txt file and, underneath the section add_executable, add the following:
target_compile_options(${PROJECT_NAME} PRIVATE
  -Wall -Wextra -Wpedantic
)
Save the file and rebuild the application:
make clean all
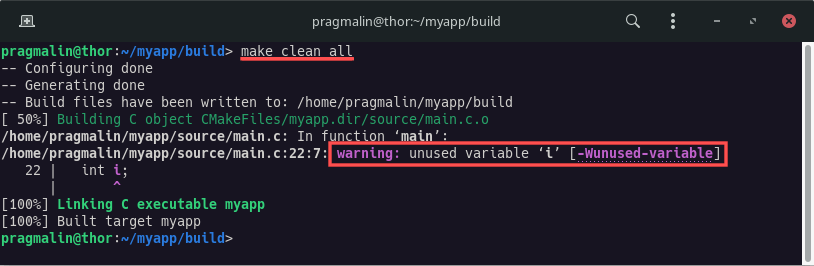
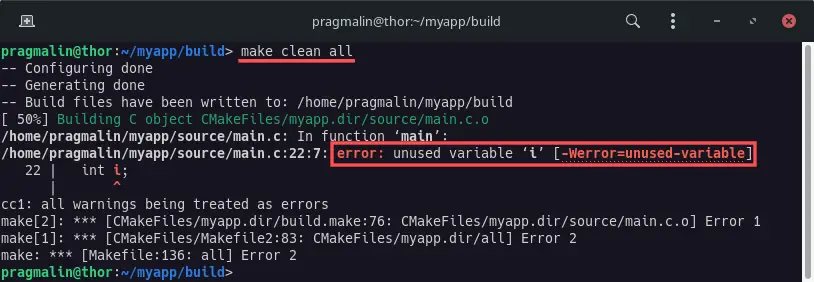
This time the GCC compiler properly flags the problem with our code. You can even go a bit stricter by turning all compiler warnings into errors. This forces the developer to fix and clean up their code, otherwise the application simply won’t build. You do this by added the -Werror flag:
target_compile_options(${PROJECT_NAME} PRIVATE
  -Wall -Wextra -Wpedantic -Werror
)
If you now rebuild the application, it will actually generate and error instead of just a warning:
make clean all
Compiler warnings explained
The lines we added to CMakeListst.txt simply add the flags -Wall -Wextra -Wpendantic when running gcc (or g++ ) for compiling a source-file. A brief overview of these flags:
-Wall: Enables common warnings for code constructs, commonly considered as questionable.-Wextra: Enables even more warnings than those turned on by-Wall.-Wpedantic: Issue a warning for which ISO C and ISO C++ requires a diagnostic. Can be used for strict ISO C and C++ conformance.
GCC offers many more warning options and feel free to add these. You can also add flags to explicitly suppress a warning. For example, -Wno-unused-variable would suppress the warning messages flagged with -Wunused-variable in the build output. Refer to the following web page for a complete overview of GCC’s warning flags:
Enable compiler warnings with cross-platform support
As mentioned in the introduction, CMake can also be used for developing cross-platform application and libraries. For example an application that you can build on Linux, Windows and macOS. All using the same CMakeLists.txt file for generating the build environment.
Most of these platforms default to building with a GCC or Clang based compiler toolchain. In which case the before mentioned method of enabling compiler warnings with CMake works just fine. This is unfortunately not the case when building with Microsoft’s Visual Studio. Visual Studio’s C and C++ compilers do not understand the -Wall -Wextra -Wpendantic flags.
To also enable compiler warnings for Visual Studio, update the previously added target_compile_options() part in your CMake’s CMakeLists.txt to this:
target_compile_options(${PROJECT_NAME} PRIVATE
  $<$<CXX_COMPILER_ID:MSVC>:/W4>
  $<$<NOT:$<CXX_COMPILER_ID:MSVC>>:-Wall -Wextra -Wpedantic>
)
Essentially, this adds the /W4 compiler flag, but only when building with the Visual Studio compiler. This enables compiler warnings similar to what we did for GCC and Clang. For a complete overview of warning options of the Visual Studio compiler, refer to:
To turn all warnings into errors, you can add the /WX compiler flag. So the equivalent of what -Werror did for GCC. In this case the target_compile_options() part in your CMakeLists.txt would look like:
target_compile_options(${PROJECT_NAME} PRIVATE
  $<$<CXX_COMPILER_ID:MSVC>:/WX /W4>
  $<$<NOT:$<CXX_COMPILER_ID:MSVC>>:-Wall -Wextra -Wpedantic -Werror>
)
Wrap up
This article explained how to update your CMakeLists.txt file to instruct CMake to enable compiler warnings, when building your software application or library. I can definitely recommend enabling compiler warnings for all your CMake based projects. It will lead to better software and possibly teaches you to break some bad coding habits.
In a nutshell, locate the add_executable part in your CMakeLists.txt file (or add_library in case of a library). Then add the following lines somewhere underneath it:
target_compile_options(${PROJECT_NAME} PRIVATE
  $<$<CXX_COMPILER_ID:MSVC>:/W4>
  $<$<NOT:$<CXX_COMPILER_ID:MSVC>>:-Wall -Wextra -Wpedantic>
)