
 by
by Catch yourself typing git status a lot? Yeah, me too. There’s got to be an easier way, right? Luckily there is: fancy-git. It makes it possible to theme your Bash terminal prompt in a Git specific way. Most importantly, it shows the name of your Git branch in your Bash terminal prompt. This tutorial shows you how to install fancy-git, for showing the name of the Git branch and its status in your Bash terminal prompt.
Background
When developing software under Windows, I got used to convenient tools such as TortoiseGit and TortoiseSVN, for working with version control repositories. Under Linux, no fully functional ports of these tools exist, unfortunately. That leaves you with two options: Either learn to work with Git and SVN directly in the terminal or find a good GUI tool for Linux. Both valid options. I personally chose the direction of working with both Git and SVN in the terminal.
Fast forward a few years to today. I estimate that about ninety percent of the software development projects that I work on, use the Git version control system. Consequently, I work a lot with Git in the terminal. Adding, modifying and removing files. Sometimes directly in the main branch. More often in a feature branch, which then needs to be merged back into the main branch.
When performing these operations, it’s easy to loose track of the branch you are working on. I catch myself typing git status often, just to see what branch I am on. Then I found the fancy-git solution. It adds the name of the Git branch that you work on, to the Bash prompt. Furthermore, it colors the text and background of the branch name to indicate its status: All clean, changes detected and files staged and ready to commit. On top of that, it can even show you when commits still need to be pushed to the remote origin.
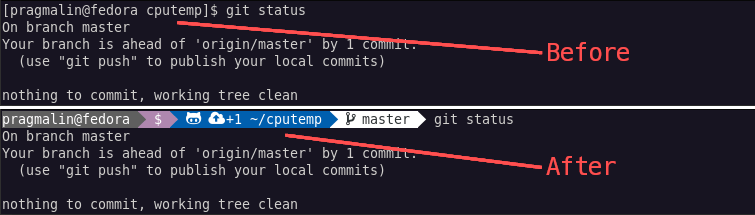
This tutorial shows you how to install fancy-git, for showing the name of the Git branch and its status in your Bash terminal prompt. A little preview:
What do you need
For starters you of course need a Linux system. Fancy-git works on all Linux distributions, so pick whichever you prefer. For this article I decided on using Fedora, running as a virtual machine.
When it comes to software packages, your system needs git and curl. Some Linux distributions install these by default, others do not. For completion purposes, you can find the installation instructions for popular Linux distributions here:
- Debian/Ubuntu/Raspberry PI:
sudo apt install git curl - Fedora:
sudo dnf install git curl - openSUSE:
sudo zypper install git curl
After installing Git, make sure to setup your Git username and email. Otherwise you won’t be able to make commits.
Other than that, you need a cloned Git repository to test that your fancy-git setup works. Feel free to use one of PragmaticLinux’ Git repositories for this. For example the cputemp one. It contains code snippets for reading out the CPU temperature. I’ll use this Git repository as well throughout this article. I cloned it to my home directory with command:
git clone https://github.com/pragmaticlinuxblog/cputemp.git ~/cputemp
Installation and configuration
This section covers the fancy-git installation and its initial configuration. The developer offers the installer as a Bash script. The installer automatically:
- Clones the latest version of fancy-git to the directory
~/.fancy-git. - Updates your user’s Bash configuration in file
~/.bashrc. - Installs fonts that support rendering of the needed icons and symbols.
Run the install script
You can automatically download and run the fancy-git installer script, using this terminal command:
curl -sS https://raw.githubusercontent.com/diogocavilha/fancy-git/master/install.sh | bash

Afterwards, close your terminal window and then reopen it. This reloads your Bash configuration and makes the installed fonts available for configuration. You’ll already see your newly color themed Bash prompt.
Apply the recommended Git color configuration
For properly displaying colors in the Git themed Bash prompt, run the following command:
fancygit --suggested-global-git-config-apply
If you are curious about what exactly this does, you can run the fancygit --suggested-global-git-config command.
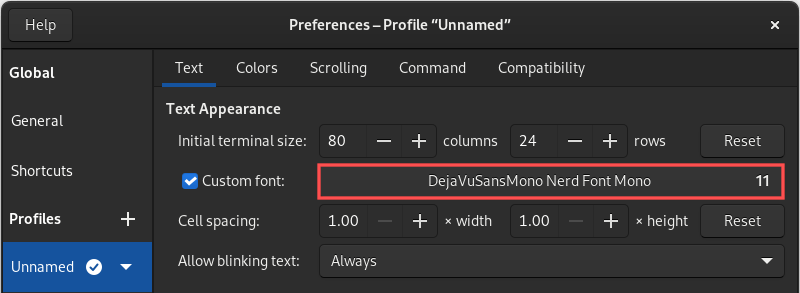
Select a terminal font that can properly render the icons and symbols
Your currently configured font for the terminal most likely cannot display the icons and symbols that fancy-git outputs in your Bash prompt. For this reason, you should reconfigure the font for your terminal. Select either:
DejaVuSansMono Nerd Font MonoJetBrainsMono Nerd Font Mono
Disable the time display
By default, fancy-git displays the time at the start of the Bash prompt. I personally don’t prefer this and luckily, you can disable it with command:
fancygit --disable-time
Verify that the Git branch name shows in your Bash prompt
Now that we completed the installation of fancy-git, let’s see what it can do. Open your terminal and browse to the directory of a cloned git repository. You’ll see a little icon appear in the prompt, which indicates that you are inside a Git repository. Additionally, your Bash prompt now ends with the name of the Git branch:

Let’s see what happens when we modify a file inside the cloned Git repository. I’ll use the following command to modify the README.md file, by appending a new line:
echo 'Adding a new line.' >> README.md
You’ll notice that the color of the Git branch inside the Bash prompt changes to yellow. You can also see a pencil icon appear in the Bash prompt. This indicates that files were changed inside the currently checked out Git branch:

In preparation for committing the modifications, you first stage the affected files:
git add README
After this operation, the color of the Git branch inside the Bash prompt changes to green. The pencil icon also changed to one that files were stages and ready for commit.

As the next logical Git operation, you commit the staged files:
git commit -m "Updated the readme."
Now the color of the Git branch inside the Bash prompt changes back to the initial white. The icon also updates to indicate that we are one commit ahead of the remote origin branch.

This reminds us that we still need to push the changes to the remote repository (git push origin master). Afterwards the Bash prompt goes back to showing the Git branch name in a white color and no additional status icons.
Change the color theme of your Git info enhanced Bash prompt
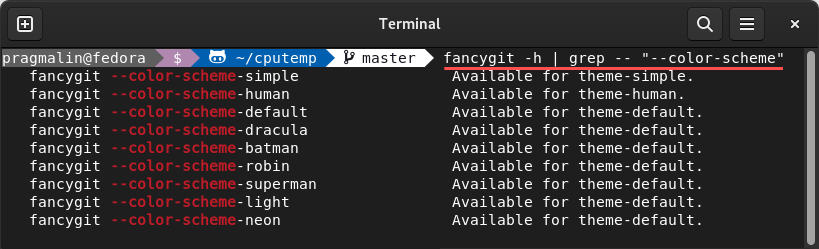
In my opinion, the default color theme of the Git enhanced Bash prompt looks pretty good already. However, I realize that this is subjective. You might want to try something different. For this purposes fancy-git includes multiple color themes. You can retrieve a list of all available color themes with this command:
fancygit -h | grep -- "--color-scheme"
To change to a different color theme, you just need to run the command as displayed in the above screenshot. For example, to change to the neon theme, run command:
fancygit --color-scheme-neon

To revert back to the default color theme, run command:
fancygit --color-scheme-default
Removal
If for some reason, you do not like your Git enhanced Bash prompt, you can remove fancy-git with the help of the uninstall Bash script. To automatically download and run the fancy-git uninstaller, use this terminal command:
curl -sS https://raw.githubusercontent.com/diogocavilha/fancy-git/master/uninstall.sh | bash
Afterwards, close your terminal window and then reopen it. Optionally, you can revert to the terminal font that was initially configured.
Wrap up
When working with Git directly in the terminal, it’s easy to loose track of the active branch and its current state. With the help of fancy-git, you can:
- Show the name of the active Git branch in the Bash prompt.
- Display Git branch status information in the Bash prompt.
This tutorial explained how to install fancy-git, for showing the name of the Git branch and its status in your Bash terminal prompt.
Follow this link for more Git related tutorials: