 by
by The relatively new Raspberry PI Imager application is great for downloading, configuring and writing the Raspberry PI operating system to your micro SD card. No more fiddling around with dd command-line parameters in the terminal. There is just one snag if you run Linux: the Raspberry PI Imager application is currently only packaged for Ubuntu. This article explains how you can install the Raspberry PI Imager on other Linux distributions as well, such as Debian, Fedora and openSUSE.
Background
If you worked with a Raspberry PI before, you undoubtedly know how to install the Raspberry PI operating system. In fact, you probably completed the following steps several times already:
- Download the image of the Raspberry PI operating system to your PC.
- Plug the micro SD card into your PC.
- Write the Raspberry PI operating system image to the micro SD card.
- Insert the micro SD card into your Raspberry PI.
- Power up your Raspberry PI to boot the Raspberry PI operating system.
This article focuses on step 3, where you write the image of the operating system to the micro SD card. Several programs exists for achieving this step on Linux:
- Directly in the terminal with the help of the
ddprogram from the terminal. - Installing Balena Etcher to have a more user-friendly graphical user interface application.
You can find an example of using the dd program for this purpose in the article about setting up your Raspberry PI 4 as a headless server. Refer to the article about how to perform a minimal install on your Raspberry PI for an example that features Balena Etcher.
What you might not yet know is that the Raspberry PI foundation developed their own tool for this. It’s called the Raspberry PI Imager.
Raspberry PI Imager introduction
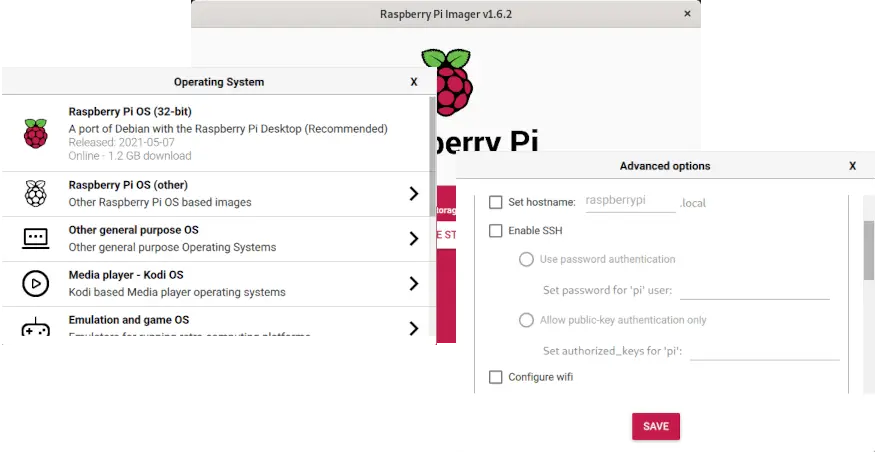
The Raspberry PI Imager was first released in early 2020. It’s an easy-to-use graphical user interface application that ships with a few extra perks:
- Through the user interface, you can select which operating system you want to install, and the Raspberry PI Imager will download it automatically for you.
- With the Raspberry PI Imager you can restore the EEPROM bootloader on your Raspberry PI and configure the boot order.
- It has a hidden advanced options screen (Ctrl+Shift+x) to preconfigure the Raspberry PI operating system. For example changing the default hostname, enabling SSH and configuring the WiFi network connection.
I can highly recommend using the Raspberry PI Imager application for installing the operating system on the micro SD card of your Raspberry PI. Did I get you interested? Great! There is just one little snag: If you go to the Raspberry PI website to download it, you can only download it for Windows, macOS and Ubuntu. Well, wait a minute…what about the other popular Linux distributions such as Debian, Fedora and openSUSE? No worries. PragmaticLinux has your back. I spent the past few days packaging the Raspberry PI Imager software for Ubuntu, Debian, Fedora and openSUSE. The result is hosted on the openSUSE Open Build Service (OBS) infrastructure. In this article, I’ll explain in detail how to install the Raspberry PI Imager application on Ubuntu, Debian, Fedora and openSUSE.
What do you need
To complete the steps in this article, you just need one thing: an Ubuntu, Debian, Fedora or openSUSE Linux system with your desktop environment of choice. While packaging up the Raspberry PI Imager software from the rpi-imager source code repository on GitHub, I prepared VirtualBox virtual machines for all these Linux distributions. That way I could test the resulting DEB and RPM packages.
openSUSE Open Build Services introduction
The nice folks over at openSUSE offer the Open Build Services infrastructure for free to developers and packagers of open source software for Linux. If software is missing from your Linux distribution’s online package repositories, you can package it into a DEB or RPM formatted archive and host it on openSUSE’s OBS platform. OBS of course supports openSUSE Leap and Tumbleweed. What not everyone knows or realizes is that you can build and host packages for other Linux distributions on OBS as well.
Locating the Raspberry PI Imager application on OBS
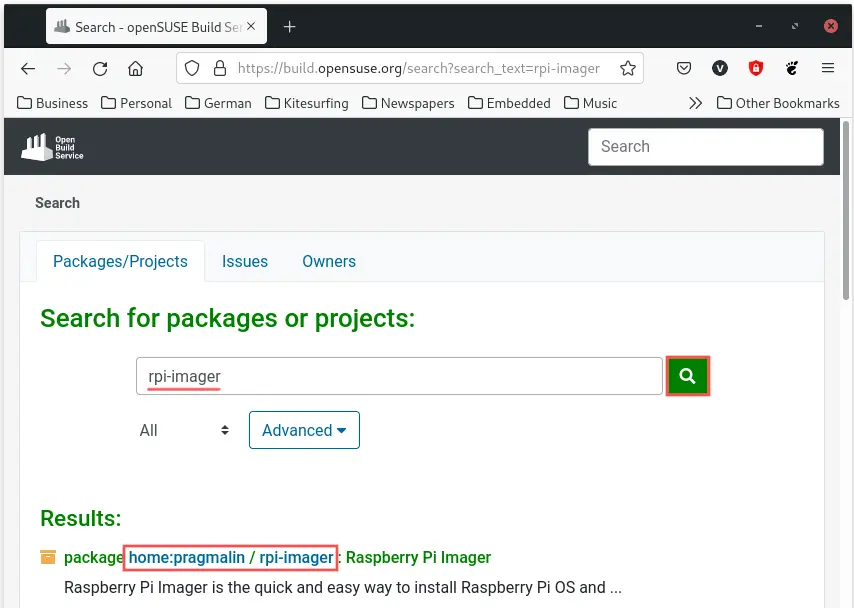
To locate the Raspberry PI Imager packages on PragmaticLinux’s OBS account, visit the OBS website at https://build.opensuse.org/ and enter rpi-imager in the search box. In the search results, you can see a link to home:pragmalin / rpi-imager:
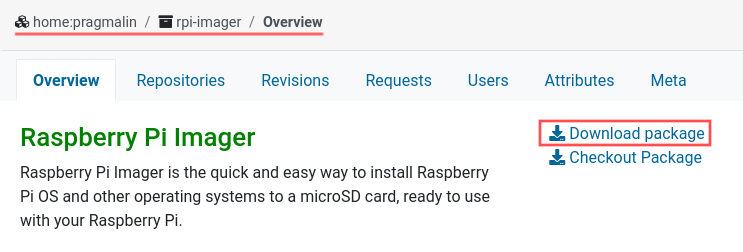
On the rpi-imager project page of PragmaticLinux’s OBS account, you can find a link called Download package. Following this link, gives you access to the DEB and RPM packages of the Raspberry PI Imager application.
On the next screen you can see an overview of the Linux distributions for which the rpi-imager package is available:
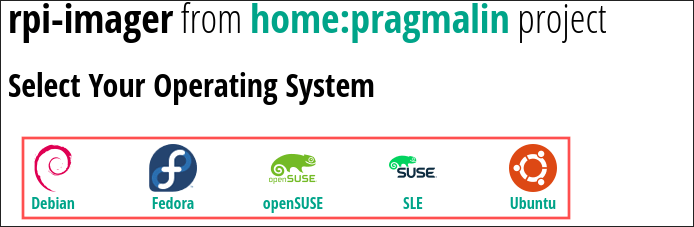
The next sections describe in detail how to install package rpi-imager of the Raspberry PI Imager application for Ubuntu, Debian, Fedora and openSUSE. It’s important to note though, that two options exist for the package installation:
- Download the DEB or RPM package file for your distribution and install it from the downloaded file, using your package manager. For example
apt,dnforzypper. - Register the online package repository of the
home:pragmalinOBS project with your package manager and then install it directly from the OBS online package repository.
Both options work of course. Personally, I prefer option number two. Simply because then you also get fixes and new versions, when updating the software packages on your Linux system. For this reason, the following sections focus on option two.
Install the Raspberry PI Imager on Ubuntu
Now that you know how to find the rpi-imager package on PragmaticLinux’s OBS account, click the Ubuntu icon. Followed by clicking the Add repository and install manually link. It shows you the instructions for registering the repository of the home:pragmalin OBS project on your Ubuntu system. Including the commands from installing the rpi-imager package afterwards. For Ubuntu 24.04, the commands are:
echo 'deb http://download.opensuse.org/repositories/home:/pragmalin/xUbuntu_24.04/ /' | sudo tee /etc/apt/sources.list.d/home:pragmalin.listcurl -fsSL https://download.opensuse.org/repositories/home:pragmalin/xUbuntu_24.04/Release.key | gpg --dearmor | sudo tee /etc/apt/trusted.gpg.d/home_pragmalin.gpg > /dev/nullsudo apt updatesudo apt install rpi-imager
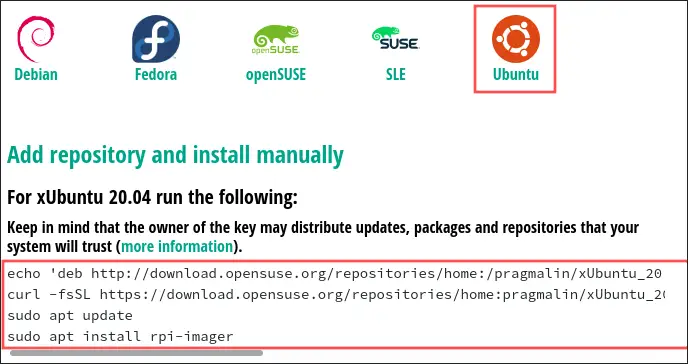
Go ahead and run these commands in the terminal to install package rpi-imager of the Raspberry PI Imager application on your Ubuntu 20.04 system.
Install the Raspberry PI Imager on Debian
Since Ubuntu and Debian both use the DEB package file format, the instructions are quite similar for Debian. This time click on the Debian icon to display the instructions to add the repository of the home:pragmalin OBS project and then install the rpi-imager package. For Debian 12, the commands are:
echo 'deb http://download.opensuse.org/repositories/home:/pragmalin/Debian_12/ /' | sudo tee /etc/apt/sources.list.d/home:pragmalin.listcurl -fsSL https://download.opensuse.org/repositories/home:pragmalin/Debian_12/Release.key | gpg --dearmor | sudo tee /etc/apt/trusted.gpg.d/home_pragmalin.gpg > /dev/nullsudo apt updatesudo apt install rpi-imager
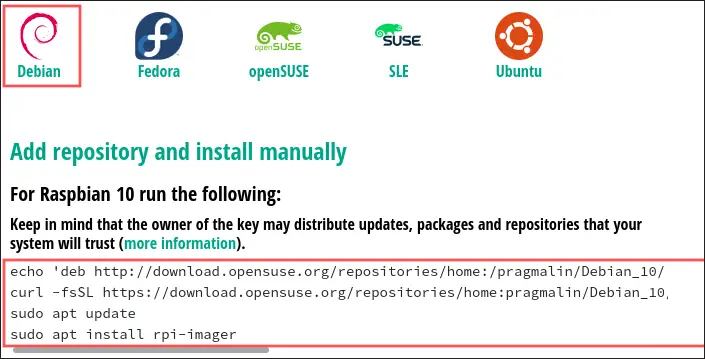
Run these four commands from the terminal, to install the Raspberry PI Imager application on your Debian 10 system.
Install the Raspberry PI Imager on Fedora
You can follow a similar procedure for installing the Raspberry PI Imager on Fedora. So click the Fedora icon, followed by a click on the Add repository and install manually link. On Fedora, you only need to run two commands to adding the repository and installing package rpi-imager. Example for Fedora 42:
dnf config-manager addrepo --from-repofile=https://download.opensuse.org/repositories/home:pragmalin/Fedora_42/home:pragmalin.reposudo dnf install rpi-imager
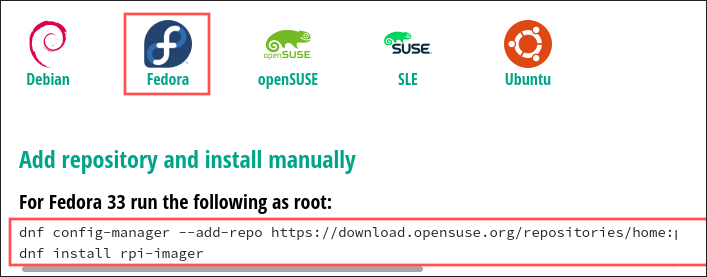
Just note that the instructions state that the commands need to run as root. For this reason, you should add sudo to the start of the commands.
Install the Raspberry PI Imager on openSUSE
By now, you probably get the idea and you can probably figure out how to install the Raspberry PI Imager on openSUSE as well. Just bear in mind that openSUSE offers two flavors of their distribution:
- A fixed release cycle distribution called openSUSE Leap.
- A true rolling release distribution called openSUSE Tumbleweed.
When installing the Raspberry PI Imager on openSUSE, you just need to make sure you pick the instructions for the right one. Example for openSUSE Tumbleweed:
zypper addrepo https://download.opensuse.org/repositories/home:pragmalin/openSUSE_Tumbleweed/home:pragmalin.reposudo zypper refreshsudo zypper install rpi-imager
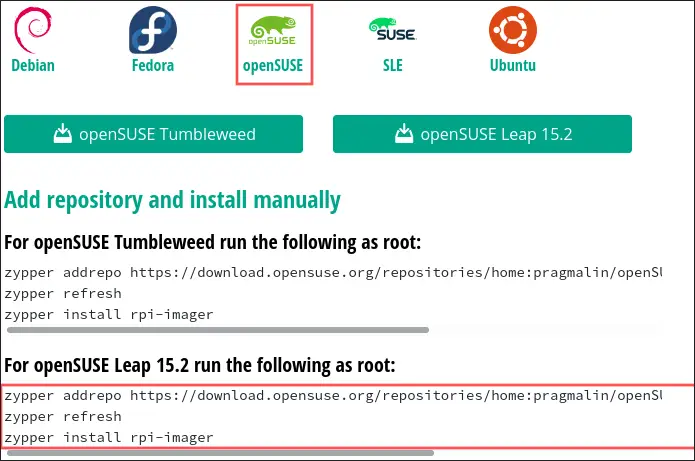
Keep in mind that the instructions state that the commands need to run as root. Therefore add sudo to the start of the commands.
Running the Raspberry PI Imager application
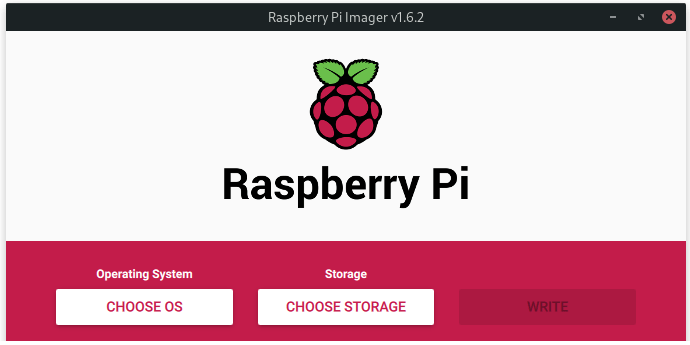
At this point, you completed the installation of the Raspberry PI Imager application onto your Linux system. The installation also created a desktop launcher for you. It’s in file /usr/share/applications/rpi-imager.desktop. This means that you can conveniently locate and run the Raspberry PI Imager application, using the application’s menu of your desktop environment.
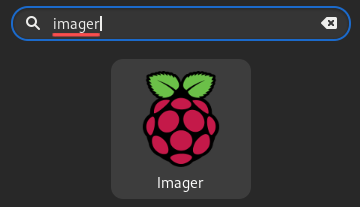
Most desktop environments offer a search feature for the application menu. To locate the Raspberry PI Imager application, enter the search text rpi or imager. Once located you can start the Raspberry PI Imager application:
Wrap up
With the Raspberry PI Imager application you can quickly and easily write an operating system image to the micro SD card for your Raspberry PI. The Raspberry PI Imager comes with a few extra benefits compared to other solutions:
- The Raspberry PI Imager application automatically downloads the operating system image for you. You merely need to select the one you want.
- With the Raspberry PI Imager you can restore the EEPROM bootloader on your Raspberry PI and configure the boot order.
- It has a hidden advanced options screen (Ctrl+Shift+x) to preconfigure the Raspberry PI operating system. For example changing the default hostname, enabling SSH and configuring the WiFi network connection.
This article introduced the Raspberry PI Imager application and specifically focused on how to install it onto your Linux system. At this point the Raspberry PI foundation only offers a package for Ubuntu. To make the Raspberry PI Imager software available to other popular Linux distributions, I packaged it and hosted the resulting DEB and RPM packages on the openSUSE OBS infrastructure. You can find it in PragmaticLinux’s account on OBS.
In a future article I plan on writing a tutorial on how to actually use the Raspberry PI Imager application. So keep your eye on the PragmaticLinux blog or, better yet, subscribe to the weekly newsletter to stay informed about new article releases. You can find the newsletter subscription sign-up box in the sidebar, towards the top of this page.