 by
by Looking for a way to increase the security on your Raspberry PI? Changing the default password for the pi user is the recommended first step. Better would be if you change the default username as well. One approach is to create a brand new user account and then completely delete the pi user from your Raspberry PI. This tutorial explains how to achieve exactly that. It’s one of the first things I recommend you do, right after installing the Raspberry PI operating system.
Background
A Raspberry PI offers a wonderful and hands-on entry into the world of Linux. Write the Raspberry PI operating system to your SD card, insert the SD card, plug in the power and voilà, your Linux system boots. Once booted, you can login with the universally known default username pi and default password raspberry.
Quick and easy to get started, but this default username and password also offers a security threat. Everyone knows these are the defaults. The moment someone ill-intentioned finds out you that run a Raspberry PI, the first thing they try is to remotely log in, using these credentials. Not a major concern if you merely run your Raspberry PI on your local network and you trust all others in your household. However, it’s always better to be safe than sorry.
If you enabled SSH access on your Raspberry PI, and log in to it, the OS even reminds you of this security issue:
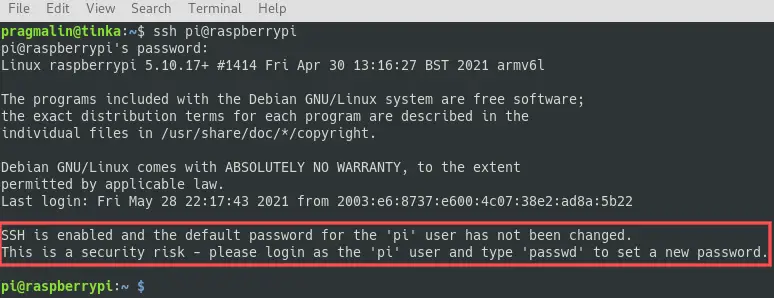
Its proposed solution is to change the password for the pi user. It even offers a convenient way for doing so, with the help of the raspi-config tool. Personally, I prefer to create a new user account with a different username. Then afterwards you can delete the pi user from your Raspberry PI. It’s harder for outsiders to guess both the username and password combination, then just the password. This tutorial explains how you can add a new user account on your Raspberry PI and delete the pi user afterwards, for improved security. I recommend doing this right after you installed the Raspberry PI operating system.
What do you need
To complete the steps in this article, you need a Raspberry PI. Ideally, one where you already installed the Raspberry PI operating system on. Which type of Raspberry PI doesn’t matter. You can have a keyboard, mouse and display attached to it, or remotely log in via SSH. That’s up to you.
For this article I decided on using my Raspberry PI Zero W. I installed the Lite edition of the Raspberry PI operating system, as explained in the tutorial about how to perform a minimal install on your Raspberry PI. I’ll use SSH to remotely connect to it.
Create a new user on your Raspberry PI
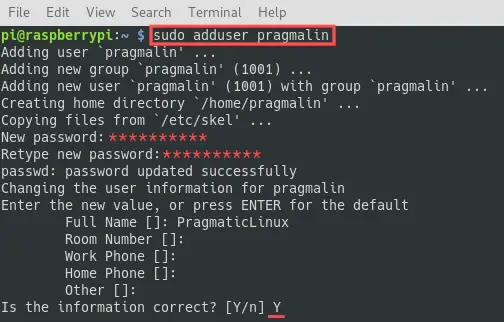
We’ll start with creating a new user first. Open up a terminal on your Raspberry PI, or SSH into it, and type the command:
sudo adduser [USERNAME]
Replace [USERNAME] with the username you prefer for the new account. I’ll go with pragmalin in the examples. After running the command, answer the questions regarding the new user account. At least enter the password for the user account:
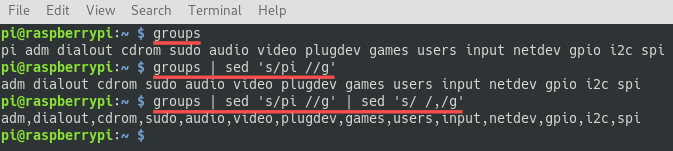
With the new user account created, we continue by adding the user to the exact same groups as the pi user belongs to. Excluding the user specific pi group itself. We don’t need that one, as we will remove it when deleting the pi user later on. With the help of some command piping, we can achieve this step with a one-liner command:
groups | sed 's/pi //g' | sed 's/ /,/g' | xargs -I{} sudo usermod -a -G {} [USERNAME]
When running this command, don’t forget to replace [USERNAME] with the username of the new account you just created. In my case pragmalin:

This command basically creates a comma separated list of the groups that the pi user belongs to, but removes the pi group. With the help of the xargs command, we then feed the resulting list into the usermod command. The {} after the -G parameter becomes the group list.
Although optional, you could run the first three commands manually to better understand what we did here:
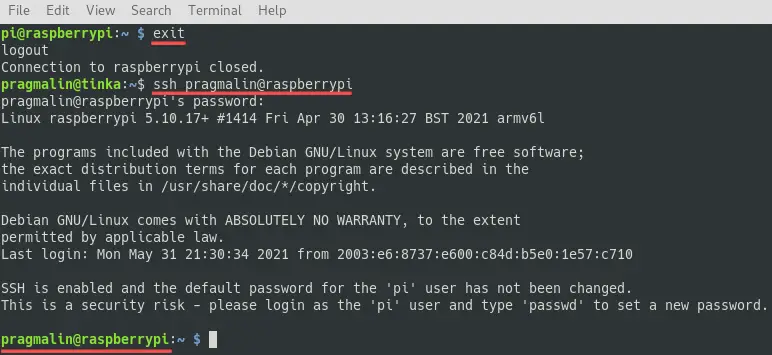
Before moving on to the next section, log out the pi user and log back in, with the credentials of the newly created user account. In my case I do this with SSH. If you run the Raspberry PI operating system with a desktop environment, you can do this with the login manager.
Copy the pi user’s home directory
On a new install of the Raspberry PI operating system, you can skip this section. If you already used your Raspberry PI operating system for a bit, you probably already stored some files in the home directory of the pi user. Later on we intend to completely delete the pi user account, including the contents of its home directory. Therefore it might be a good idea to copy the contents of the pi user’s home directory, to the home directory of the newly created user.
The command for copying the entire contents of a directory to another directory:
cp -R [SOURCE]/. [DESTINATION]
Note that the /. after the [SOURCE] directory is important. You only want the contents inside the [SOURCE] directory. Otherwise you end up with a [SOURCE] subdirectory. The -R flag makes the copy operation recursive, so including all subdirectories and their content.
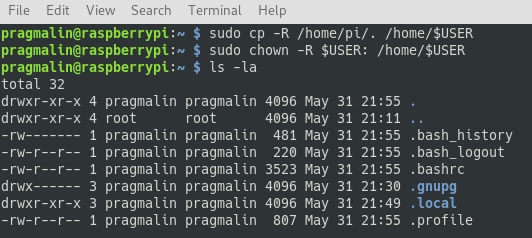
Run the following command, assuming that you are logged in as the new user:
sudo cp -R /home/pi/. /home/$USER
The files from the /home/pi are owned by the pi user. Therefore we used sudo. It also means that we still need to change the owner to the new user ($USER). The following command makes sure the new user owns all the files and directories in its home directory, including those we just copied:
sudo chown -R $USER: /home/$USER
Reconfigure the user to automatically login
If you installed the Lite version of the Raspberry PI operating system, so without a desktop environment, you can skip this section. By default, the Raspberry PI operating system automatically logs the pi user into the desktop environment. We need to reconfigure this, such that it logs in our new user instead. Otherwise, it will still start a few processes owned by the pi user, making it not possible to properly delete the pi user for your Raspberry PI operating system.
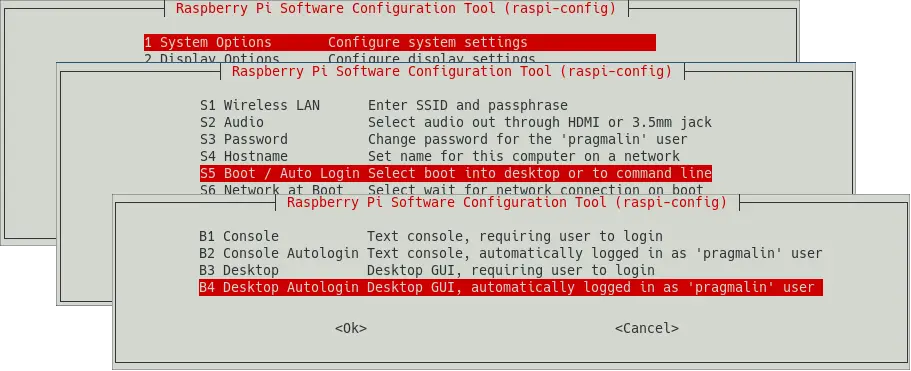
The raspi-config tool enables us to change the user that it automatically logs in upon startup. Go ahead and open a terminal and start the raspi-config tool:
sudo raspi-config
Next, select System Options → Boot / Auto Login → Desktop Autologin. Note that you can also select Desktop instead of Desktop Autologin, if you want to disable the automatic login feature. After making this configuration change, exit the raspi-config tool by selecting Finish on the main screen.
Delete the pi user from your Raspberry PI
At this point we created and configured the user account for our new user. As a next step we completely delete the pi user from our Raspberry PI. This last step is actually the easiest part. You just need to open up the terminal and run the following command:
sudo deluser --remove-home pi
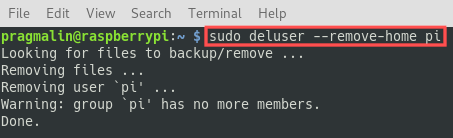
The pi user is now officially gone, including its home directory. If you’d rather keep its home directory, then omit the --remove-home part from the command.
Wrap up
This article explained how you can delete the pi user from your Raspberry PI operating system. We completed the following steps:
- Created a new user account that will replace the
piuser. - Merged the contents of the
piuser’s home directory with the home directory of the newly created user. - Reconfigured the user that the operating system automatically logs in to the desktop environment.
- Deleted the
piuser account from the Raspberry PI, including the removal of its home directory.
The result is a more secure Raspberry PI operating system, because an unwanted third-party can no longer log in user the default pi user account. In case you enabled the SSH server for your Raspberry PI, consider configuring logins with an SSH key pair. This further hardens the security and gives you more convenience, because you can login without having to specify a password. Refer to this tutorial for more details: