 by
by So you want to install Linux on your PC. You eagerly downloaded the ISO image of your Linux distribution of choice. You realize your PC did not come with a CD or DVD drive anymore. No problem, because you found out that your PC can also boot directly from a USB drive. But how do you create a bootable USB drive from the downloaded Linux ISO image? Grab your USB drive, a beverage of choice and read on, as that is exactly the question I’ll answer in this article.
Background
When you want to install Linux or boot a Linux live environment, you start by downloading the installer or live environment from the Internet. For example the Debian network installer or Clonezilla live release. The actual file you downloaded has the .iso extension. This file is an ISO image, which is short for optical disc image. As the name implies, you write this ISO image file to a CD or DVD and then boot your PC from this CD or DVD.
Nowadays desktop PCs, and specifically laptops, no longer feature a CD or DVD drive to boot from. What to do? Well, you can chose between the following two options:
- Purchase an external CD or DVD drive.
- Create a bootable USB drive from the Linux ISO.
Option one strikes me as cumbersome. The BIOS of all modern PCs offer support to boot from a USB drive. Chances are that you have a USB drive of a few GB lying around somewhere already. This makes option two the more viable and preferable one. This leads to the question: “How do I write the Linux ISO image to my USB drive, such that my PC can boot from it”? That is exactly the topic of this article.
In this article, I’ll explain how you can create a bootable USB drive from a Linux ISO image. To cover all bases, I’ll present two different methods: One where we just use graphical user interface programs and one where we do everything directly in the terminal.
What do you need
This article assumes you already have Linux running somewhere. It could be on a regular PC or laptop, a Raspberry PI or simply a virtual machine. Besides that, you just need a USB drive such as a memory stick of a few Gigabytes. Since Linux ISO images are originally meant for optical disks, an ISO image will typically not be larger than 4.7 GB. Therefore a USB drive of 8 GB or more works perfectly.
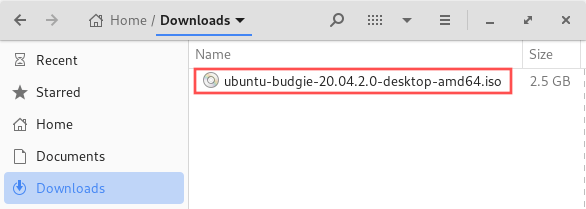
Since our goal is to create a bootable USB drive from a Linux ISO image, we’ll need an ISO image. You probably already downloaded an ISO image. If not and you are looking for one to test with, you could give Ubuntu Budgie a try. I downloaded the Ubuntu Budgie ISO image myself for this article:
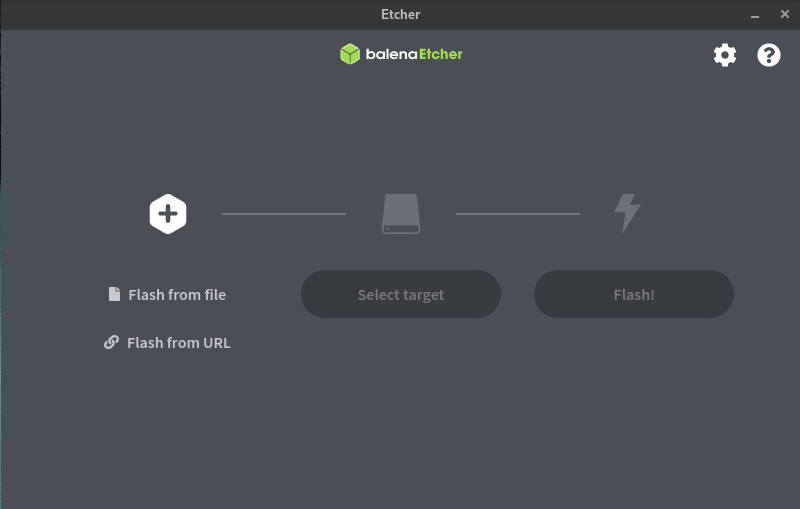
Write the ISO file to the USB drive with Balena Etcher
The first method, where we’ll just use graphical user interface programs, builds on Balena Etcher. It’s a free and open source application that makes writing ISO images to a USB drive a breeze. Note that you can even use it to write operating system images to an SD-card. Especially handy for those that work with Raspberry PIs. The article about installing a minimal Raspberry PI operating system explains how to use Balena Etcher for that purpose.
Install Balena Etcher
As a first step, we’ll install Balena Etcher on our Linux system. If you already installed it previously, you can skip this section. The following commands install Balena Etcher on a Debian or Ubuntu based Linux system. Head over to the Balena Etcher GitHub repository for detailed installation instructions, in case your run a different Linux distribution.
Installing Balena Etcher on Debian or Ubuntu:
curl -1sLf 'https://dl.cloudsmith.io/public/balena/etcher/setup.deb.sh' | sudo -E bashsudo apt updatesudo apt install balena-etcher-electron
In case Balena Etcher doesn’t start, have a look at this fix.
Write the ISO file to the USB drive
Make sure you plugged the USB drive into your PC at this point. Next, start Balena Etcher. You can find its launcher in your desktop environment’s application menu. To create a bootable USB drive from a Linux ISO image, perform these steps:
- Select Flash from file and select your Linux ISO image in the file open dialog.
- Click the Select target button and pick your USB drive from the list of available drives.
- To start writing the ISO file to the USB drive, click the Flash! button.
- Once completed, you can simply close the Balena Etcher application.
Here is a screen animation that demonstrates these steps:
In case you get an error dialog stating that the process ended unexpectedly, simply try again. This probably meant that the USB drive was still mounted. On the second try it should work.
Write the ISO file to the USB drive with dd
In contrast to the previous section, in this section we’ll use just the terminal to create a bootable USB drive from a Linux ISO image. The powerful dd utility program makes this possible.
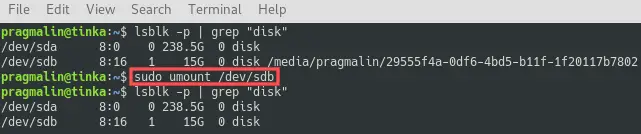
Identify the device name
When using the dd program to write the ISO file to the USB drive, it is extremely important that you select the correct device name. So as a first step, we need to identify the device name. Make sure you plugged the USB drive into your PC at this point. Next, open the terminal and run this command to list all disk drives known to your Linux system:
lsblk -p | grep "disk"

As you can see in the previous screenshot, my Linux system knows about two disks. I know that my USB drive is around 16 GB in size, so the second one must be my USB drive. This means the device name of my USB drive is /dev/sdb.
If your Linux system lists multiple drives and you are not sure which one is your USB drive, simply do the following:
- Make a (mental) note of the current listed disk drives.
- Unplug your USB drive and run the
lsblk -p | grep "disk"command again. - Determine which device name disappeared. That one was your USB drive.
- Now that you know which one was your USB drive, plug it back in.
- Run the
lsblk -p | grep "disk"command one last time. Identify your USB drive and write down its device name.
In the next sections I’ll use the
/dev/sdbdevice name in commands, to identify my USB drive. Make sure to replace the device name with the one of your USB drive on your Linux system.
Make sure the USB drive is not mounted
The last terminal screenshot helped me figure out the device name of my USB drive. Furthermore, it showed me that the USB drive is currently mounted. Somewhere in /media/pragmalin/. Before we can write an ISO file to the USB drive, we need to make sure it is not mounted. Use the following command syntax to unmount your USB drive:
sudo umount [DEVICE NAME]
So in my case I ran the command sudo umount /dev/sdb to unmount my USB drive. Note that you can use the lsblk -p | grep "disk" afterwards to verify that the mount point directory is no longer listed. This means the USB drive unmounted successfully:
Write the ISO file to the USB drive
With the USB drive unmounted, we can continue with writing the actual ISO file to the USB drive. As mentioned earlier, we’ll use the dd program for this. If you are curious about the dd program, you can run man dd in the terminal to open its user manual.
The syntax for writing an ISO file to the USB drive with dd :
sudo dd if=[ISO FILE] of=[DEVICE NAME] bs=4M conv=fdatasync status=progress
Replace [ISO FILE] with the actual full path to the ISO file and [DEVICE NAME] with the device name of your USB drive. In my case, I ran this command from the ~/Downloads directory, where the ISO file is located:
sudo dd if=ubuntu-budgie-20.04.2.0-desktop-amd64.iso of=/dev/sdb bs=4M conv=fdatasync status=progress

Wrap up
While working your way through this article, you learned two methods for creating a bootable USB drive from a Linux ISO image:
- With the help of Balena Etcher we could do everything comfortably with a graphical user interface program.
- Using the good old
ddcommand, we could do everything directly in the terminal.
Both methods work just fine and personal preferences determines which one you should use. Personally, I like the Balena Etcher approach. That way I do not have to remember or lookup the dd command syntax.