

 by
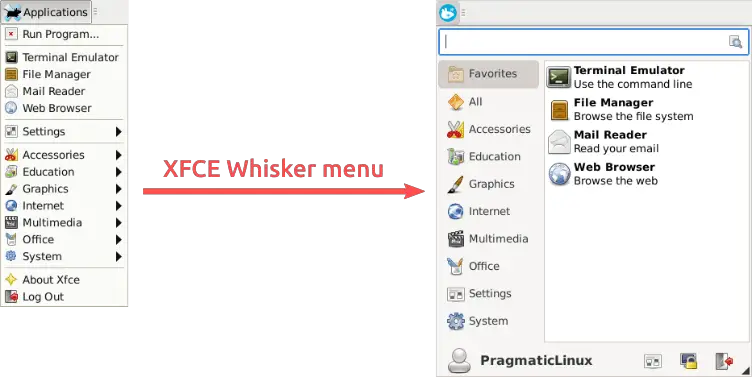
by Disappointed after first seeing the plain vanilla XFCE desktop environment? Do not let the default theming discourage you. XFCE can easily be tweaked to look as appealing as any modern desktop environment. For starters, I recommend replacing the default XFCE start menu with the Whisker menu. It looks better and offers an improved work flow. This article describes how to install and configure the Whisker menu as your XFCE start menu.
Background
The XFCE desktop environment hits the sweet spot when balancing responsiveness, resource usage and easy-of-use. XFCE is my goto desktop environment for lower performance systems. For example old PCs, virtual machines and Raspberry PIs.
Some Linux distributions, such as Debian and Fedora, install a plain vanilla version of XFCE. When first presented with this version, you might get a flashback to your Windows 95/98/XP days, especially the default start menu. Don’t let this fool you though. With just a few simple steps, you can make XFCE look and behave like a modern desktop environment.
In this article I’ll explain how to replace the default start menu with the so called Whisker menu. Not only does the Whisker menu look and feel more modern, it also enables a more productive work flow. No more mousing your way through the menu to locate the application you want to start. Instead, simply press the SUPER key, type the first few characters of the application name and hit ENTER to launch it.
What do you need
This article assumes you run Linux with the default XFCE configuration and theming. This probably means you either installed Debian, Fedora or Arch with the XFCE desktop environment. Most other Linux distributions such as openSUSE, Xubuntu, Manjaro offer their own branded version of XFCE that already includes the Whisker menu.
It could also be that you manually installed XFCE from scratch. I personally prefer this for my Raspberry PIs. I can highly recommend giving this a try. For more information, refer to the article about how to install the XFCE desktop environment on a Raspberry PI.
For this article, I prepared a clean install of Debian with the XFCE desktop environment. It runs as a VirtualBox virtual machine.
Install the XFCE Whisker menu plugin
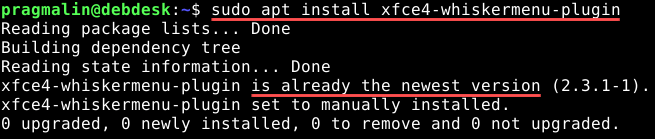
The XFCE Whisker menu is an official XFCE plugin. As such, all Linux distributions offer this plugin in their online package repositories. With other words, you can install the XFCE Whisker menu plugin conveniently with your distributions package manager:
- Ubuntu and Debian:
sudo apt install xfce4-whiskermenu-plugin - Fedora:
sudo dnf install xfce4-whiskermenu-plugin - openSUSE:
sudo zypper install xfce4-whiskermenu-plugin
Chances are that your distribution already installed the plugin by default, as a recommended dependency of the XFCE desktop environment. This is the case on Debian as you can see:
Add the Whisker menu to your XFCE panel
In this section we add the Whisker menu to the XFCE panel and remove the default applications menu. The Whisker menu is a plugin for the XFCE panel. Therefore, we can add and configure it through the Panel Preferences dialog.
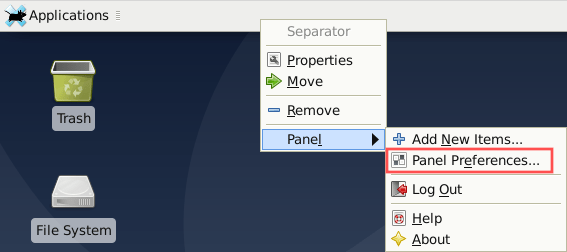
To access the Panel Preferences dialog, right-click an empty space on the XFCE panel. From the popup menu, select Panel → Panel Preferences:
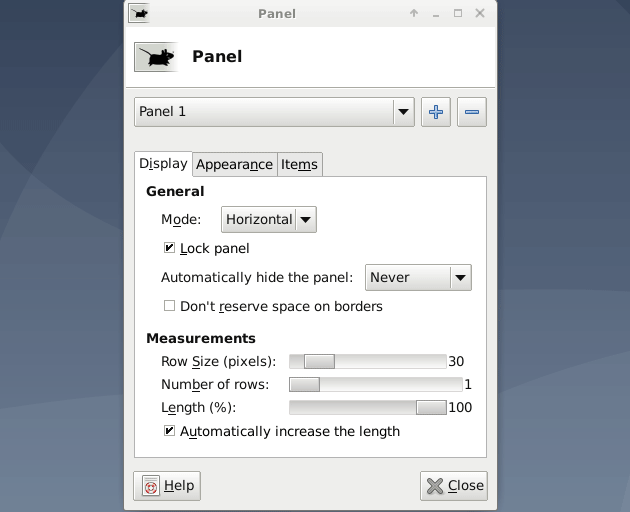
After the Panel Preferences dialog appeared, perform the following steps to add the Whisker menu and remove the default applications menu:
- Go to the Items tab.
- Click the Plus button to add a new item.
- Select the Whisker Menu and click the Add button.
- Close the Add New Items dialog.
- With the Whisker menu item selected, click the Arrow Up button a few times to bring it to the top.
- Select the Applications Menu and click the Minus button to remove it.
- Finish up by clicking the Close button.
Watch the following screen animation for further clarification on completing these steps:
After completing these steps, the Whisker menu shows up on your panel:
Configure the XFCE Whisker menu
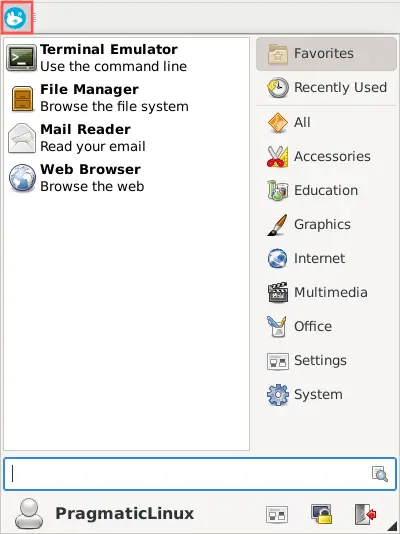
The default configuration of the Whisker menu works just fine. Personally, I prefer a slightly different configuration. I prefer the search box on the top, the application categories on the left and I do not need the Recently Used items.
You can change the Whisker menu configuration through its Properties dialog. To access this dialog, right-click the Whisker menu button on the XFCE panel. So the button you would normally left-click, to open the start menu. Next, select Properties from the popup menu.
The following screenshot shows my preferred configuration of the Whisker menu:

Feel free to play around with these settings yourself, to settle on the configuration that you like.
Use the super key to open the XFCE whisker menu
The SUPER key is basically the ⊞ WIN or the ⌘ CMD key on your keyboard. Most Linux desktop environments make it possible to simply hit the SUPER key to open up the applications menu. Once opened, you can start typing the first few characters of the application to launch. The search results then automatically highlight the best match. With the application highlighted, you can start it by pressing ENTER. Here’s a screenshot of what I mean with this:
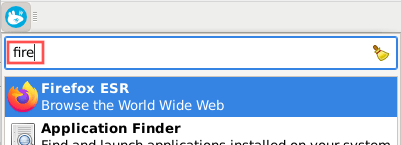
In the screenshot, I want to start the Firefox browser. I simply type just fire until Firefox is highlighted and then hit ENTER to launch it.
I highly prefer this work flow. It makes me feel much more productive. Unfortunately, by default the XFCE Whisker menu does not open, when you press the SUPER key. This section explains how to fix that.
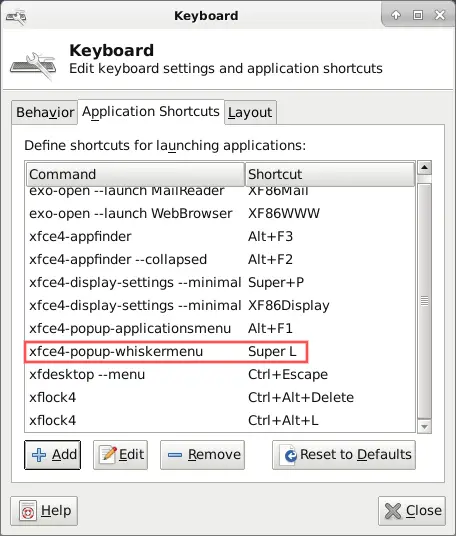
Open the XFCE Whisker menu, goto the Settings category and select Keyboard. This opens up the Keyboard settings dialog. On the Application Shortcuts tab, we can create a new shortcut. Here’s how to add a new keyboard shortcut for opening up the XFCE Whisker menu after pressing the SUPER key.
- Click the Add button. The Shortcut Command dialog opens up.
- Enter
xfce4-popup-whiskermenuin the edit box and click the OK button. - You’ll get prompted to press the keyboard key you want for opening up the XFCE Whisker menu.
- Press the SUPER key on the keyboard, so the ⊞ WIN or the ⌘ CMD key.
- Once done, you can click the Close button on the Keyboard setting dialog.
That’s it. If you now press the SUPER key on your keyboard, you’ll notice that it opens up the XFCE Whisker menu.
Wrap up
In this tutorial we replaced the default applications menu with the versatile Whisker menu on your XFCE desktop. The Whisker menu gives your XFCE desktop a modern look. More importantly, it enables a more productive work flow in XFCE, if configured to open up after pressing the SUPER key on your keyboard. You can then simply press the SUPER key, type the first few letters of the application name and hit ENTER to launch it. Quick, convenient and no need for a mouse at all for starting applications.

2 thoughts on “Install and configure the Whisker menu as your XFCE start menu”
Comments are closed.