 by
by Wouldn’t it be great if GIT supported a command like “svn export”? Developers that made the switch from Subversion to GIT can relate to this question. With the “svn export” command, you can obtain a clean directory tree of your repository. That means without any version control related files. Think .git directory or those .gitignore files. Unfortunately, no “git export” command exists. This article presents a few different approaches that resembles what “svn export” does, but then using GIT.
Background
The two predominant version control systems are GIT and Subversion (SVN). With GIT taking the lead in popularity since the year 2014. When you plan on learning a version control system at this point in time, GIT should definitely be your first choice. Especially if you take into account the excellent GitHub and GitLab web applications, where you can host your GIT repositories for free.
When I made the switch from SVN to GIT a few years back, I was skeptical at first. GIT being a distributed version control system, made it appear unnecessarily complex. Especially when you are used to SVN’s centralized approach. Once I got the hang of GIT, I realized that it offers many benefits that outweigh the added complexity of dealing with a distributed version control system. To name a few:
- Branching is easier.
- It’s faster.
- Supports working off-line.
There is just one thing that I miss in GIT, namely a git export command. So being able to export a clean directory tree. With clean I mean without any version control related files in it, such as the .git directory and .gitignore files.
Such an export of a clean directory tree, belongs to my standard workflow for making a new software release:
- Create a new version tag.
- Export the clean directory tree.
- Build documentation, binaries or whatever else you want to include in the release archive.
- Create the release archive, such as
ziportar.gz, and publish it
This articles presents a few approaches that enables you to do a git export similar to what you can do with svn export.
What do you need
This article assumes you already installed GIT on your Linux system. The following list shows the installation instructions to install GIT on popular Linux distributions:
- Debian/Ubuntu/Raspberry PI:
sudo apt install git - Fedora:
sudo dnf install git - openSUSE:
sudo zypper install git
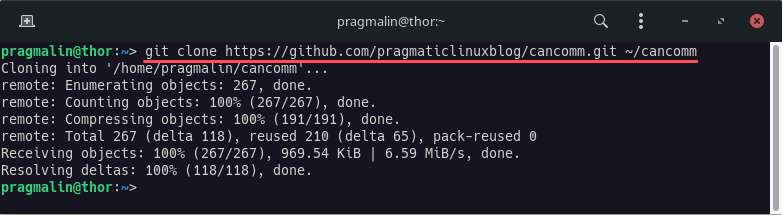
For testing out the different git export approaches, it helps if you already cloned a GIT repository. For demonstration purposes, we can use the LibCanComm repository. LibCanComm is a Linux shared library for convenient access to CAN communication, based on the SocketCAN kernel functionality. Run this command to clone the LibCanComm repository to the cancomm subdirectory of your user’s home directory:
git clone https://github.com/pragmaticlinuxblog/cancomm.git ~/cancomm
Install git-archive-all from PyPI
To create something that resembles the svn export command for GIT, we’ll rely on the external git-archive-all program. This little gem of a Python program can export the contents of the GIT repository into a compressed archive file. For example a .zip or .tar.gz file. For those that researched this topic a bit beforehand, you might wonder: Why not just use the readily available git archive command? One good reason: Because this command does not include files of submodules that your cloned GIT repository might include.
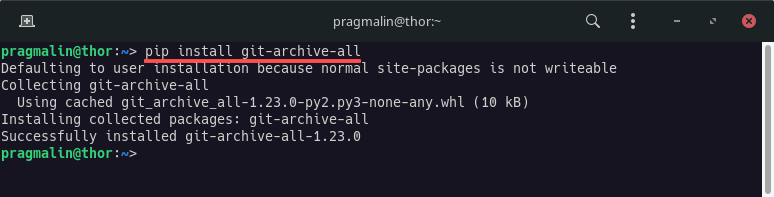
You can install the git-archive-all program directly from the Python package index website (PyPI). The command is:
pip install git-archive-all
Keep in mind though that this installs directly into your user’s Python environment. If you just want to test things out, you could install git-archive-all into a Python virtual environment, as explained in this article:
Alternatively (and my personally preferred method) is to install it with pipx. When installing a Python application with pipx, it automatically:
- Creates a new Python virtual environment for the application.
- Installs the Python application into this virtual environment.
- Adds the application’s executable to a location on your user’s PATH.
This essentially creates an isolated sandbox environment for the installed Python application. While at the same time making it convenient to use, because you can run the application right away.
Refer to this article for more details on installing git-archive-all with pipx:
Export the contents of a cloned GIT repository
With git-archive-all installed, let’s dive right in and see how we can use it to export the contents of our previously cloned GIT repository.
From the directory with the cloned repository
When running the command from within the cloned GIT repository, the command syntax looks like this:
git-archive-all [OUTPUTFILE]
Go ahead and run the following commands to try this out:
cd ~/cancomm
git-archive-all cancomm.tar.gz
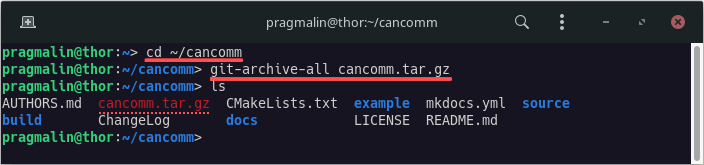
As you can see in the above screenshot, this created the compressed tarball archive cancomm.tar.gz in the same directory. If you want to output the archive file in a different directory, you can prepend the directory to the output filename. Example:
git-archive-all ~/Downloads/cancomm.tar.gz
The git-archive-all program automatically determines the archive type to create, based on the extension of the specified archive file. We wrote the .tar.gz extension, resulting in a compressed tarball. If you prefer working with ZIP archives instead, then simply give the output file the .zip extension. Example:
git-archive-all cancomm.zip
From any other directory
In the previous section, we first changed to the root directory of the cloned repository (cd ~/cancomm). When nothing else is specified, git-archive-all assumes that you run it from the directory with the cloned repository. Alternatively, you can run git-archive-all from any other directory and tell it about the location of the cloned repository. The command syntax for this approach looks like:
git-archive-all -C [CLONEDDIR][OUTPUTFILE]
For example, running the git-archive-all command from any directory and storing the created archive file in your user’s Downloads directory:
git-archive-all -C ~/cancomm ~/Downloads/cancomm.tar.gz

Export a specific GIT repository branch or tag
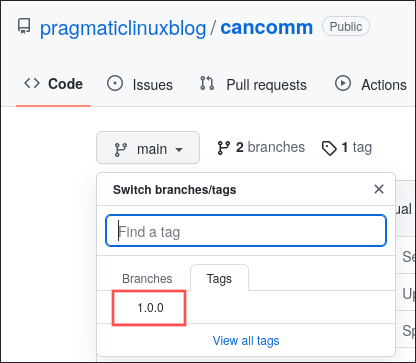
The git-archive-all program exports the currently active branch of the cloned GIT repository. In this article, we cloned the main branch of the LibCanComm repository. Often you want to export a branch or tag, belonging to a specific version for example. Below you see a partial screenshot of LibCanComm‘s GitHub repository. It highlights the version tags:
What if we want to export the GIT repository from the 1.0.0 tag? In this case, you first need to checkout this tag, before running the git-archive-all command. Example:
cd ~/cancomm
git checkout 1.0.0
git-archive-all cancomm_v1_0_0.tar.gz
git checkout main
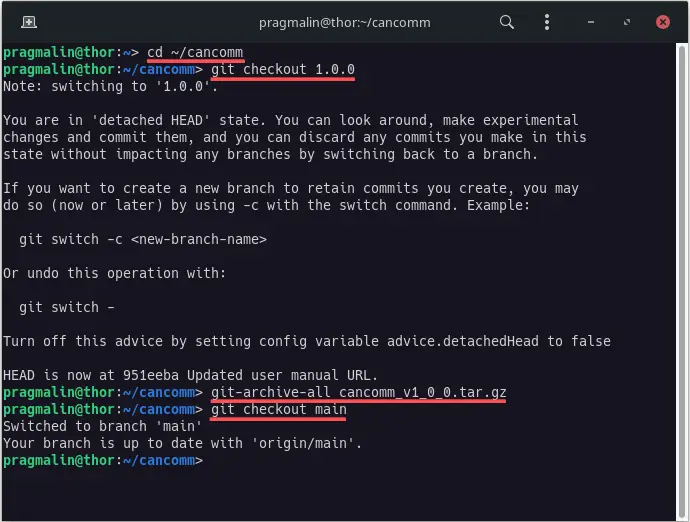
Note that the last line checks out the main branch again, assuming that you want to continue work in the main branch and not the version 1.0.0 tag, after exporting the files.
Exclude specific files and directories
Your GIT repository might contain a few files and directories that you do not want present in the exported archive. You can exclude specific files and directories by creating a .gitattributes file in the root directory of your GIT repository. Then add a list of files and directories to exclude, marked with the export-ignore attribute at the end. Example:
# Ignore the following files and directories when exporting to an archive
.gitattributes export-ignore
.gitignore export-ignore
example export-ignore
This .gitattributes file skips itself, all .gitignore files and the example directory, when creating the archive with git-archive-all. Refer to the following screenshot to see the impact of the .gitattributes file on the archive:
- On the left you see the originally created archive, before adding the
.gitattributesfile. - On the right you see the newly created archive, after adding the
.gitattributesfile.
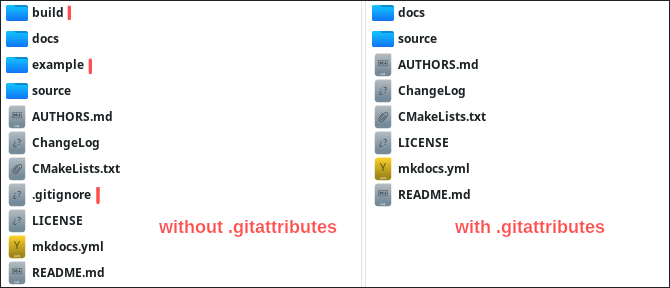
One a side note: Notice the missing build directory on the right side? The build directory contains only a .gitignore file, which was skipped. This essentially caused GIT to see it as an empty directory, causing its automatic removal.
The trick with the .gitattributes file works already, by just placing this file in the directory, where you cloned the repository to. You do not need to stage, commit and push it to your GIT repository. However, if you always manually add the .gitattributes file, you might as well place it under version control.
Wrap up
This article explained in detail, how you can export a GIT repository, similar to what svn export does. We installed and used the git-archive-all program for this, because it can handle GIT submodules. A feature that GIT’s included git archive command lacks. The command syntax:
git-archive-all -C [CLONEDDIR][OUTPUTFILE]
This solution gets close to the functionality of svn export, with the exception of the following two items:
- You cannot specify a remote GIT repository URL. In order to use
git-archive-all, you need to first clone the GIT repository locally. - The program
git-archive-allcreates a compressed archive file, as opposed to a clean directory tree.
You can remedy the last item, by simply extracting the created archive file, after its creation. For example:
git-archive-all -C ~/cancomm ~/Downloads/cancomm.tar.gz && tar -xzf ~/Downloads/cancomm.tar.gz -C ~/Downloads
For more information on extracting tarball archives, refer to this tutorial: