 by
by Out-of-the-box the GNOME desktop environment might strike you as minimalistic. Don’t be fooled though, because that is by design. The idea is that you extend the functionality of the GNOME desktop though extensions to make it fit your preferred work flow. Furthermore, you can tweak the look-and-feel by installing different GNOME themes. This article focuses on the latter part. You’ll learn where you can download themes and how to manually install a GNOME icon, cursor, GTK and Shell theme.
Background
The GNOME desktop environment, together with KDE Plasma, have the largest user base in Linux land. They are wonderfully different, resulting in a bit of a polarization among Linux desktop users. And that’s fine because one of the benefits of Linux is that you can use whatever you want.
KDE Plasma gives you a more traditional desktop layout with start menu, combined with tons of settings to configure the desktop environment to your liking. GNOME takes a different approach. By default it offers a minimalistic get-out-of-your-way type desktop environment. At first, it might take some getting used to and you could feel restricted in your accustomed work flow. It definitely does not offer as many settings to change, compared to KDE Plasma. Instead, it allows the functionality of the desktop environment to be extended by anyone through extensions. Consequently, an wealth of third-party extensions are developed and maintained by the community, enabling you to fine-tune the behavior of the GNOME desktop environment, to your personal liking and preferred work flow.
Just like extensions enable you to customize the functionality of your GNOME desktop environment, themes make it possible for you to change the appearance of your GNOME desktop environment. For changing the look and feel of your beloved GNOME desktop environment, you can tweak four things:
- Icon theme, for customizing the icons. For example the application icons, but also the directory and file icons.
- Cursor theme, which changes the look of the mouse cursor in all its different states.
- GTK theme, for changing the look of applications. The window, title bar and its controls such as button, check boxes, etc.
- Shell theme, which controls the look of the desktop. So mostly the top bar in GNOME.
This article explains how you can customize your GNOME desktop environment, by manually installing a different icon, cursor, GTK and Shell theme.
Where to get GNOME themes
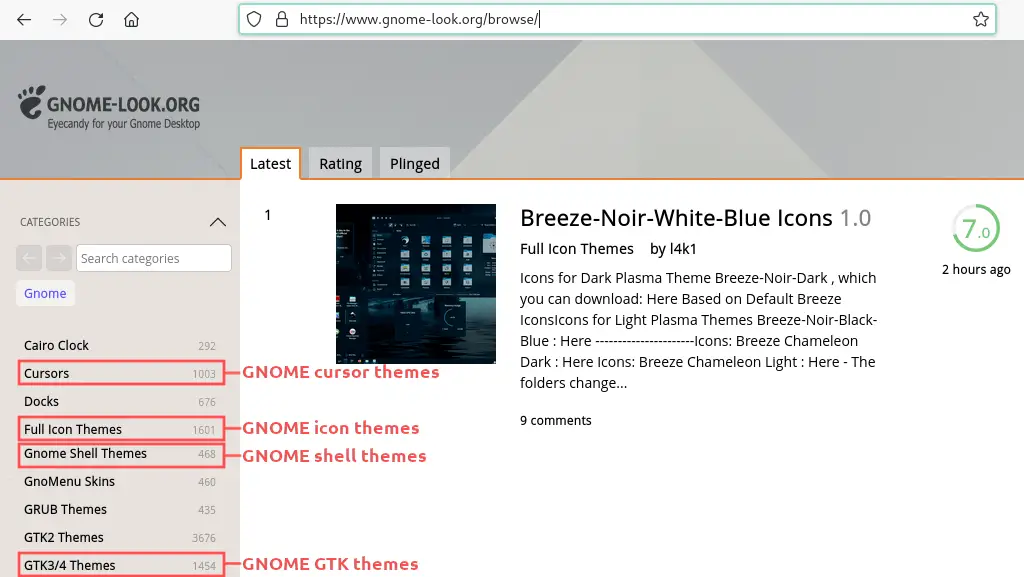
The online package repositories of popular Linux distribution tend to offer only a small selection of themes. Therefore, this article takes an alternative approach, where we download the theme related files directly from the third party website gnome-look.org:
Afterwards, we’ll manually install the GNOME theme files on our Linux system. Keep in mind though that if your Linux distribution’s package repository does offer the theme, it’s a better idea to use the package manager to install the theme.
What do you need
Since this article covers how to manually install a GNOME theme, you need a Linux distribution with the GNOME desktop environment installed. All Linux distributions offer the GNOME desktop environment, so it doesn’t really matter which on your use. For this article, I decided on using Fedora 34 in a VirtualBox virtual machine. Fedora 34 was the first Linux distribution that shipped the new GNOME 40 desktop environment. You can of course also use Ubuntu, Debian or openSUSE.
If you don’t yet have the GNOME desktop installed or you’d rather not try this out on your daily driver machine, consider setting up Ubuntu as a virtual machine. Refer to the following article for detailed instructions:
- How to install Ubuntu Desktop 20.04 LTS in VirtualBox
- Install VirtualBox guest additions in Ubuntu 20.04
Manually install a GNOME icon theme
As a first step, we start with manually installing a GNOME icon theme. Head over to the Full Icon Themes page on the Gnome-Look website. Next download an icon theme that appeals to you. For this tutorial, I selected and downloaded the Candy icons theme with filename candy-icons.tar.xz.
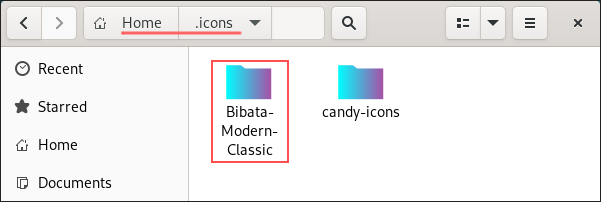
To manually install a GNOME icon theme, you need to copy the theme’s files into a hidden ~/.icons directory inside your home directory. Using the Nautilus file manager, first make sure that it shows hidden files:
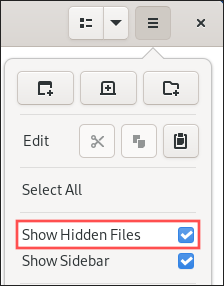
Now that Nautilus shows hidden files, go to your home directory and create the subdirectory with name .icons. Next, extract the downloaded icon theme archive file and copy the results to the ~/.icons directory. In my case, the contents of that directory now looks like this:
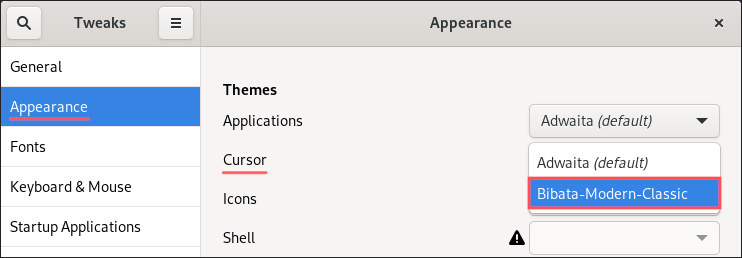
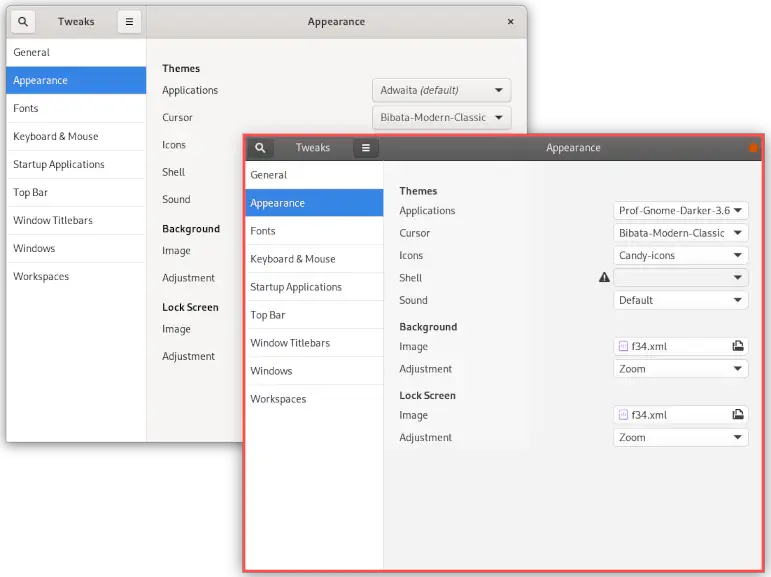
With the files of the GNOME icon theme installed, we can configure this icon theme for our GNOME desktop. You can configure your preferred icon theme with the GNOME Tweaks application. Go to category Appearance and select your newly installed GNOME icon theme from the Icons drop-down box:
To see the new icons in action, open the applications overview in GNOME. The keyboard shortcut is Super+A. Here’s a before and after screenshot:
In case the application icons don’t show properly, this is most likely because the icon theme depends on other icon themes. The icon theme’s description on the Gnome-Look website informs you about which ones you need. Locate, download and install these dependent icon themes the same way, to fix this problem.
Manually install a GNOME cursor theme
With the GNOME icon theme installed, we continue with the manual installation of a GNOME cursor theme. Point your web browser to the Cursors page on the Gnome-Look website and locate a cursor theme of your liking. I set my sights on the Bibata cursor theme and downloaded the file Bibata-Modern.tar.gz.
Manually installing a GNOME cursor theme is similar to a GNOME icon theme. You extract the archive of the downloaded cursor theme and copy the results to the ~/.icons directory. After performing this step, the contents of the ~/.icons directory looks like:
After copying the cursor theme files to the right location, you can configure the new GNOME cursor theme with the GNOME Tweaks application. Go to category Appearance and select your newly installed GNOME cursor theme from the Cursor drop-down box:
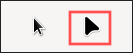
Right after you select a different GNOME cursor theme, the appearance of your mouse cursor changes instantly. Here’s a before and after comparison:
Manually install a GNOME GTK theme
Of all the different themes that you can change, manually installing a different GNOME GTK theme gives the biggest impact. This is because it changes the look and feel of applications themselves. So the application window and its controls.
Just like with the icon and cursor themes, you first visit the Gnome-Look website and select and download a GNOME GTK theme from the GTK3/4 Themes page. For this tutorial, I selected the Prof-Gnome-theme and downloaded the filename Prof-Gnome-Darker-3.6.tar.xz.
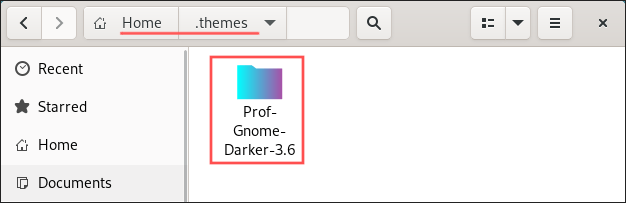
GNOME GTK themes should be installed in the ~/.themes directory inside your home directory. Go ahead and create this directory, if it does not yet exist. Once done, extract the downloaded GNOME GTK theme archive file and copy its contents to the ~/.themes directory. On my PC, the contents of the ~/.themes directory now looks like this:
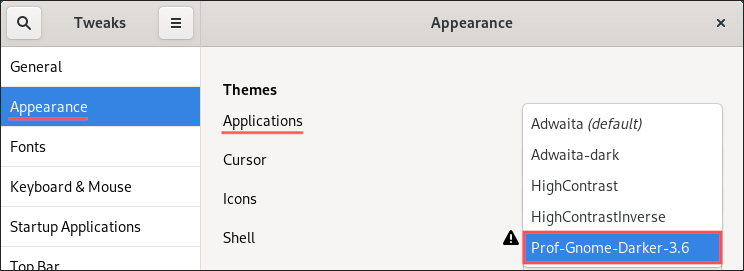
Now that you installed files of the GNOME GTK theme, you can configure this GTK theme for your GNOME desktop with the GNOME Tweaks application. Go to category Appearance and select your newly installed GNOME GTK theme from the Applications drop-down box:
To give you an idea of the differences a GTK theme makes, here is the before and after comparison screenshot:
Manually install a GNOME Shell theme
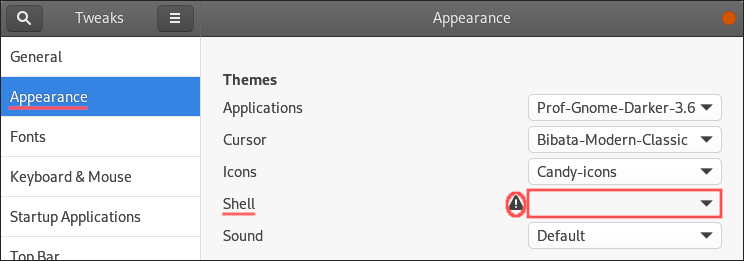
By default, a user cannot change the GNOME Shell theme in the GNOME Tweaks application. The drop-down box is disabled and it shows an exclamation mark next to it:
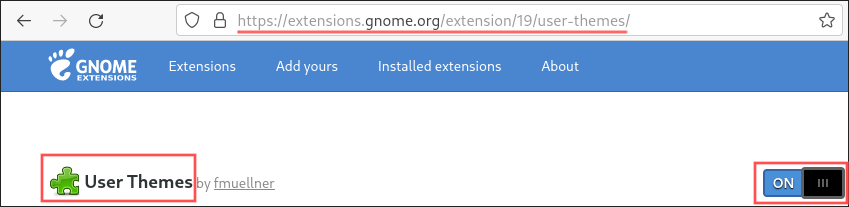
Therefore we need to first fix this. All you have to do is install the User Themes extension from the GNOME extensions website:
With this fix out of the way, manually installing a GNOME Shell theme resembles the installation of a GNOME GTK theme. Visit the Gnome-Look website and select and download a GNOME Shell theme from the GNOME Shell Themes page. For this tutorial, I selected the Flat Remix theme and downloaded the filename 01-Flat-Remix_20210724.tar.xz.
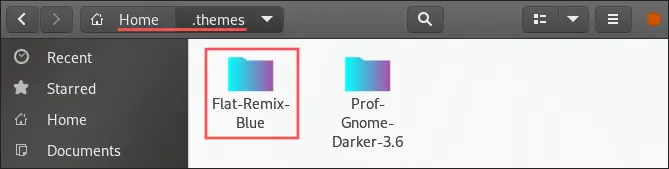
GNOME Shell themes should be installed in the ~/.themes directory inside your home directory. Extract the downloaded GNOME Shell theme archive file and copy its contents to the ~/.themes directory. On my PC, the contents of the ~/.themes directory now looks like this:
After copying the GNOME Shell theme files to the right location, you can configure the Shell theme for your GNOME desktop. Again with the GNOME Tweaks application. Go to category Appearance and select your newly installed GNOME Shell theme from the Shell drop-down box:

You’ll notice a change in how the top bar on your desktop looks. Another part of the desktop that changes with the GNOME Shell theme is the little pop-up dialog with the shutdown menu. Here’s the before and after comparison screenshot:

Wrap up
Several options exist for customizing the look and feel of your GNOME desktop. The following four theming options exist:
- Icon theme
- Cursor theme
- GTK theme
- Shell theme
In this article, you learned how to manually install a GNOME icon, cursor, GTK and Shell theme. The themes selected in this article were picked in an arbitrary way. Feel free to experiment with different themes, until you are pleased with how your GNOME desktop looks.