 by
by Curious about the recently released Debian 11 “bullseye”? Why not install it inside a VirtualBox virtual machine and give it a try? Just keep in mind that afterwards, you want to install the VirtualBox Guest Additions. This enables you to adjust the screen resolution to match your monitor’s. Furthermore, you can enable features such as the bi-directional clipboard and shared folders. In this article I’ll explain how to install the VirtualBox Guest Additions in Debian 11 “bullseye”.
Background
The Debian team released the new Debian 11, codename “bullseye”, about two weeks ago on the 14th of August 2021. About time to take it for a spin I would say! Before installing any new Linux distribution on actual hardware, I prefer to first test it out in a VirtualBox virtual machine. I can highly recommend using virtual machines for testing out Linux distributions. It’s quick and easy to setup a VirtualBox virtual machine and you can take snapshots of your virtual machine. If something goes wrong with an installation or something else you were trying out, you can restore the last snapshot and try again.
When you boot-up your Debian 11 “bullseye” virtual machine, you’ll notice that you can’t resize to screen resolution to match the native resolution of your monitor. For this, and other conveniences, to work, you need to first install the VirtualBox Guest Additions in your Debian 11 “bullseye” virtual machine. The VirtualBox Guest Addition features I personally use the most are:
- The improved display driver. This one enables automatic screen resolution adjustment, when you resize the virtual machine window.
- Bi-directional clipboard. After enabling this feature, you can copy-paste text between the host and the guest operating system.
- Shared folders. After setting up the shared folders, you can conveniently exchange files between the host and the guest operating system.
You don’t really need these features, when you installed Debian 11 “bullseye” as a server. But whenever you setup and use a desktop environment, I can highly recommend installing the VirtualBox Guest Additions. This tutorial explains step-by-step how to install the VirtualBox guest additions in Debian 11 “bullseye”. Including the configuration of the bi-directional clipboard and a shared folder.
What do you need
This article assumes you already installed Debian 11 “bullseye” in a VirtualBox virtual machine. If you haven’t done so yet, then you can refer to the article about how to install Ubuntu Desktop 20.04 LTS in VirtualBox. Compared to Ubuntu, setting up the virtual machine is exactly the same for Debian 11 “bullseye”. You just need to download the Debian 11 “bullseye” ISO and link it to the virtual machine’s virtual optical disk drive, instead of the Ubuntu ISO. You can download the Debian 11 “bullseye” ISO from this link.
I’ll be using my openSUSE Tumbleweed system as the host operating system. So the one where I installed VirtualBox. However, you can use whatever host operating system you prefer. Linux, Windows or macOS all work fine.
Update the installed packages on your operating system
Before installing anything on any Linux system, it is always a good idea to first update the installed packages to their latest version. The same holds true for your virtual machine. On Debian (and Ubuntu), you update the installed packages by running the following two commands:
sudo apt updatesudo apt upgrade
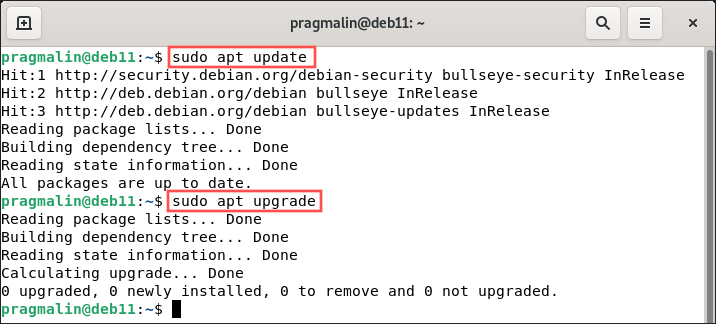
Refer to this tutorial for more details on updating your system with APT. In case the update installed a different kernel, it’s a good idea to reboot the virtual machine first, before continuing with the next section.
Install the dependencies for building kernel modules
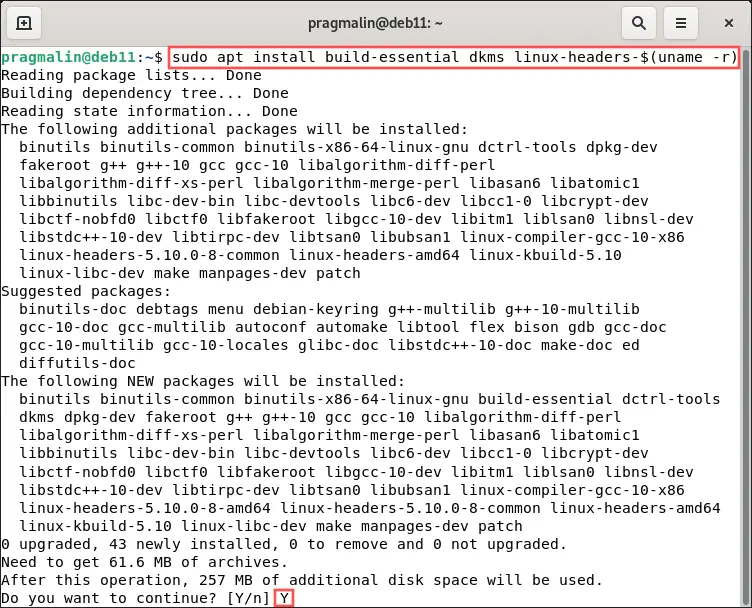
Part of installing the VirtualBox Guest Additions for Debian 11 “bullseye”, involves building a few kernel modules. For example, the one for the display driver. Therefore, we need to first install the packages needed for building kernel modules. With your Debian 11 “bullseye” virtual machine running, open the terminal and run the following command:
sudo apt install build-essential dkms linux-headers-$(uname -r)
Install the VirtualBox Guest Additions
With the dependent packages for building kernel modules installed, it’s time to start with the actual VirtualBox Guest Additions installation in your Debian 11 “bullseye” virtual machine. From your virtual machine menu, select Devices → Insert Guest Additions CD Image…:

This inserts the VirtualBox Guest Additions CD image into your virtual machine’s virtual optical disk drive. What we need to do next is mount the CD and open a terminal in the mount-point directory. Using the GNOME desktop environment, the quickest method is to open the Nautilus file manager. In the panel on the left side, you’ll see and entry for the CD. Click on it to mount it and show its content in the file manager. Next, right-click on en empty space in the directory and select Open in Terminal from the pop-up menu:

With the VirtualBox Guest Additions CD mounted and the terminal opened, run this command to perform the actual installation on your Debian 11 “bullseye” virtual machine:
sudo sh ./VBoxLinuxAdditions.run
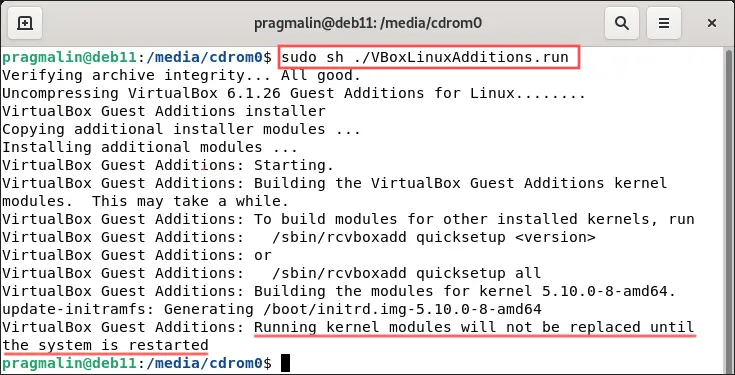
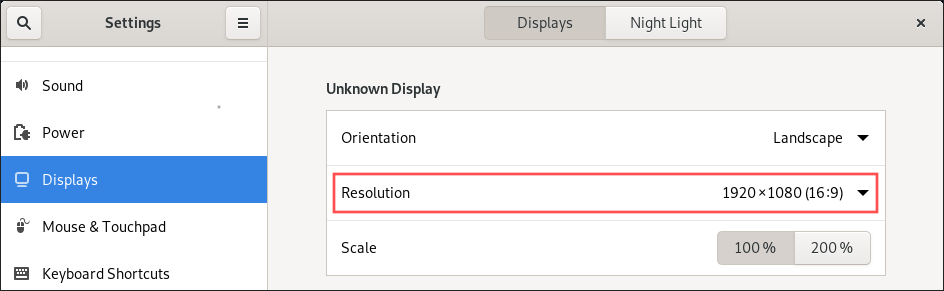
Note that the last line informs you that a system reboot needed for the installation to fully complete. Go ahead and reboot your VirtualBox virtual machine. Once the reboot completed, you can change the size of your virtual machine’s window or even go full screen. You’ll notice that the screen resolution now automatically updates. This proves that the VirtualBox guest additions were successfully installed in your Debian 11 “bullseye” virtual machine. For example, here’s what the screen resolution looks like after I switched to full screen mode:
Enable the bi-directional clipboard
In addition to an improved display driver, the VirtualBox Guest Additions offer a bi-directional clipboard. This allows you to copy-paste text between the host operating system and your Debian 11 “bullseye” virtual machine. In the event that you are interested in this feature. you just need to enable it. From the menu of your Debian virtual machine, select Devices → Shared Clipboard → Bidirectional:
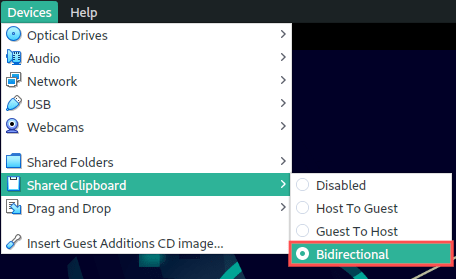
From now on both your host operating system and your guest operating system can access text on the clipboard.
Configure a shared folder
A feature I use myself quite often, is the VirtualBox shared folders. With the help of the VirtualBox shared folders, you can select a directory on your host operating system. Your Debian virtual machine then automatically mounts this directory. Effectively, this means that you can exchange files between your host operating system and your Debian virtual machine, through this selected directory.
Getting shared folders to work, is a bit trickier. Therefore, I dedicated an entire article towards the topic of how to mount a shared folder in VirtualBox. In this section, I’ll summarize how to setup a shared folder.
The first thing to do is add your user to the group vboxsf. Otherwise you user does not have permissions to access the shared folder. Inside your Debian virtual machine, open a terminal and run this command:
sudo usermod -a -G vboxsf $USER
Next reboot your Debian virtual machine, to activate these user and group changes.
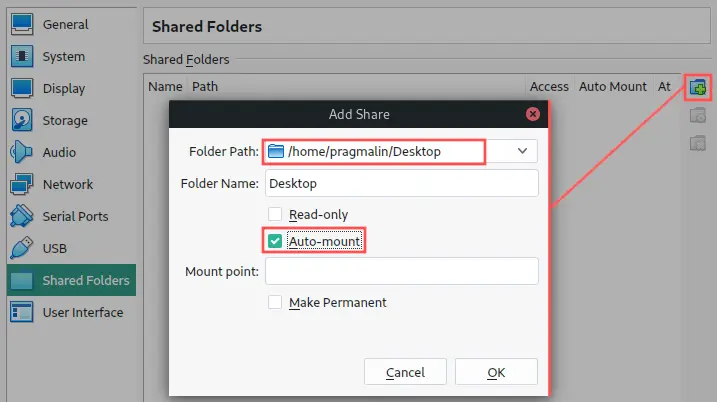
Open the shared folders settings by selecting Devices → Shared Folders → Shared Folders Settings from the Debian virtual machine menu. When the settings dialog shows up, continue by adding a shared folder on this settings dialog and make sure to enable the Auto-mount option. I typically select my user’s Desktop folder as the directory to share:
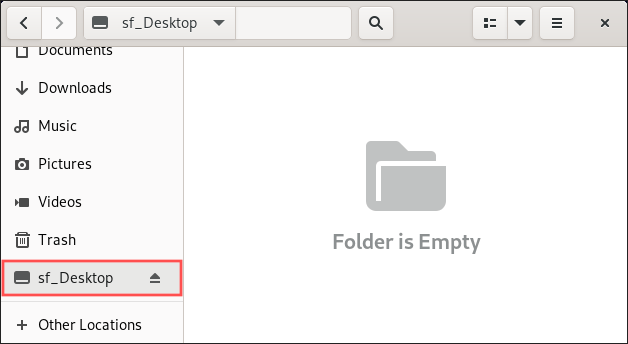
If you now open the file manager on your Debian virtual machine, you’ll notice that you can immediately access the shared folder. It’s name is sf_<directory name>. In my case sf_Desktop:
Wrap up
The VirtualBox Guest Additions make working with your Debian virtual machine more pleasant. Its most prominent features are:
- An improved display driver that supports automatic screen resolution changes.
- A bi-directional clipboard for copy-pasting text between the host and the guest operating system.
- One or more shared folders to exchange files between the host and guest operating system.
Your Debian virtual machine does not offer the VirtualBox Guest Additions by default. Therefore, it is recommended to install the VirtualBox Guest Additions, after you completed a fresh installation of Debian in your virtual machine.
This article showed you step-by-step how to install the VirtualBox Guest Additions in a Debian 11 “bullseye” virtual machine. Including enabling the bi-directional clipboard and setting up a shared folder.