 by
by Interested in running Ubuntu server? In contrast to Ubuntu desktop, you now administer your system completely from the terminal. Most likely through a remote SSH connection. Consequently, you need to perform software updates on your Ubuntu system directly in the terminal. In this article you learn how to update your Ubuntu system, using the apt program in the terminal.
Background
Your first introduction to Linux most likely involved installing an Ubuntu based desktop distribution. Something along the lines of Ubuntu, Linux Mint, Pop!_OS, Elementary or Linux Lite. All of these desktop Linux distributions automatically notify you, when they detect the availability of software updates. You can then conveniently install these software updates, through intuitive graphical user interface applications.
When you continue with your Linux journey, sooner or later you probably show an interest for running Linux as a server. Perhaps to create a Samba file server for your local network. Another popular one is to put together a web server with LAMP stack and install WordPress on it. By now you already familiarized yourself with Ubuntu, so you probably start off with Ubuntu server.
In contrast to Ubuntu desktop, Ubuntu server does not offer you a graphical user interface application for updating the software packages on your system. With Ubuntu server, you perform administrative tasks directly from the terminal, most likely remotely via SSH. This leads to the following question: How to update Ubuntu directly in the terminal? This tutorial teaches you exactly that. Spoiler alert: we use the apt program. Read on to find out how to update the software packages on your Ubuntu server using apt in the terminal.
What do you need
The title of this article mentions that it explains how to update Ubuntu using APT in the terminal. Note though that the instructions are not limited to just Ubuntu server. You can use the same procedure on Ubuntu Desktop as well. In fact, since Ubuntu derives from Debian, the instructions apply to all Debian and Ubuntu based distributions. This includes the Raspberry PI operating system.
Therefore you just need a Debian or Ubuntu based Linux system to complete the steps presented in this article. It can be a VPS server, a desktop PC, a VirtualBox virtual machine or a Raspberry PI. If you do not yet have any of this, refer to the article about how to install Ubuntu in VirtualBox. I plan on using something similar myself: an Ubuntu Budgie based VirtualBox virtual machine.
Why and when to update your Ubuntu system
Before answering the question of how to update Ubuntu from the terminal, let’s first dive into the questions of why and when you should update your Ubuntu system.
Canonical, the developer and maintainer of Ubuntu, periodically publishes a new release of their operating system. Every two years a long term release (LTS) for those that want version stability. Then additionally a release every six months for those that want newer versions of software. Personally, I recommend sticking to the LTS releases, especially for servers.
Over time it happens that security patches and fixes for software bugs become available for software packages on your Ubuntu system. Canonical offers these to you for free. For an astonishing five year period, in the case of an LTS release. To keep your system secure, it is therefore important that you install these software updates on your system. How often? It depends. For an Internet facing system, such as a web server, I recommend updating your system weekly and definitely at least once a month. For a system running on your local network and only available to those who you trust, the update interval is not that critical.
One exception exists to the above update frequency. When you want to install a new software package (sudo apt install [PACKAGE NAME]), you should first update the currently installed packages on your Ubuntu system. Since the past update, dependencies for software packages might have changed. Therefore an installation error could sporadically happen, if you did not update your system right before the installation of the new software package.
APT or APT-GET?
In the past you probably already came across tutorials and forum posts that install software using the terminal in Ubuntu. Some of these use the apt program, while others use the apt-get program. How do you know which one to use? The short answer: use apt. The following list sums up why:
- The
aptprogram was specifically developed for improved user-friendliness. Colored output and progress bars, to name just a few improvements. aptis newer, faster and implements functionality of not only theapt-getprogram, but also of theapt-cacheprogram.- The supported commands are backwards compatible with
apt-get. For this reasonaptsupports thedist-upgradecommand, as an alias for the new and more descriptivefull-upgradecommand.
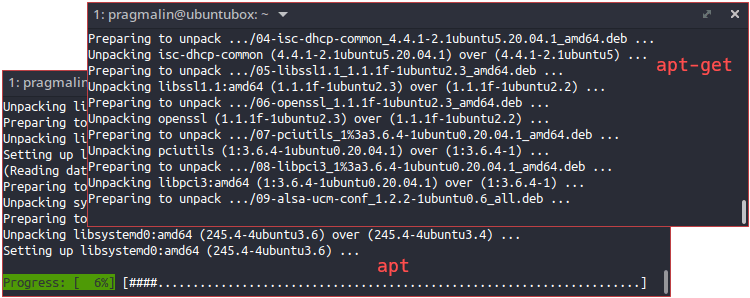
The following image contains two screenshots of updating the Ubuntu software packages in the terminal. The top one uses apt-get and the bottom one apt. You can clearly see that apt offers more info by means of the progress bar. Definitely the nicer program to work with.
Alright, now that we cleared that up, let’s continue with what you came here for.
Step 1 – Update software package information
Canonical maintains a large online repository with tens of thousands of software packages for each Ubuntu release. Before you can update the software packages installed on your Ubuntu system, you first download the latest software package information from this online repository. Your Ubuntu system needs this information to detect the availability of an upgrade for an already installed software package.
To update the software package information from the online repository, run this command in the terminal:
sudo apt update
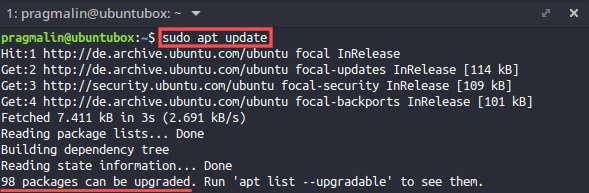
Once the command completed, the last line in the output shows if updates are available for installed software packages on your Ubuntu system.
Step 2 – Upgrade installed software packages
Assuming that the previous step informed you about the availability of software updates, it’s time to perform the actual upgrade. At this point it can get a bit confusing, because multiple apt commands exist for upgrading the software packages:
upgradefull-upgradedist-upgrade
The apt-get program supports dist-upgrade and apt renamed this one to full-upgrade. For backward compatibility, apt implemented the dist-upgrade alias for this. With other words, with apt the commands full-upgrade and dist-upgrade are exactly the same. Okay, with that extra piece of information, we can shorten the command list to:
upgradefull-upgrade
APT upgrade versus full-upgrade
According the the apt MAN-page, the upgrade command does the following:
- It upgrades a software package and even installs new packages, if its dependencies require this.
- It will never remove packages. If a package removal is required, the upgrade is not performed.
In contrast to this, the full-upgrade command:
- Does the same as
upgrade, but will also remove packages if needed.
When to use full-upgrade
You only need to use full-upgrade when you:
- Upgrade from one major operating system release to the next. Think Ubuntu 18.04 LTS to 20.04 LTS.
- Run a rolling release type operating system. For example Debian Testing or SID.
When to use upgrade
If you run an Ubuntu or Debian based operating system, based on a fixed release cycle, you should use upgrade. For example Ubuntu 20.04 LTS or Debian 10 “buster”. The idea behind a fixed release cycle is that software versions stay the same and you only get security fixes. Therefore, it will not be necessary to actually remove a package, when upgrading installed software packages.
For the examples in this article, I run Ubuntu Budgie 20.04 LTS. Consequently, I will use upgrade . To start the upgrade operation of your installed software packages, run the following command from the terminal:
sudo apt upgrade
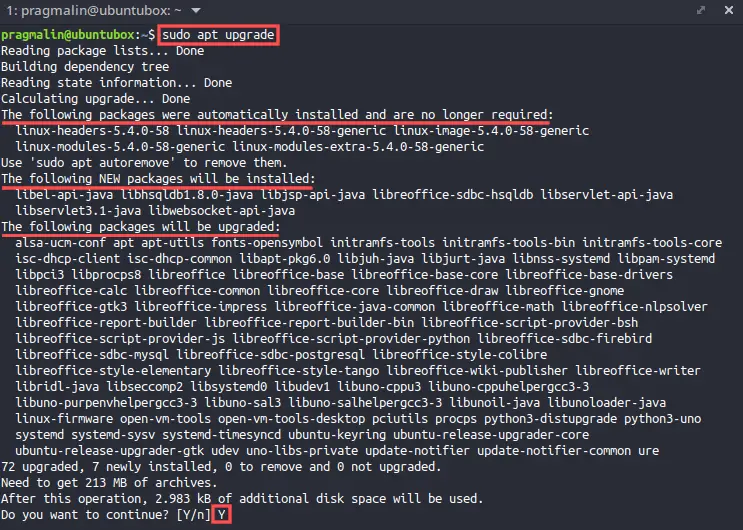
Before apt starts the actual software upgrade procedure, it first presents you with all the details:
- The packages that your system no longer needs.
- New packages that it plans on installing.
- Installed packages that it plans on upgrading.
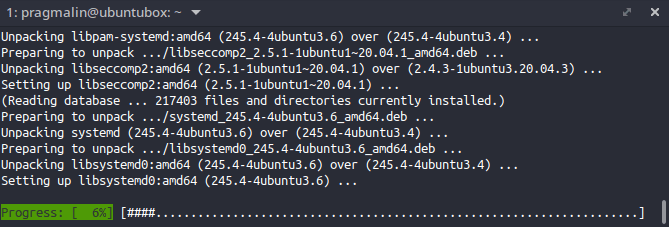
Press y to proceed with the actual software upgrade operation. After starting the upgrade, you can follow its progress:
Step 3 – Reboot if required
Some software packages require a system reboot to complete the update. For example an update to the Linux kernel itself. How do you know if your system requires a reboot after the update? On Ubuntu and Debian systems, you inspect the file /var/run/reboot-required.
If this file exists, then your system requires a reboot. To find out if this file exists, you can run the cat command on this file. The cat command simply outputs the file’s contents:
cat /var/run/reboot-required
If this file exists and your system requires a reboot after running sudo apt upgrade, the command output looks like:

If your system does not require a reboot after running sudo apt upgrade, the file is not available. In this case the command output looks like:

How to reboot your Ubuntu system from the terminal? You can achieve the system restart by running this command from the terminal:
sudo reboot
Step 4 – Remove unneeded software packages
Sometimes software packages remain on your system, even when your system no longer needs them. For example a software package that was installed as a dependency and you manually uninstalled the dependent software package. Kernel updates are another example. The new kernel requires a reboot to activate. This means that your system still needs the old kernel, until you rebooted your system.
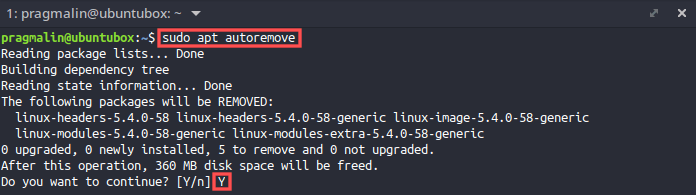
To complete the update of your Ubuntu system, you could remove those software packages that your system no longer needs. They just sit there, taking up unnecessary hard disk space. The command for removing software packages that your Ubuntu or Debian system no longer needs:
sudo apt autoremove
Wrap up
In this tutorial you learned how to your update the software packages on your Ubuntu system, directly from the terminal. I recommend that you do this at least once a week. Especially if your Ubuntu system directly faces the Internet. For example a web server.
To summarize, the following command sequence updates your Ubuntu system from the terminal:
- Refresh package information:
sudo apt update - Download and apply package updates:
sudo apt upgrade - Reboot if required:
sudo reboot - Remove no longer needed packages:
sudo apt autoremove
Supposing that you run a rolling release Ubuntu or Debian distribution (Debian testing or SID for example), replace sudo apt upgrade with sudo apt full-upgrade.
Note that Ubuntu derives from Debian. Therefore the same command sequence works for Debian based systems, including the Raspberry PI operating system.