

 by
by Want to monitor the CPU and RAM usage of your Linux system from your own Python program? Then you came to the right place! This article teaches you how to install the PsUtil package into your Python virtual environment and how you can use it to monitor the CPU and RAM usage from your own Python program. PsUtil is a Python package with functionality to easily obtain system utilization information.
Background
Giampaolo Rodola initially developed and currently maintains the PsUtil code. He has done so for over a decade now, meaning that the code base is quite mature and stable. He works on the code regularly in his public PsUtil GitHub repository. Furthermore, he publishes stable releases of PsUtil on the Python Package Index (PyPi). This makes installing the PsUtil package a breeze with the help of pip.
With the PsUtil package installed in your Python (virtual) environment, you can obtain information about CPU and RAM usage. This makes it easy to add system utilization monitoring functionality to your own Python program. With PsUtil, you can quickly whip together your own system monitor tool in Python.
This article teaches you how to install the PsUtil package into your Python virtual environment and how you can use it, to monitor the CPU and RAM usage from your own Python program. I’ll present a number of Python functions to obtain CPU and RAM usage, based on the PsUtil package. Later on, you can simply copy-paste these functions into your own Python programs.
Monitor CPU and RAM usage
Why would you want to create your own PsUtil based Python program to monitor CPU and RAM usage? Well, I can think of a few examples. Specifically the following one:
- Long term logging of CPU and RAM usage of a server. This information can help you determine if it’s time to upgrade your server hardware.
- A periodic Cron job could write the CPU and RAM usage to a log-file, including a time stamp.
- With the help of Logrotate you could control how long a history of logged data to keep.
- You could write a small Python program to read and visualize the logged CPU and RAM usage.
Aren’t there tools for this already? Sure, you could install something such as Sysstat. But isn’t it more fun to build something yourself? It could be an enjoyable and educational hobby project.
What do you need
Pretty much all Linux distributions come bundled with Python 3. Consequently, all you need for this article is a basic Linux installation with desktop environment. Ideally, you also have PyCharm installed, the excellent Python IDE from JetBrains. The free PyCharm Community Edition suffices. Refer to this article for instructions on how to quickly install the PyCharm Community Edition on your system.
For writing this article and testing out the example code, I used my Debian 10 based laptop. It is based on the Gnome desktop environment and has the PyCharm Community Edition installed.
Since we plan on working with some Python code, let’s prepare our Linux system for Python development. On Debian you can achieve this by installing the following system packages:
sudo apt install build-essential python3 python3-dev python3-venv python3-pip
Project and virtual environment creation
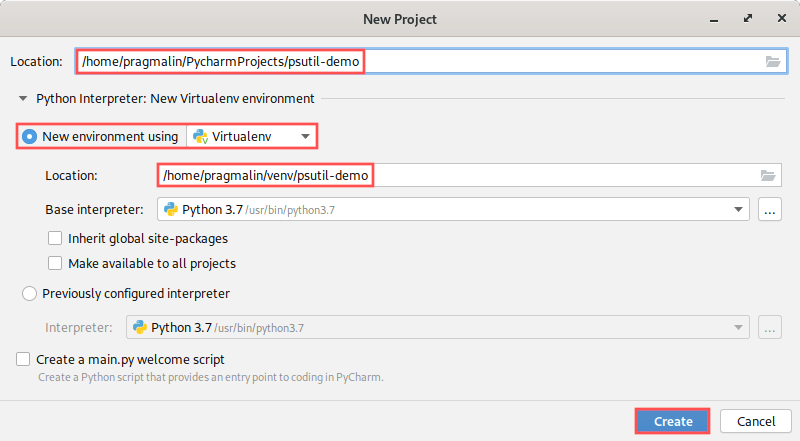
Let’s create a new project, called psutil-demo, for testing out the CPU and RAM usage functions. We’ll make use of PyCharm’s feature to automatically create and manage a Python virtual environment for our psutil-demo project. Start PyCharm and create a new project. On the new project dialog:
- Select the location and name of the project.
- I called the project psutil-demo and located it in subdirectory PycharmProjects of my home directory.
- Select the option to create a new virtual environment for the project and specify its location.
- I named it the same as the project and located it in subdirectory venv of my home directory.
I highly recommend using a separate Python virtual environment for each of your Python projects. You can then install whatever package, and even a specific version of a package, just for the project you work on. It won’t affect your system’s Python installation or your other Python projects. Refer to this article for more background information on Python virtual environments, in combination with PyCharm
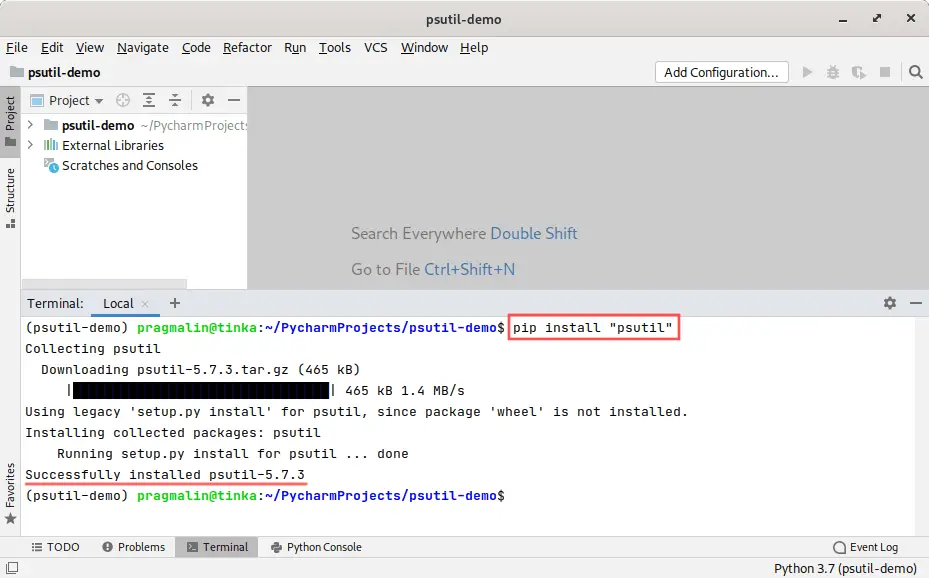
Installing the PsUtil package from PyPi
The Python Package Index (PyPi) is an online repository of Python packages, maintained by the Python Software Foundation. The developer of the PsUtil package uploads stable releases to PyPi. This means that we can conveniently install the PsUtil package into our newly created virtual environment with the help of pip.
To install the PsUtil package inside our project’s virtual environment, open up the terminal screen inside the PyCharm IDE. Next, run the command:
pip install "psutil"
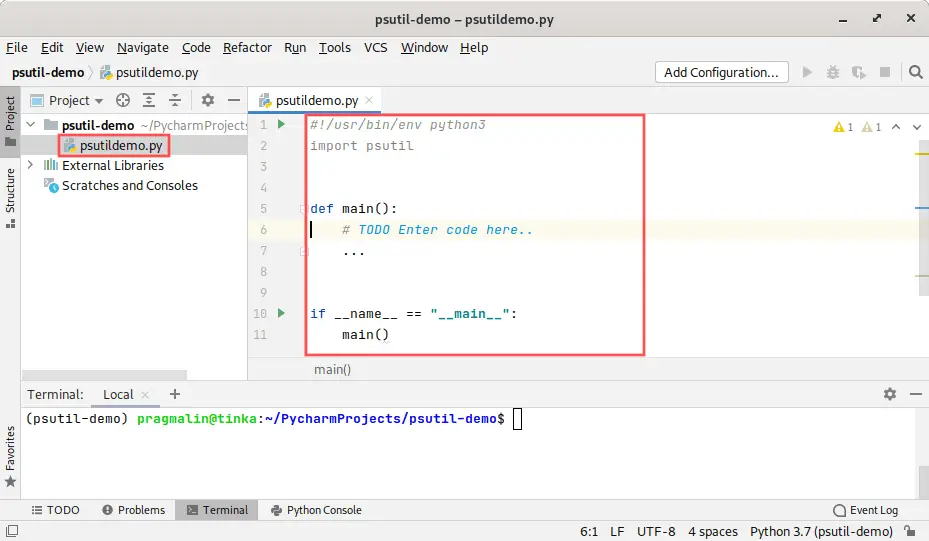
Create an empty Python program
To test you our PsUtil based Python code, which obtains CPU and RAM usage information, we’ll create an empty Python program. Using the PyCharm IDE, create a new Python file in the project, called psutildemo.py, and enter the following contents:
#!/usr/bin/env python3
import psutil


def main():
    # TODO Enter code here..
	...


if __name__ == "__main__":
    main()
CPU usage in Python with PsUtil
In this section I’ll present three reusable functions for obtaining CPU related information.
Function for CPU usage as a percentage
The CPU load represent a good indicator for how busy your Linux system is. PsUtil contains function cpu_percent for this purpose. It is recommended to specify an Interval parameter, when calling this function. The function then calculates the average CPU load during this interval. A short interval such as 0.1 seconds, makes the results very spiky. In contrast, a really long interval filters out incidental spikes and it takes longer for the function to return. By doing some trial and error testing, I found that 0.5 seconds seems to be the sweet spot. You can of course change this yourself. Here’s a Python function to obtain the CPU usage as a percentage, with the help of PsUtil:
def get_cpu_usage_pct():
    """
    Obtains the system's average CPU load as measured over a period of 500 milliseconds.
    :returns: System CPU load as a percentage.
    :rtype: float
    """
    return psutil.cpu_percent(interval=0.5)
Go ahead an insert this function somewhere below function main in our psutildemo.py test program. To test function get_cpu_usage_pct add this line inside function main:
# Output current CPU load as a percentage.
print('System CPU load is {} %'.format(get_cpu_usage_pct()))
To run the test program, select option Run… from the Run program menu in PyCharm. Next, select psutildemo to create a run configuration for the test program:
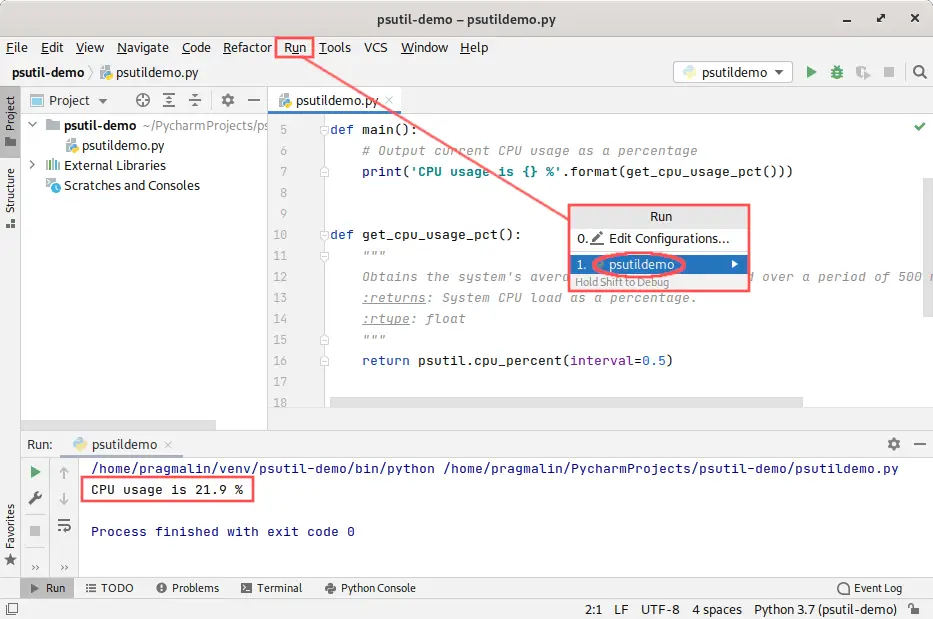
You can see the output of the test program at the bottom of the screen, in the Run window. Note that from now on, you can simply click the green play button in the toolbar, to run the test program.
Function for CPU frequency
The Linux kernel can automatically scale the CPU frequency up or down for power saving purposes. Package PsUtil implements function cpu_freq to report the current value of the CPU frequency. The following function encapsulates obtaining the CPU frequency for you:
def get_cpu_frequency():
    """
    Obtains the real-time value of the current CPU frequency.
    :returns: Current CPU frequency in MHz.
    :rtype: int
    """
    return int(psutil.cpu_freq().current)
Go ahead and enter this function below the previously added get_cpu_usage_pct function in our psutildemo.py test program. Next, add this line inside function main for testing purposes:
# Output current CPU frequency in MHz.
print('CPU frequency is {} MHz'.format(get_cpu_frequency()))
To test the new function, simply run the test program in PyCharm and monitor the output in the Run window. Example output:

Function for CPU temperature
While creating functions for obtaining CPU related information, wouldn’t it be nice to also get the CPU temperature? Unfortunately, package PsUtil does not offer this feature. However, in an earlier article about measuring the CPU temperature on a Raspberry PI, I already presented such a function. For this function we need to add an import statement for the os module at the top of our psutildemo.py test program:
import os
Once added, continue by inserting the new get_cpu_temp function. For example below the previously added get_cpu_frequency function:
def get_cpu_temp():
    """
    Obtains the current value of the CPU temperature.
    :returns: Current value of the CPU temperature if successful, zero value otherwise.
    :rtype: float
    """
    # Initialize the result.
    result = 0.0
    # The first line in this file holds the CPU temperature as an integer times 1000.
    # Read the first line and remove the newline character at the end of the string.
    if os.path.isfile('/sys/class/thermal/thermal_zone0/temp'):
        with open('/sys/class/thermal/thermal_zone0/temp') as f:
            line = f.readline().strip()
        # Test if the string is an integer as expected.
        if line.isdigit():
            # Convert the string with the CPU temperature to a float in degrees Celsius.
            result = float(line) / 1000
    # Give the result back to the caller.
    return result
To test the new function for reading out the CPU temperature, add this line to function main:
# Output current CPU temperature in degrees Celsius
print('CPU temperature is {} degC'.format(get_cpu_temp()))
Example output for the CPU temperature, after running the test program:

RAM usage in Python with PsUtil
The previous section presented three functions for obtaining CPU usage related information in a Python program, with the PsUtil package. Let’s continue with functions for reading out RAM related information.
Function for RAM usage in bytes
Next to CPU load, RAM usage is an important metric to determine how your system is handling its current workload. We’ll start with a function for obtaining the current RAM usage in bytes:
def get_ram_usage():
    """
    Obtains the absolute number of RAM bytes currently in use by the system.
    :returns: System RAM usage in bytes.
    :rtype: int
    """
    return int(psutil.virtual_memory().total - psutil.virtual_memory().available)
Insert this function get_ram_usage somewhere in our psutildemo.py test program. To test the function, add this line inside function main:
# Output current RAM usage in MB
print('RAM usage is {} MB'.format(int(get_ram_usage() / 1024 / 1024)))
Run the test program and observe the output in the Run window. Example output:

Function for total RAM in bytes
To judge if your Linux system has sufficient RAM for its current workload, we would also need to know how much RAM in total is available. Here’s a function to determine the total amount of RAM installed on the system:
def get_ram_total():
    """
    Obtains the total amount of RAM in bytes available to the system.
    :returns: Total system RAM in bytes.
    :rtype: int
    """
    return int(psutil.virtual_memory().total)
Add the following line to the test program for demonstrating the usage of function get_ram_total:
# Output total RAM in MB
print('RAM total is {} MB'.format(int(get_ram_total() / 1024 / 1024)))
Example output that shows the total RAM on the system in megabytes:

Function for RAM usage as percentage
The previous two functions demonstrated how you can determine the total amount of RAM installed on the system and the current amount of RAM consumed by the running system. Wouldn’t it be nice to just combine these two values and calculate a percentage based RAM load? So basically something similar to CPU load, but then for RAM. Well, PsUtil can do this for us. Here’s a function that calculates the RAM load as a percentage:
def get_ram_usage_pct():
    """
    Obtains the system's current RAM usage.
    :returns: System RAM usage as a percentage.
    :rtype: float
    """
    return psutil.virtual_memory().percent
To test out function get_ram_usage_pct, simply add this line inside function main of our test program:
# Output current RAM usage as a percentage.
print('RAM usage is {} %'.format(get_ram_usage_pct()))
Example output on my system after running the test program:

Swap usage in Python with PsUtil
A typical Linux system has a swap partition on the hard disk. The Linux kernel allocates swap space, when the system’s current workload already consumed the entire RAM. Think of the swap as emergency backup RAM.
Compared to RAM, using the swap is extremely slow. This makes sense, because reading and writing to the hard disk is slower than doing the same operation in RAM. With other words, ideally your system does not have to allocate memory on the swap. If it does a lot of swapping, it’s really time to upgrade your hardware to more RAM.
Can we monitor swap usage in Python with PsUtil? Yep, we sure can. In this section I’ll present three functions for determining swap usage. Their layout is similar to the RAM functions presented earlier.
Function for Swap usage in bytes
Let’s get started with a function for reporting the current amount of Swap bytes in use:
def get_swap_usage():
    """
    Obtains the absolute number of Swap bytes currently in use by the system.
    :returns: System Swap usage in bytes.
    :rtype: int
    """
    return int(psutil.swap_memory().used)
And to test this function, simply add this line to function main:
# Output current Swap usage in MB
print('Swap usage is {} MB'.format(int(get_swap_usage() / 1024 / 1024)))
Function for total Swap in bytes
Knowing the number of swap bytes in use only has meaning if you relate it to the total swap available to the system. Otherwise, you cannot determine if your system is about to run out of swap space. The following function reports the total size of your system’s swap partition:
def get_swap_total():
    """
    Obtains the total amount of Swap in bytes available to the system.
    :returns: Total system Swap in bytes.
    :rtype: int
    """
    return int(psutil.swap_memory().total)
After adding the following line to function main, you can test the new function:
# Output total Swap in MB
print('Swap total is {} MB'.format(int(get_swap_total() / 1024 / 1024)))
Function for Swap usage a percentage
Once you know the current swap space in use and the total swap space, you can calculate the swap usage as a percentage. There’s no need for us to do this manually in code, because PsUtil can do this for us:
def get_swap_usage_pct():
    """
    Obtains the system's current Swap usage.
    :returns: System Swap usage as a percentage.
    :rtype: float
    """
    return psutil.swap_memory().percent
And to test it, you can add this line to function main:
# Output current Swap usage as a percentage.
print('Swap usage is {} %'.format(get_swap_usage_pct()))
Completed PsUtil test program
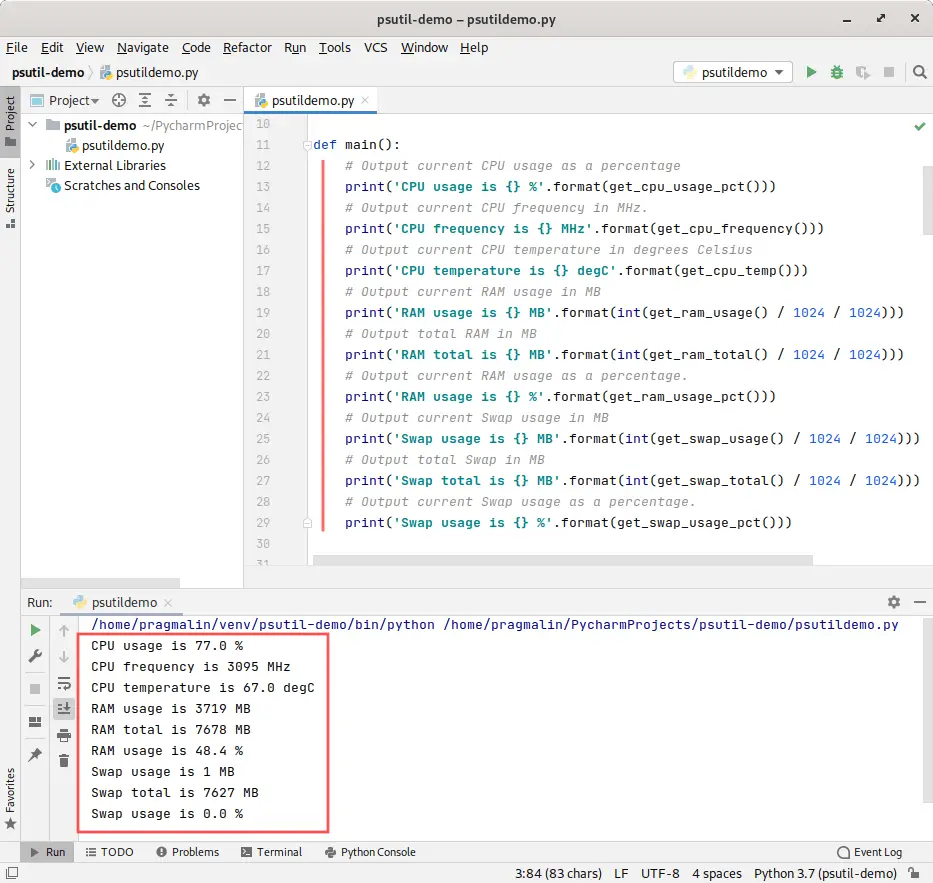
I published the completed test program from this article in a repository on PragmaticLinux’s GitHub. This way you can reference it in the future, when you would like to use some of the presented functions in your own Python program. A screenshot of the completed test program in PyCharm looks like this:
Wrap up
While working your way through this article, you learned how to retrieve CPU and RAM usage information in Python code, with the help of the PsUtil package. Together we built the following functions, which you can freely re-use in your own future Python programs:
CPU related
get_cpu_usage_pct()reads the current CPU load as a percentage.get_cpu_frequency()obtains the current CPU frequency in MHz.get_cpu_temp()reports the current CPU temperature in degrees Celsius.
RAM related
get_ram_usage()retrieves the current RAM usage in bytes.get_ram_total()returns the total installed RAM in bytes.get_ram_usage_pct()reports the RAM usage as a percentage.
Swap related
get_swap_usage()determines the current swap usage in bytes.get_swap_total()informs you about the total available swap in bytes.get_swap_usage_pct()to obtain the swap usage as a percentage.
Additionally, we created a demo program in the PyCharm IDE for testing out these functions. When setting up the demo program, we created a virtual environment. We downloaded the PsUtil package from the Python Package Index (PyPi) and installed into this virtual environment. For your reference, I published the resulting demo program in a GitHub repository. This includes the source code of all nine utility functions presented throughout this article.


One thought on “Monitor CPU and RAM usage in Python with PsUtil”
Comments are closed.